Messenger e-commerce store
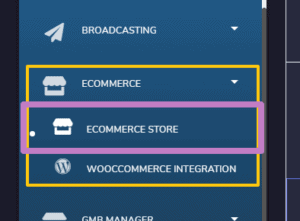
Messenger e-commerce store is now known as Ecommerce store. To access the Messenger e-commerce store section, tab on Ecommerce on the left navigation menu, pagkatapos ay piliin Ecommerce Store.
For this, we will be discussing:
Stores
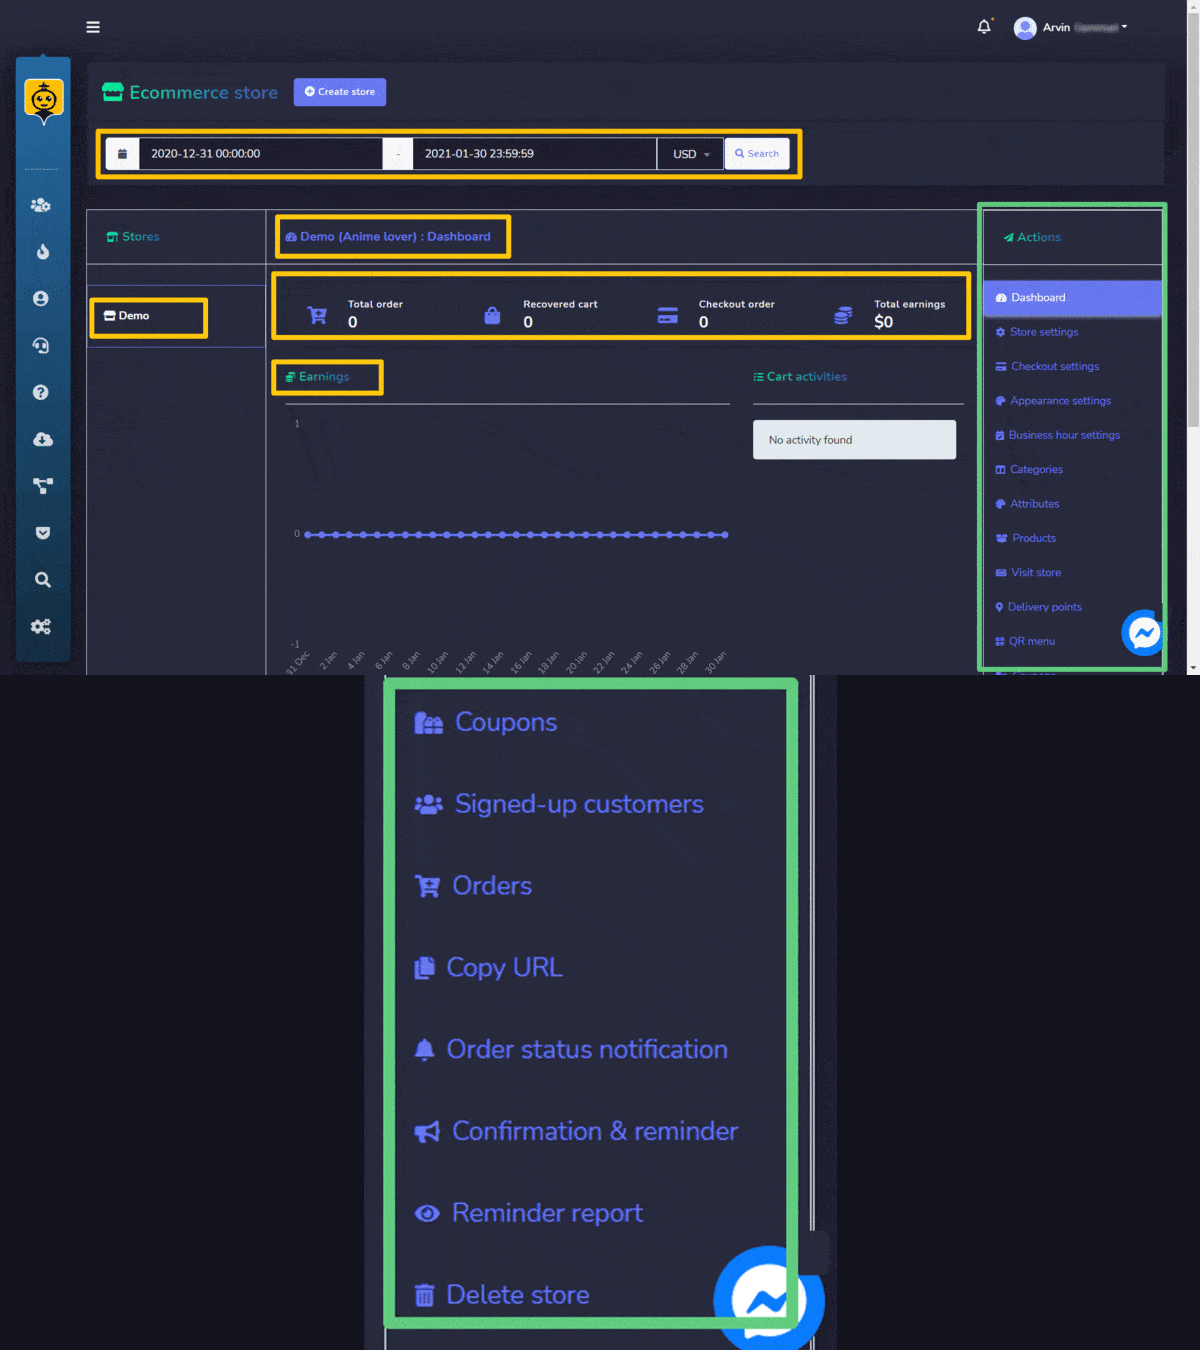
Stores section allows you to view the existing stores’ dashboard. View different products summary and see all orders.
- You can simply apply date filters to track down the narrowed search.
- You can perform actions from Mga Aksyon column on the right of the stores.
- Maaari mong switch between the different stores you created and analyze the stats.
Lumikha ng tindahan
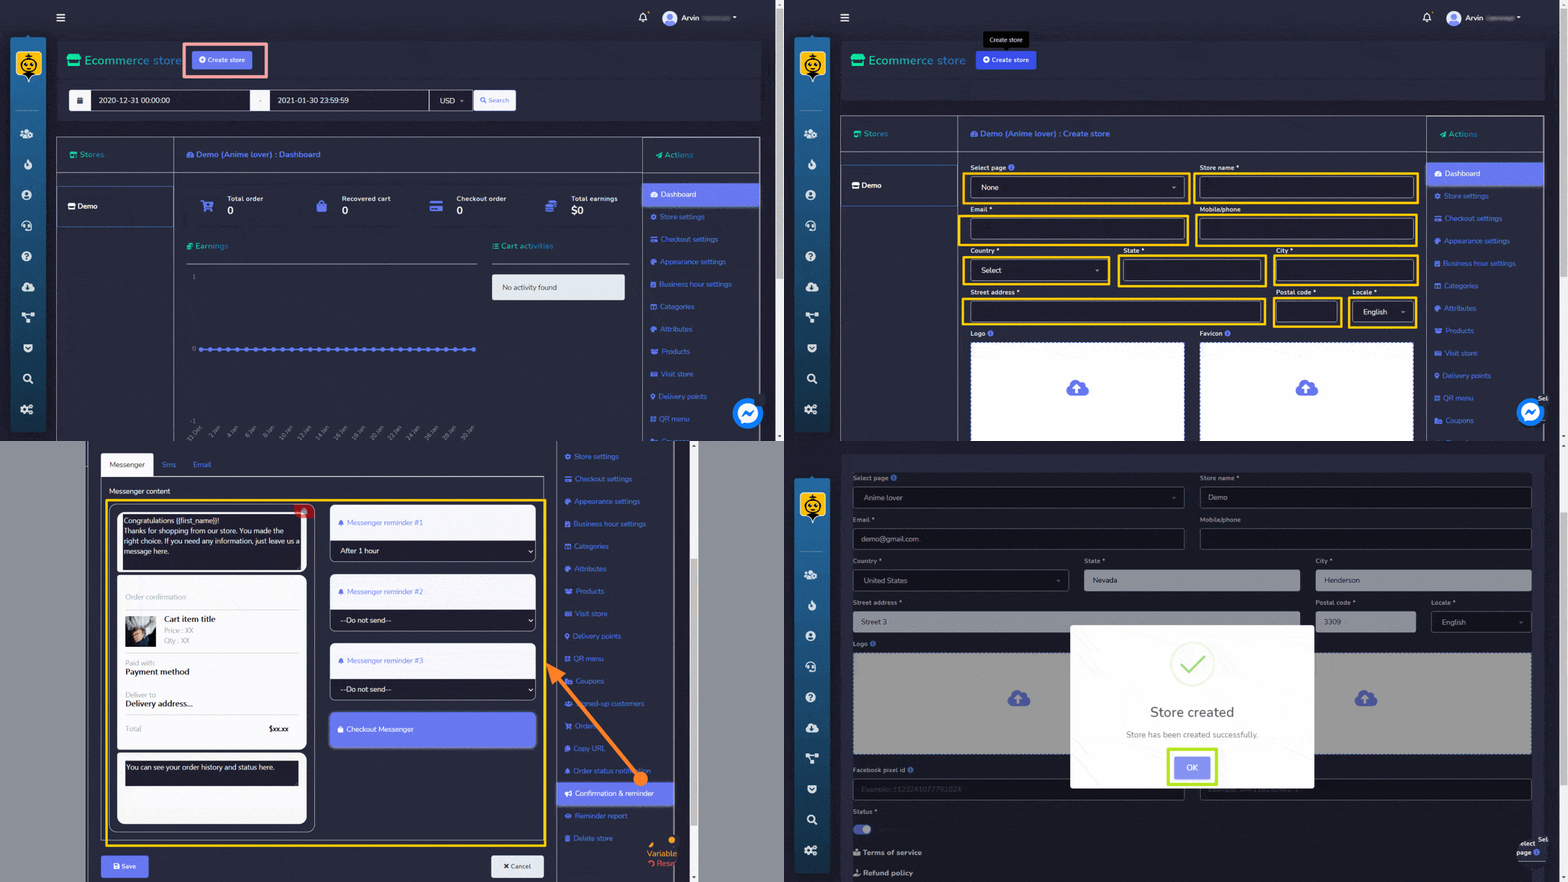
You can create a new store by following the steps given below:
- Pumili
 option from the top right of the screen.
 - Magbigay impormasyon ng tindahan, piliin ang pangalan ng pahina.
- Ibigay ang store name, email address, postal address.
- Ibigay ang payments settings.
- Itakda ang katayuan of the store.
- Fill in the conformation message
- Pumili Lumikha ng tindahan to create the new store.
Mga Aksyon
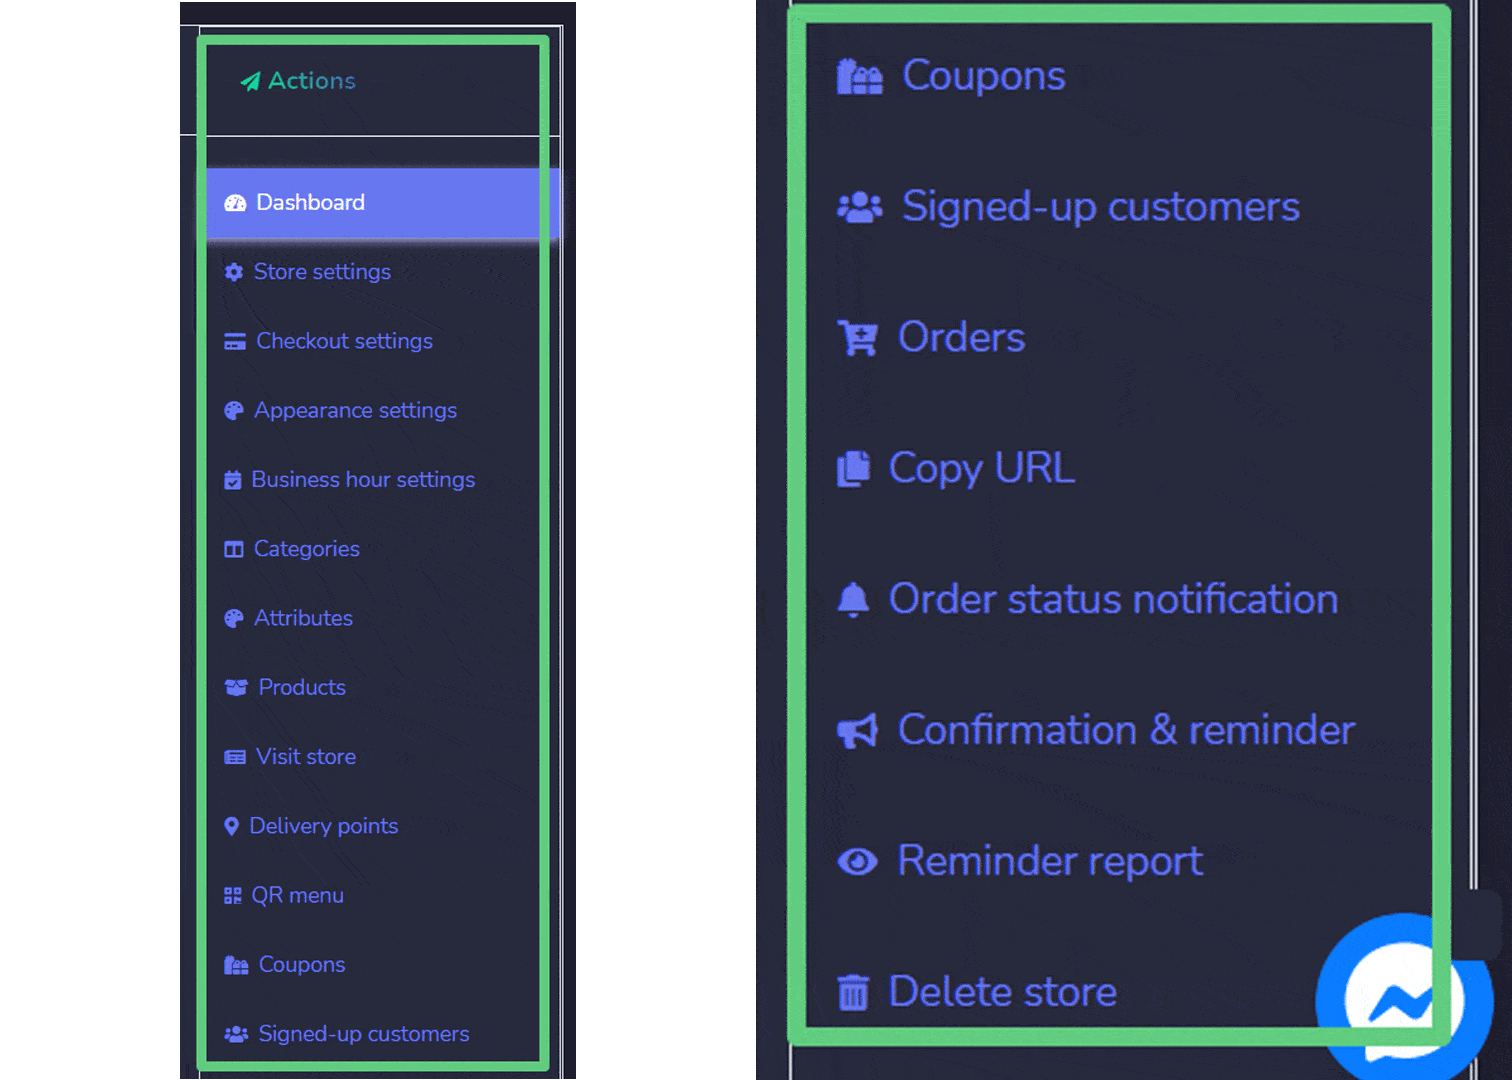
Mga Aksyon mula sa Ecommerce store screen containing following options such as:
- Dashboard
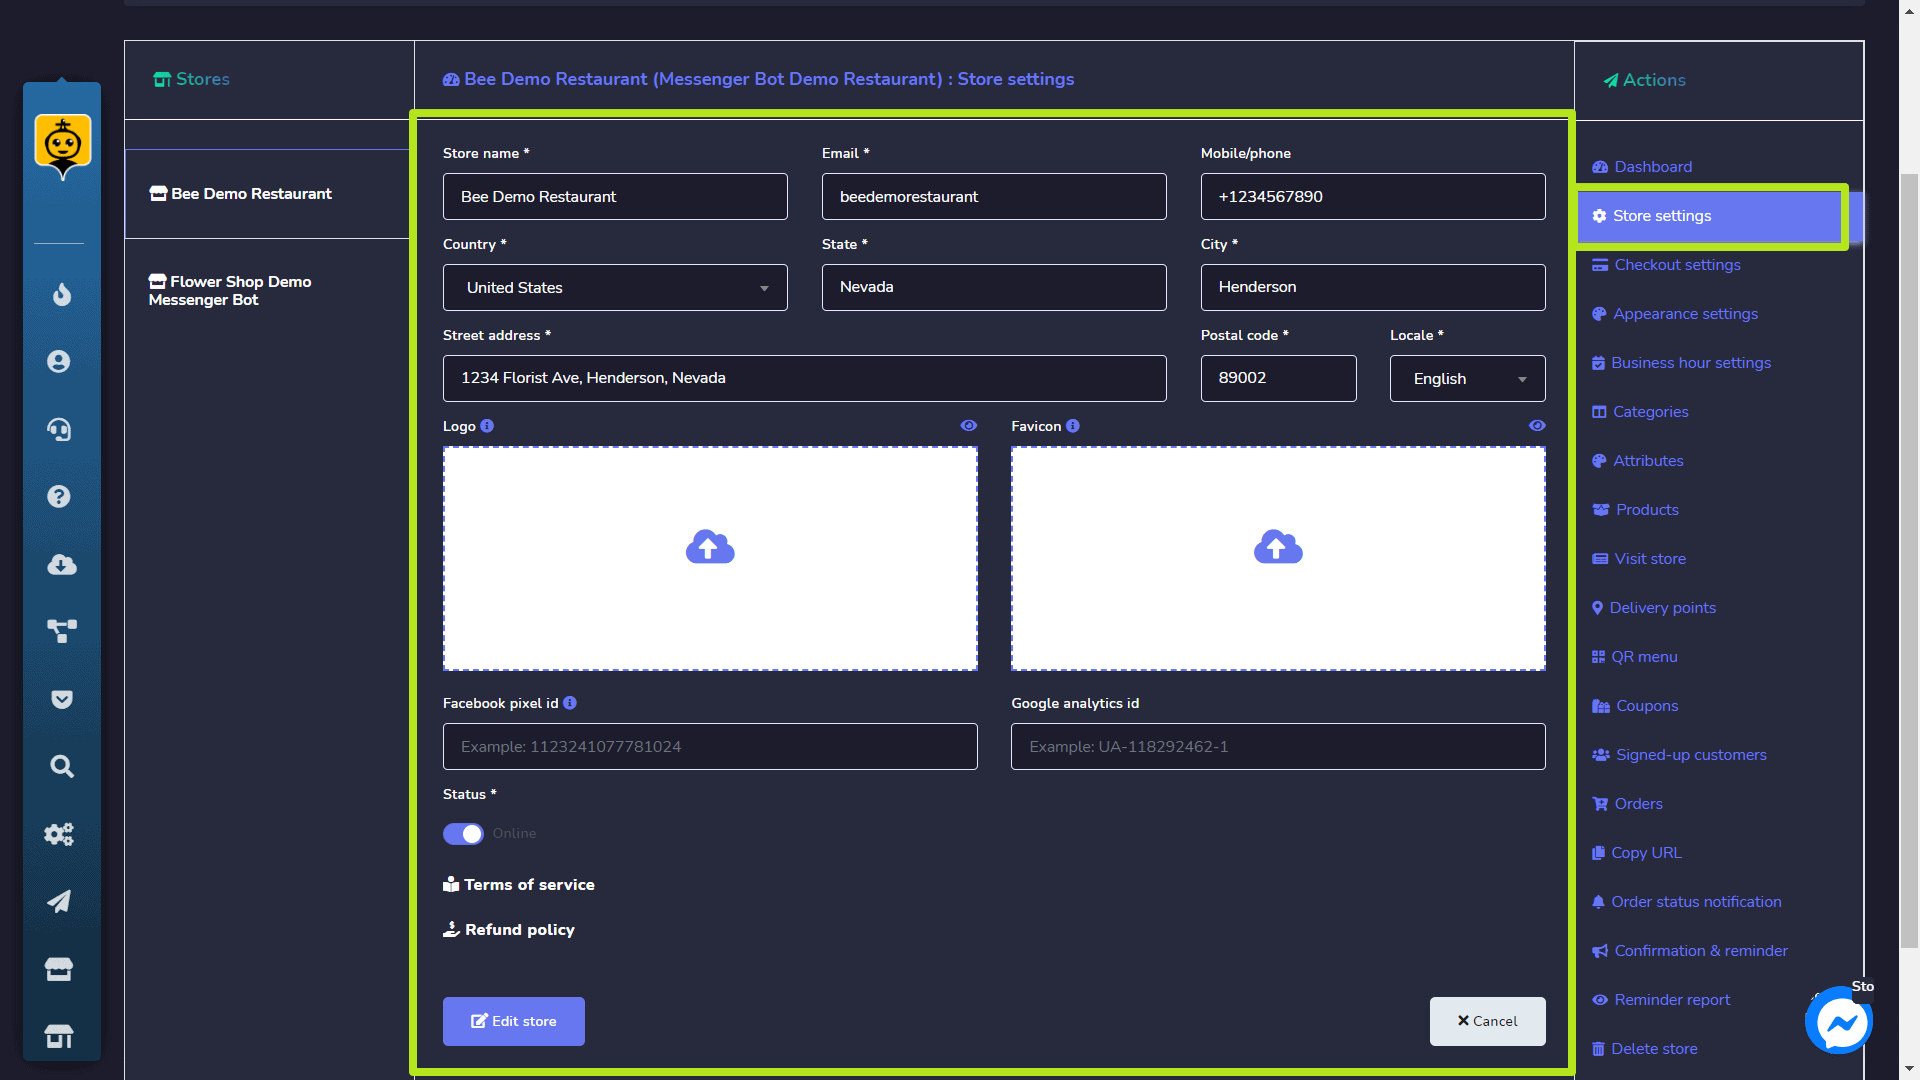
- Store settings
- Checkout settings
- Appearance settings
- Business hour settings
- Mga Kategorya
- Mga Katangian
- Mga Produkto
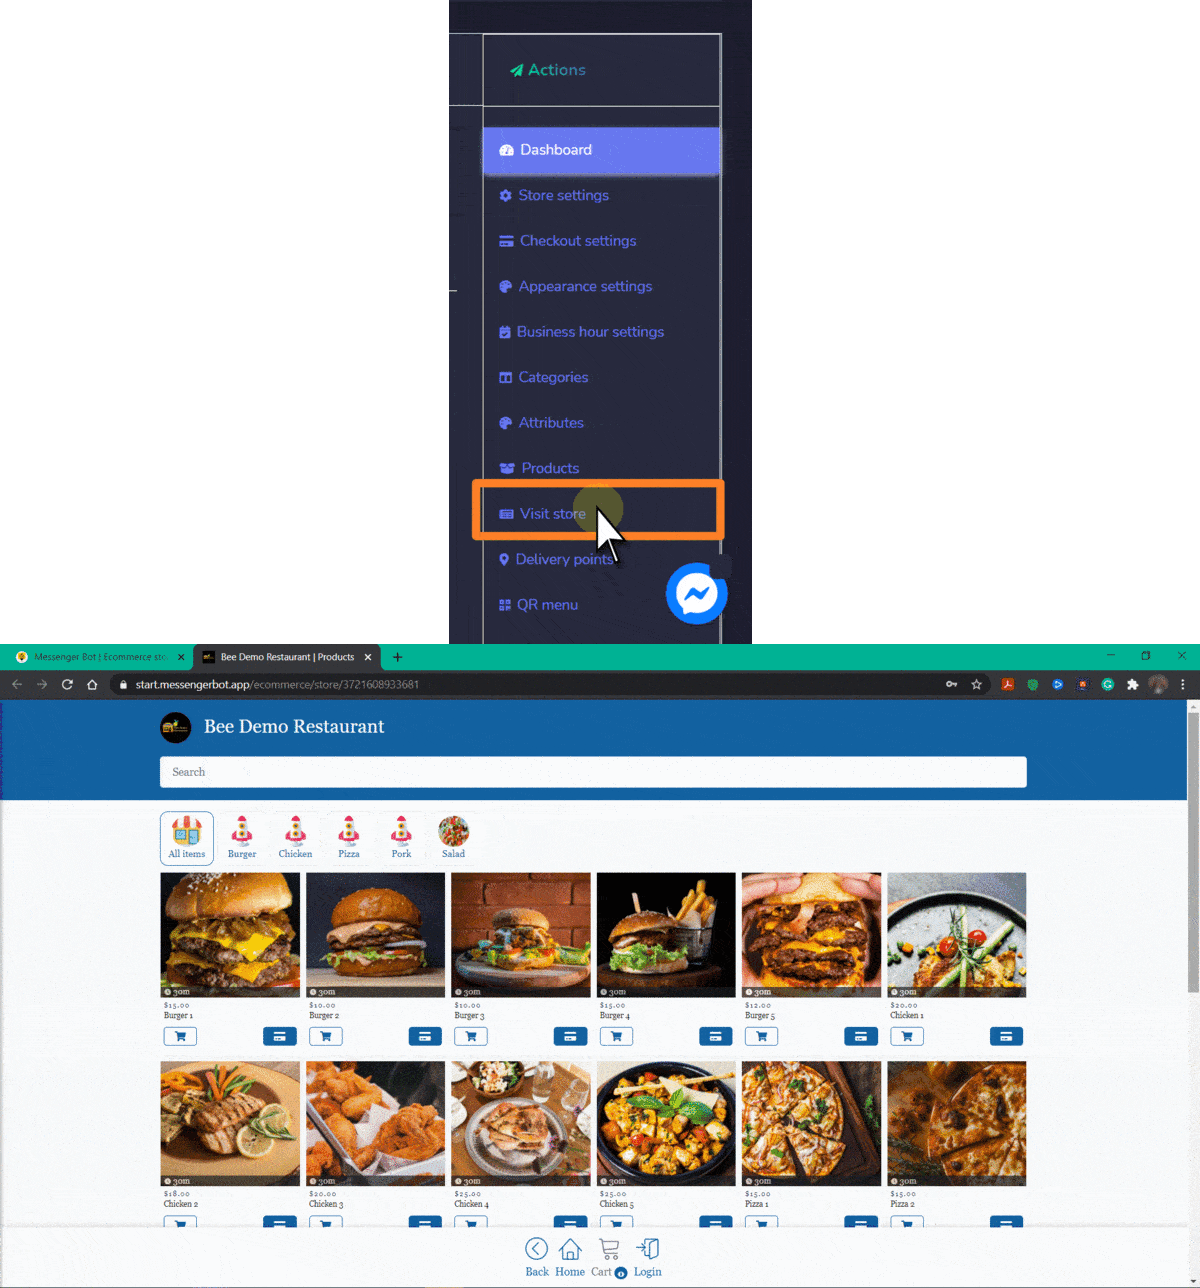
- Visit store
- Mga Punto ng Paghahatid
- QR menu
- Mga Kupon
- Signed-up customers
- Mga Order
- Kopyahin ang URL
- Order status notification
- Confirmation & reminder
- Reminder report
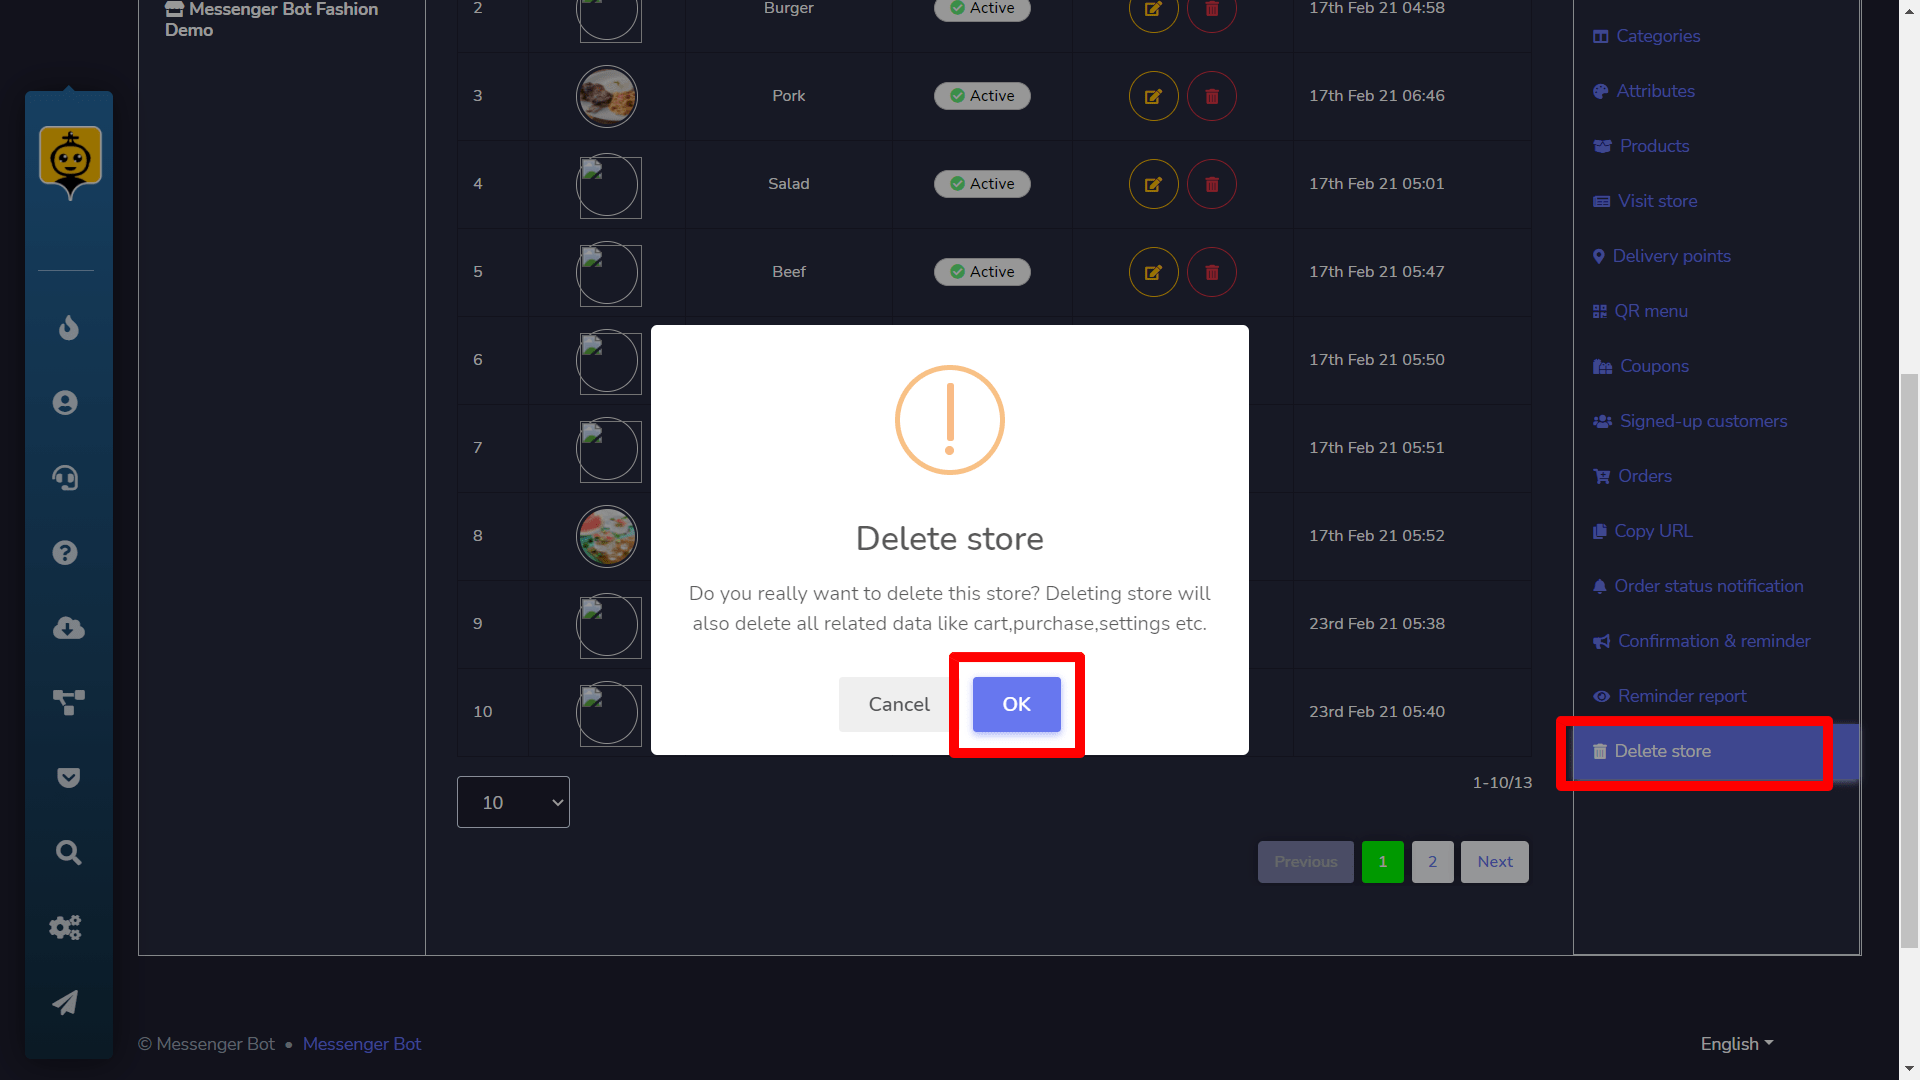
- Delete store
Some description of each section is given below:
Dashboard
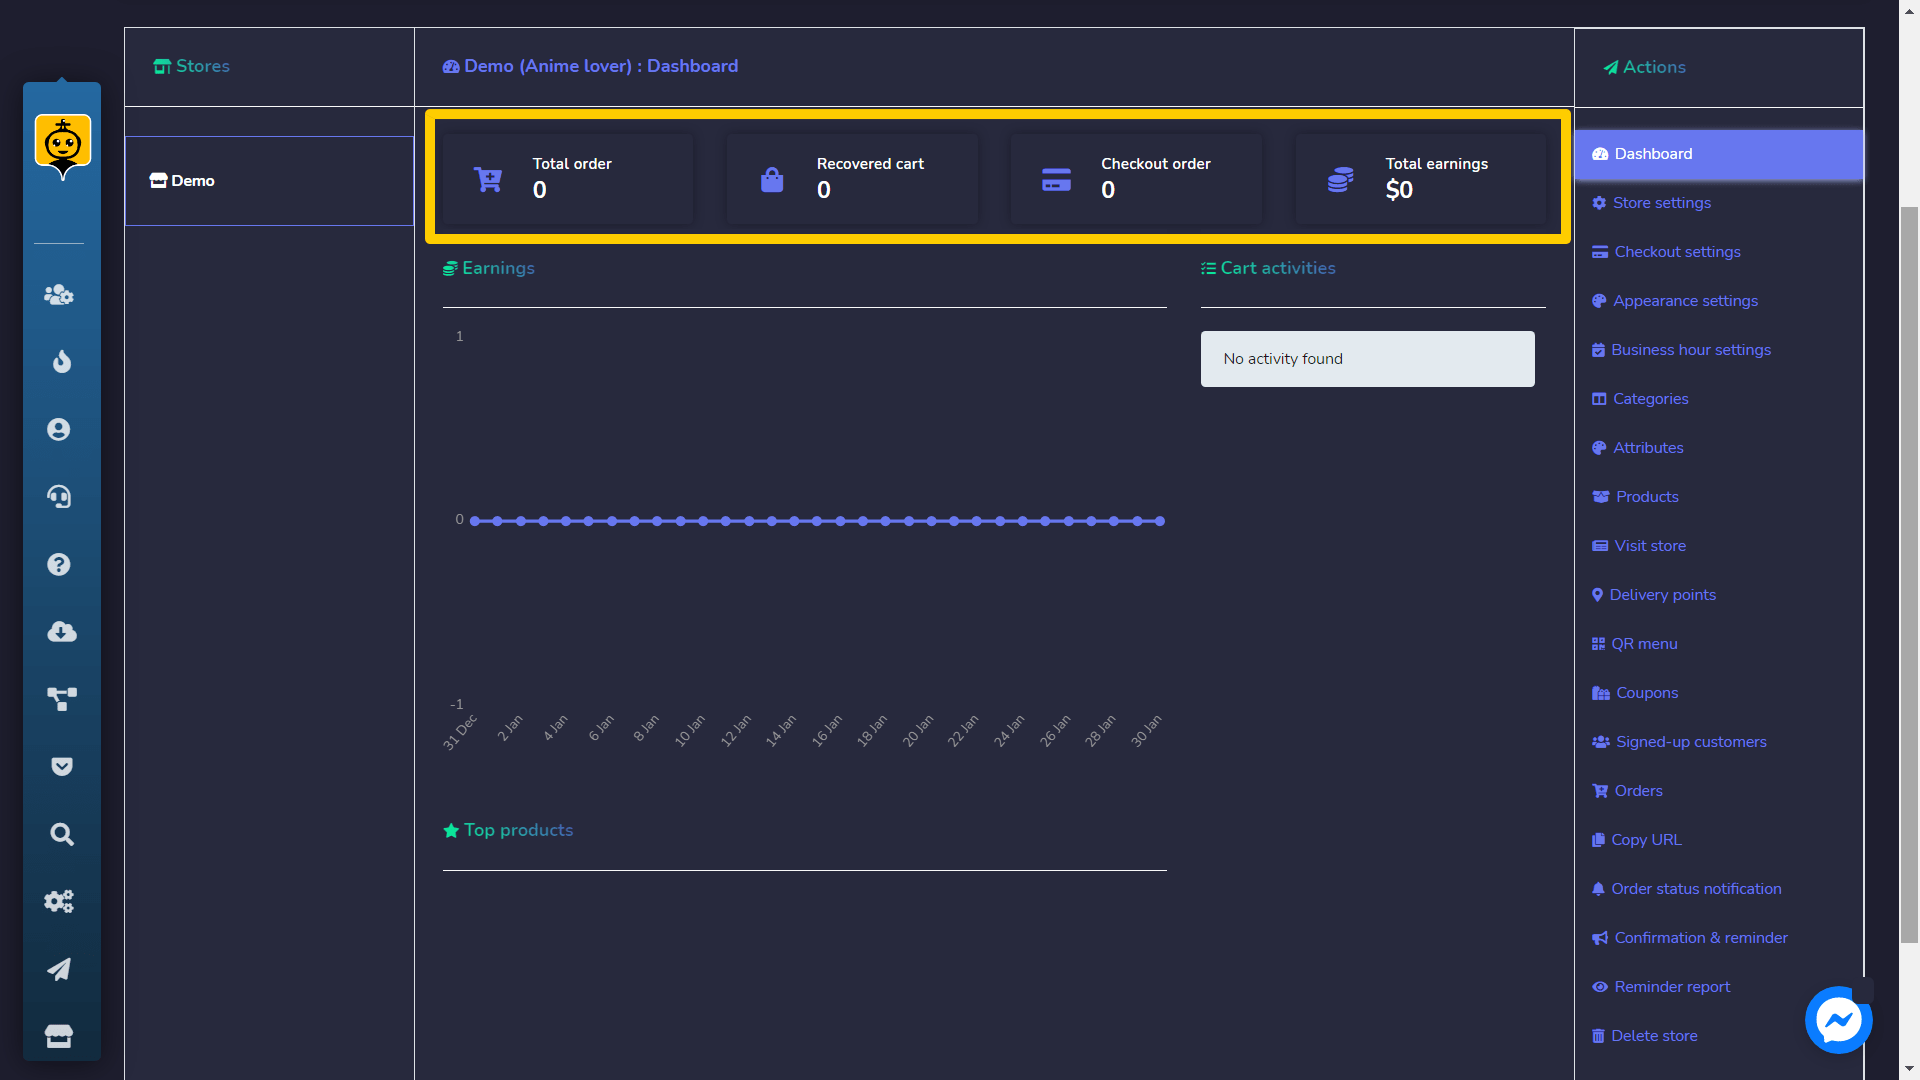
It displays a summary of the statistics will include:
- Total order: The number of items ordered on selected dates.
- Checked out order: The number of orders that have been processed.
- Total earnings: Total amount of earnings till selected date.
Mga Produkto
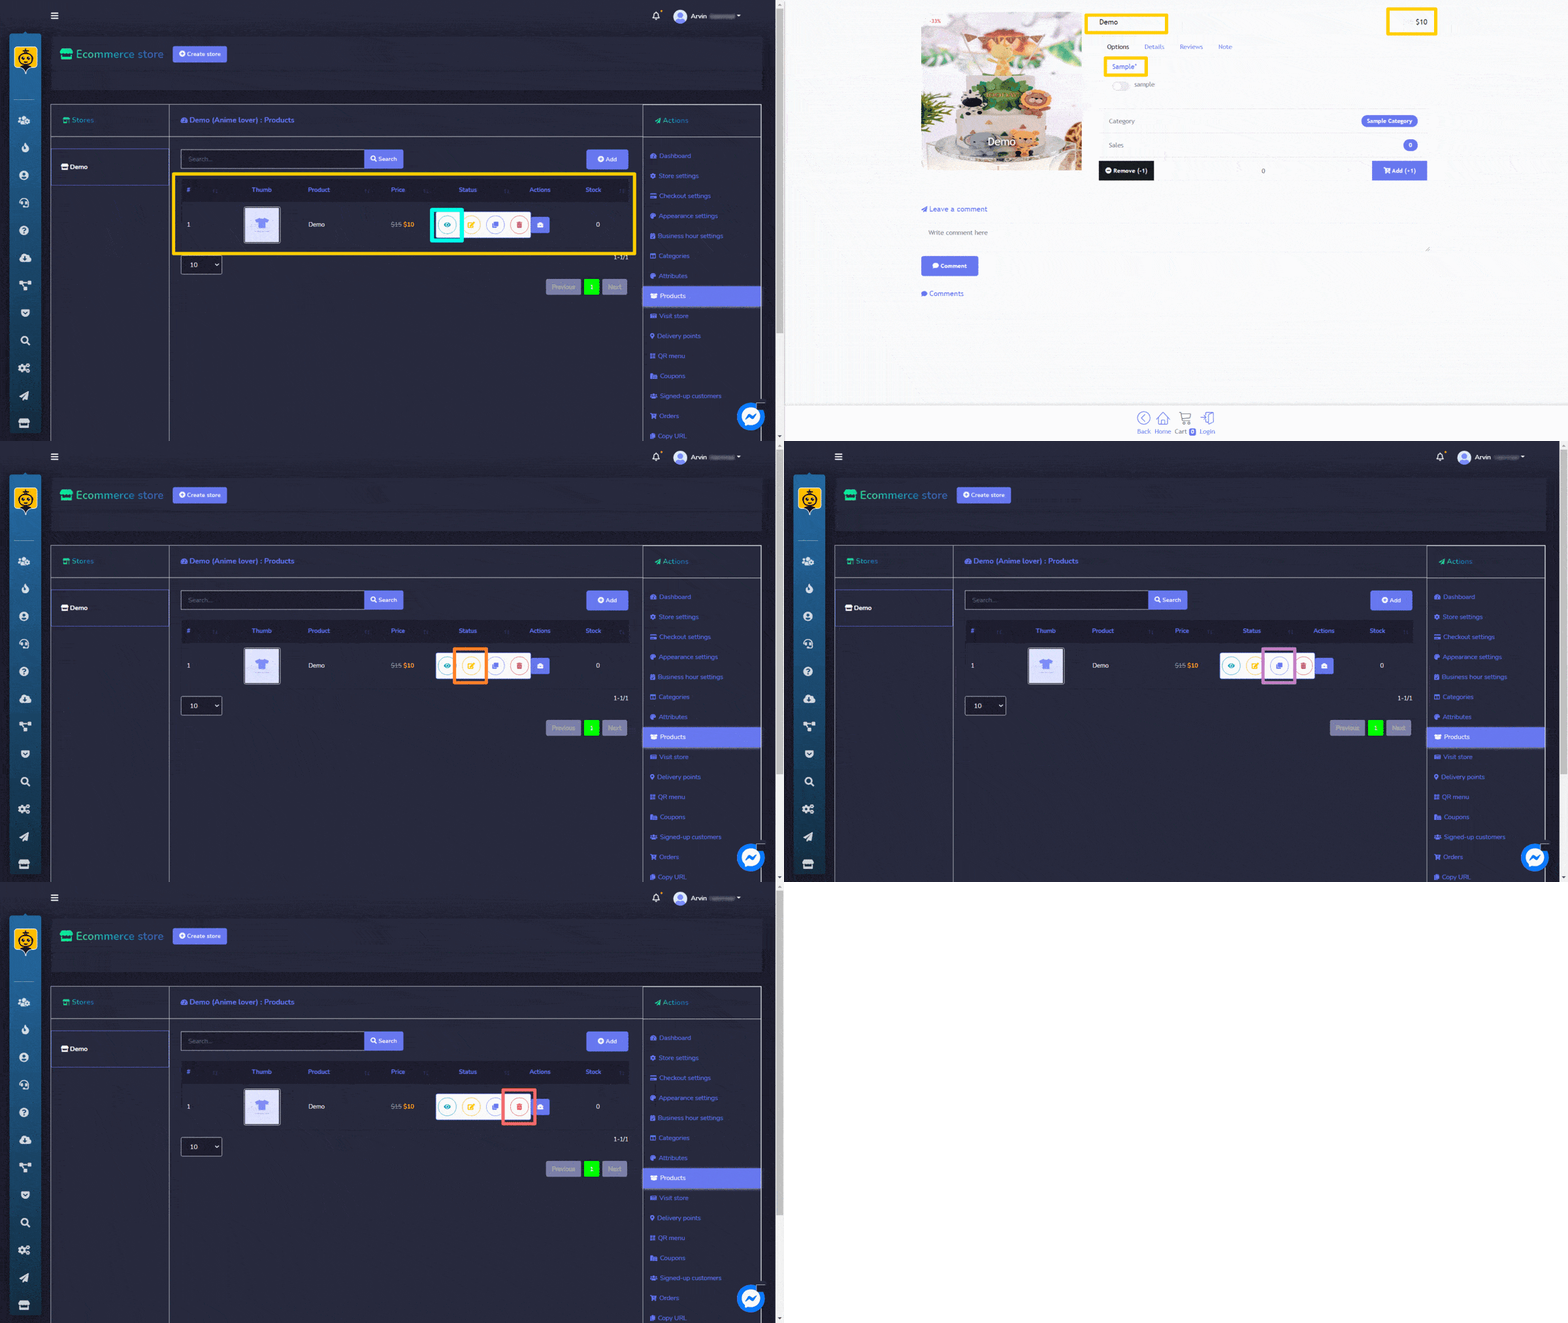
The products option allows you to get access to all existing products. You can perform following actions:
- View product page by selecting
 .
. - Edit the product.
- Clone the product created by selecting
 .
. - Delete the product.
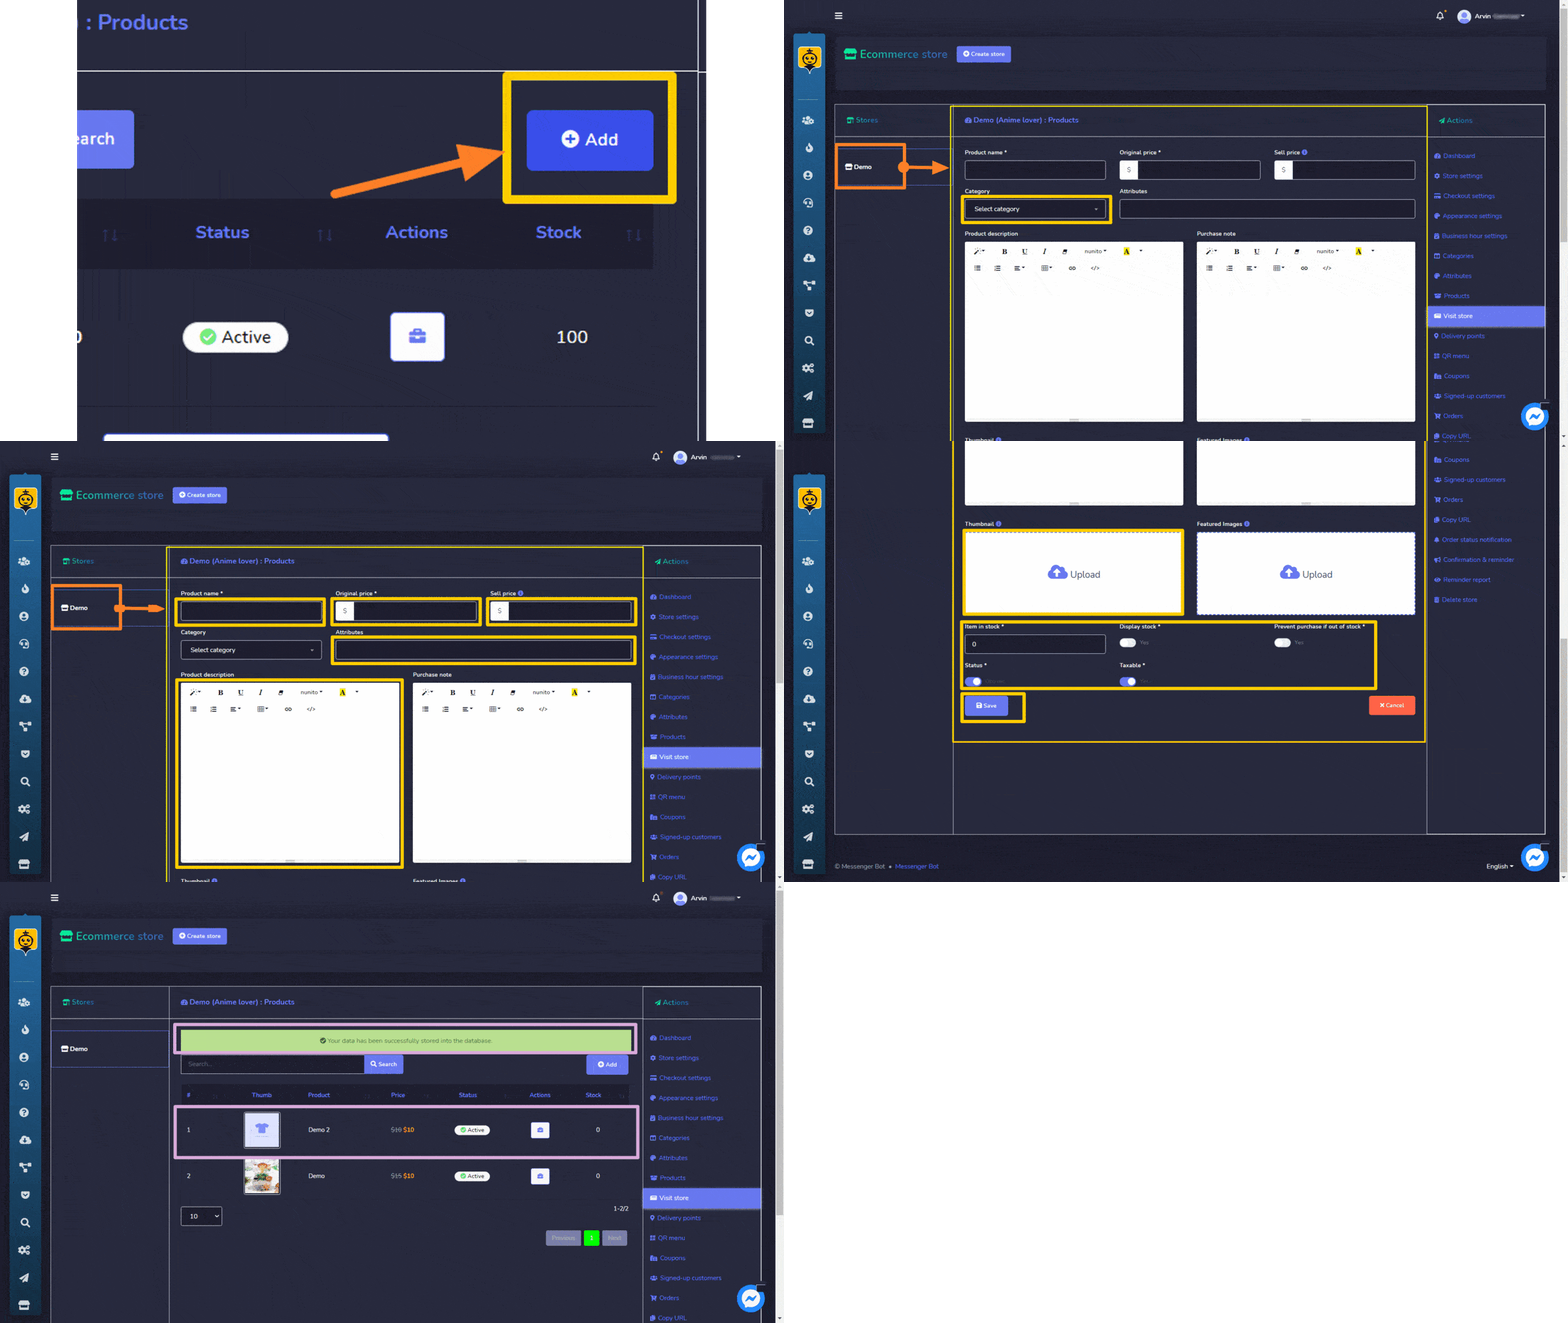
Maaari mo ring add a new product to the database by following the steps given below:
- Pumili
 from products screen.
 - You need to select a tindahan in which you want to add this product.
- Pumili ng isang kategorya of the product.
- Magbigay product name at attributes.
- Add the original price at sell price.
- Add a paglalarawan, you can also add a thumbnail.
- Pumili ng katayuan and tell whether the product is taxable or not.
- Pindutin I-save.
Mga Kupon
The products option allows you to get access to all existing coupons. You can perform the following actions:
- Edit the coupon information
- Delete the coupon
- You can choose the saklaw ng petsa para sa view na ito din.
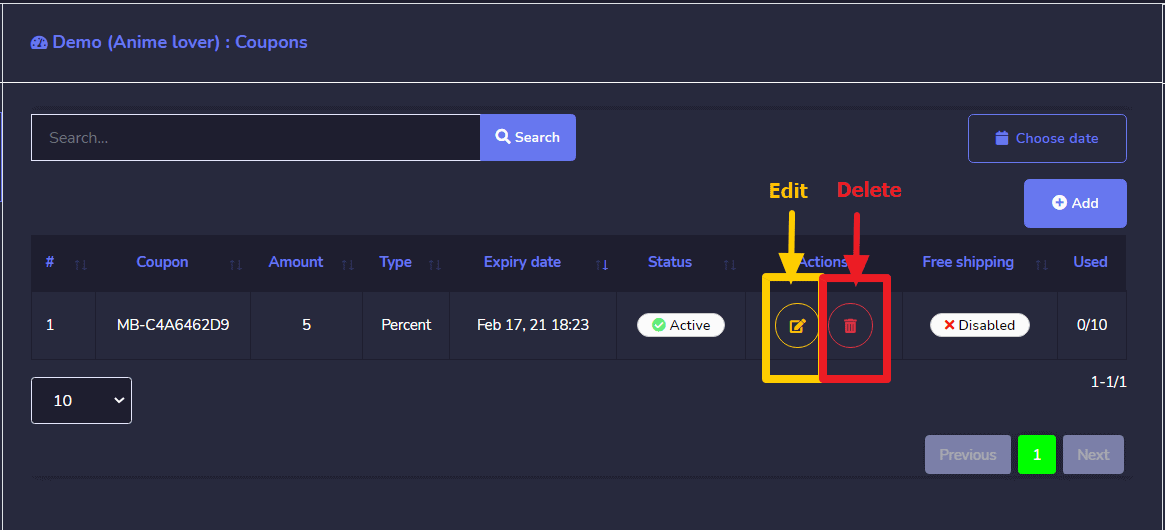
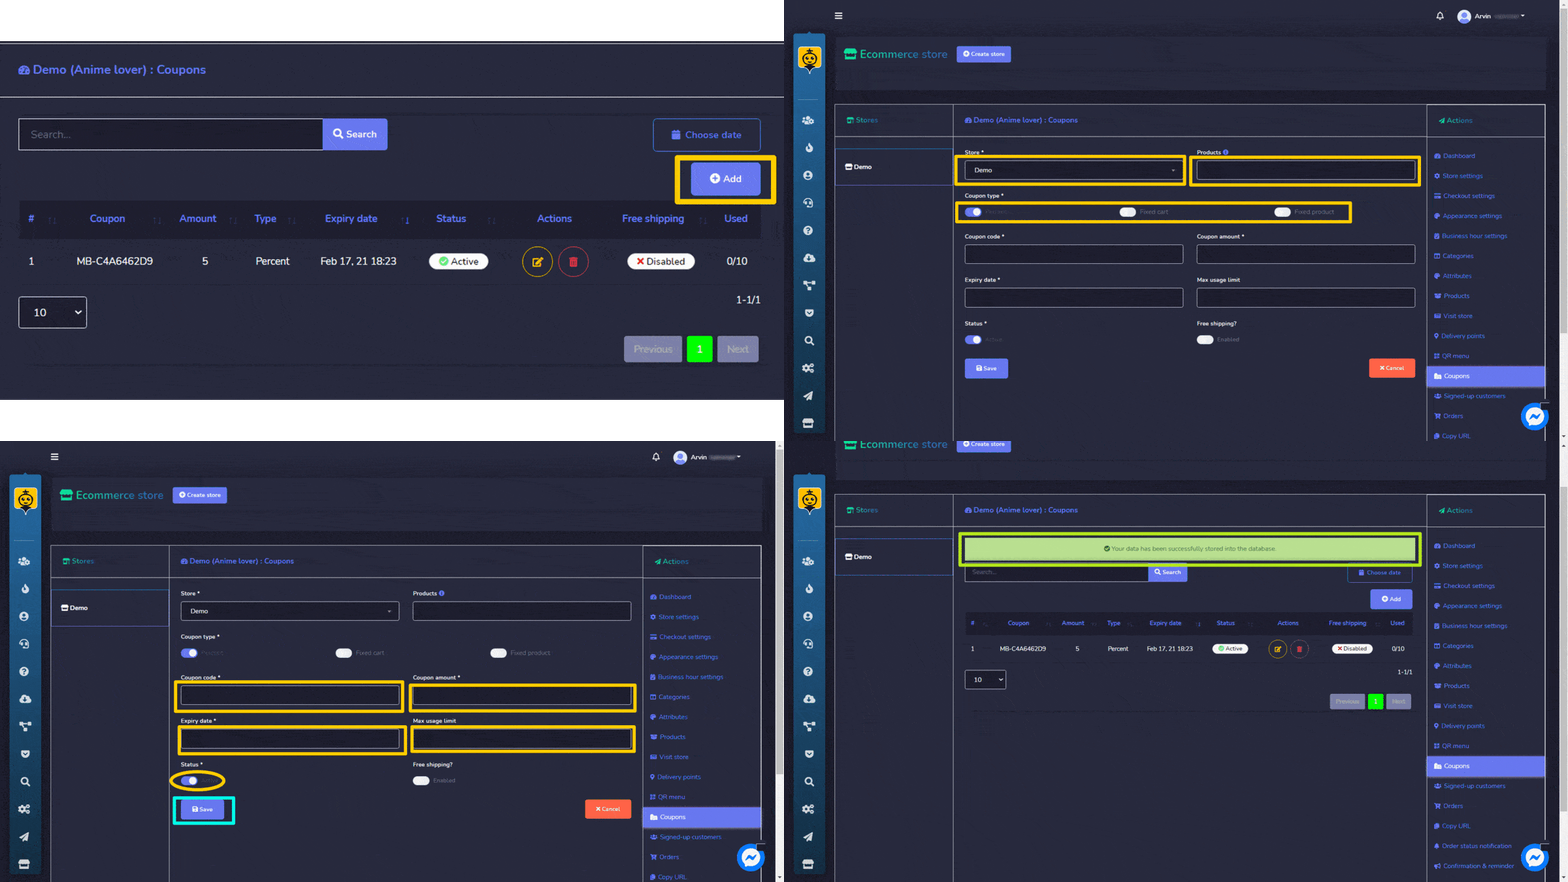
You can also add a new coupon to the database by following the steps given below:
- Pumili
 from products screen.
 - Pumili ng tindahan na nais mong idagdag ang coupon.
- Choose the product na nais mong idagdag ang coupon.
- Magbigay ng isang code para sa iyong coupon.
- Enter an amount for your coupon.
- Provide an Expiry date at maximum na limitasyon ng paggamit para sa iyong coupon.
- Pumili I-save.
Mga Kategorya
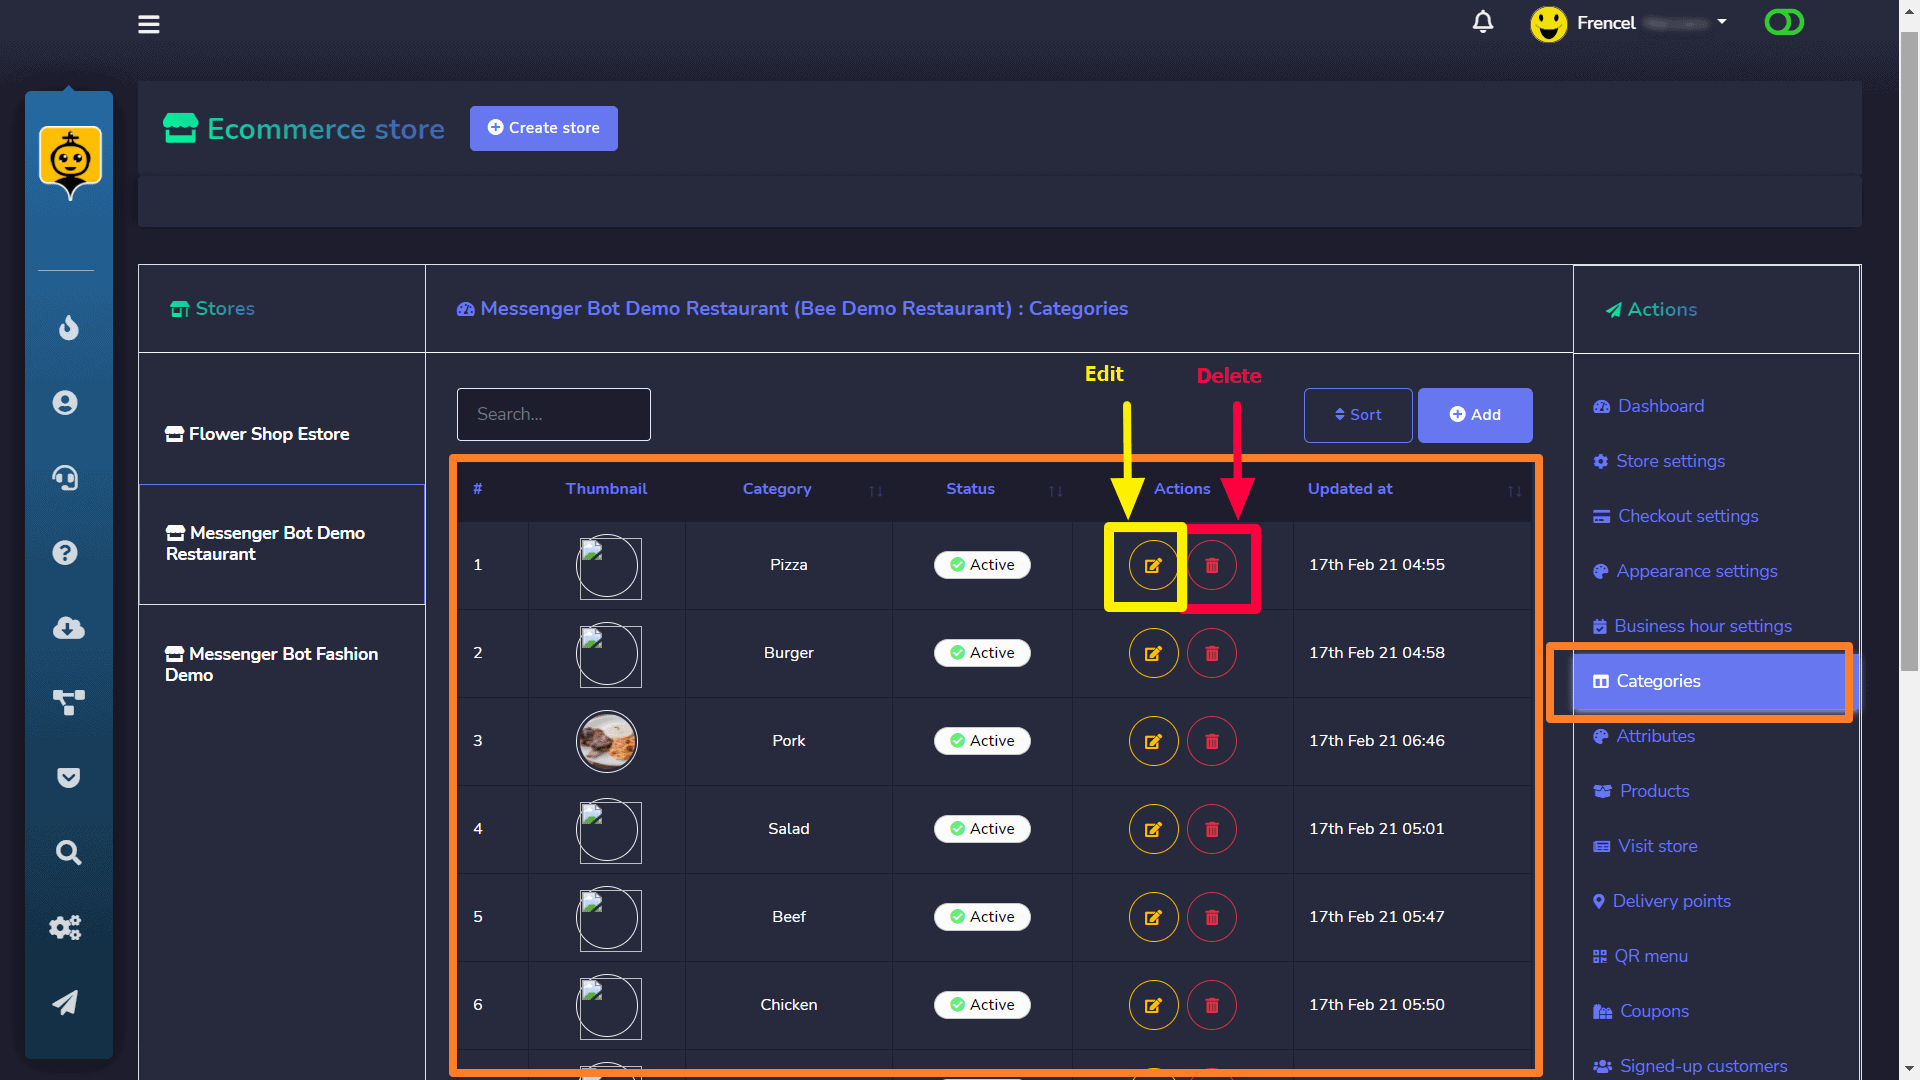
The categories for your stores appear in this section. You can perform the following actions:
- I-edit the category
- Tanggalin the category
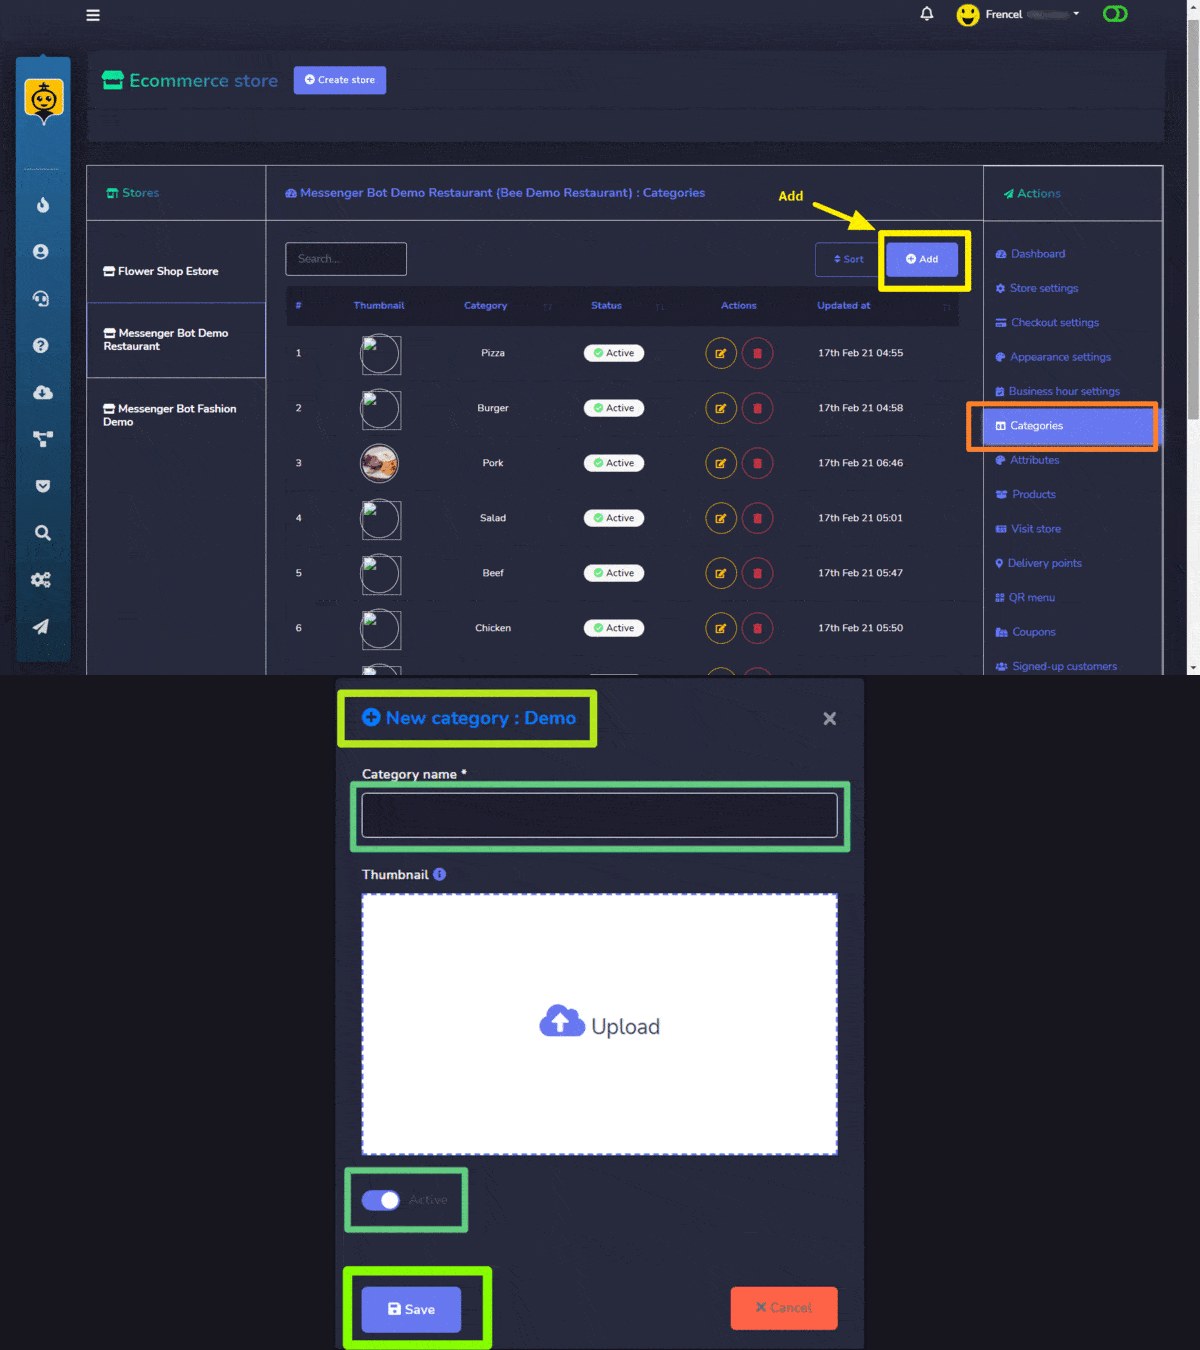
- Pumili
 from the top right of the categories screen.
 - A new category window will appear.
- Choose the tindahan for which you want to create categories.
- Choose the pangalan for your category.
- Pumili I-save.
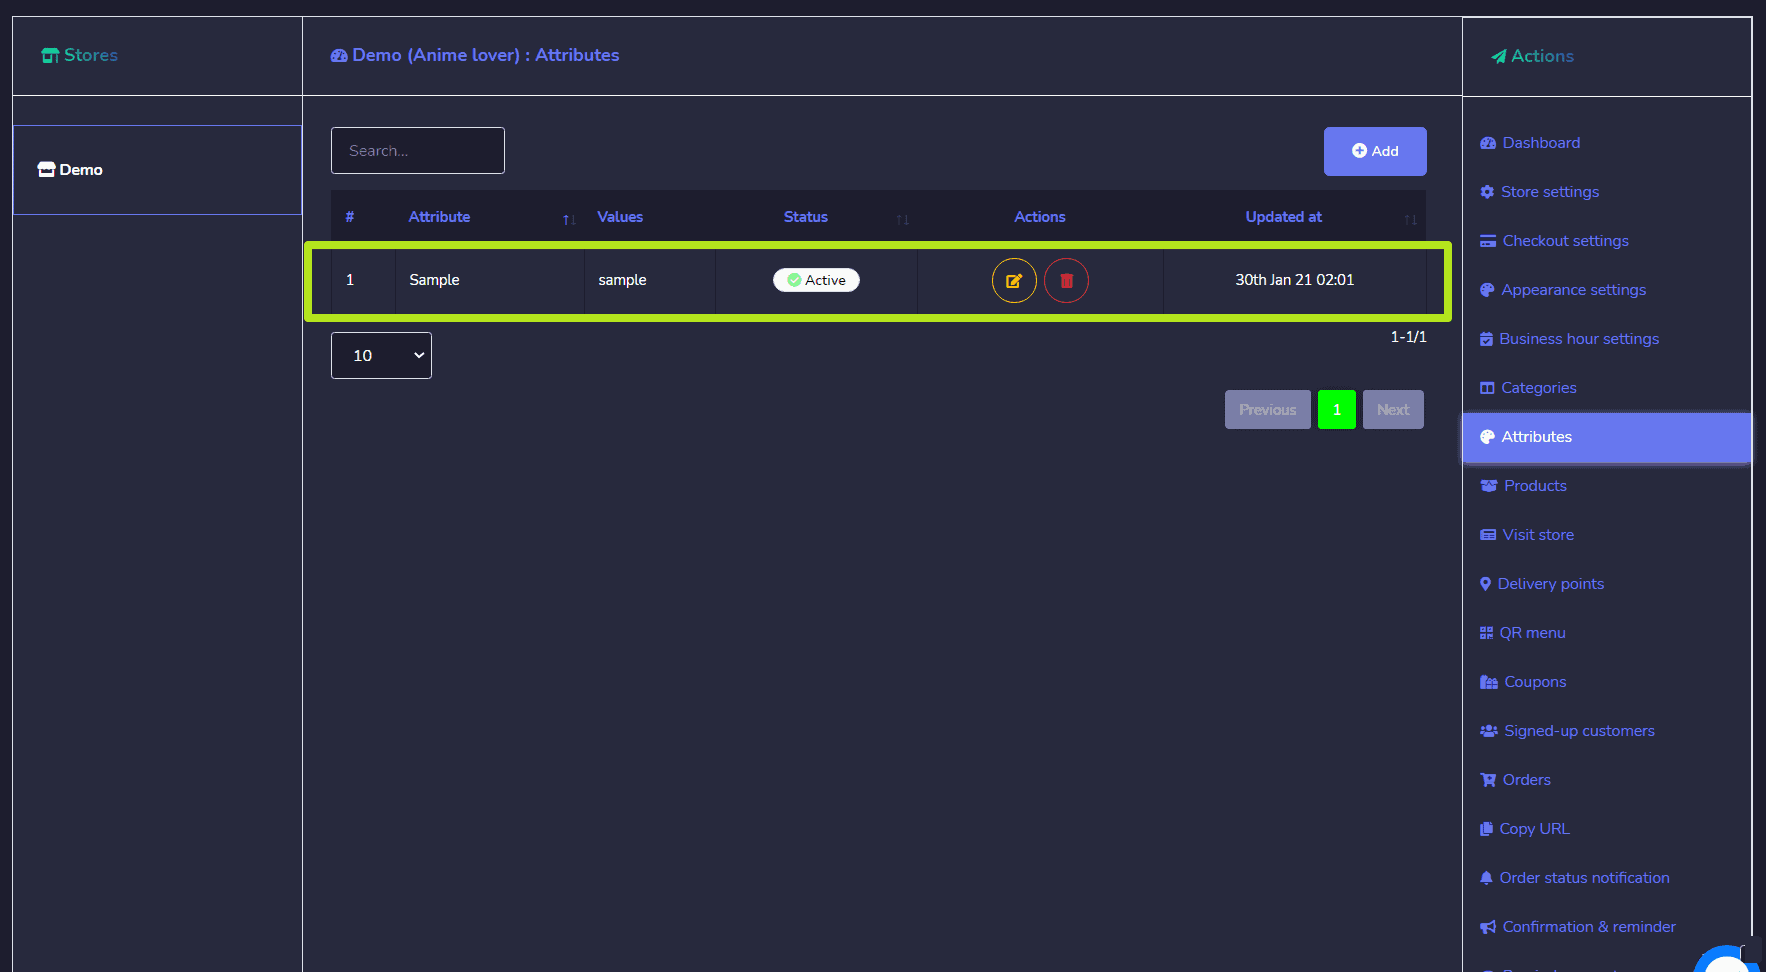
Mga Katangian
The attributes for your stores appear in this section. You can perform the following actions:
- Edit an attribute
- Delete an attribute
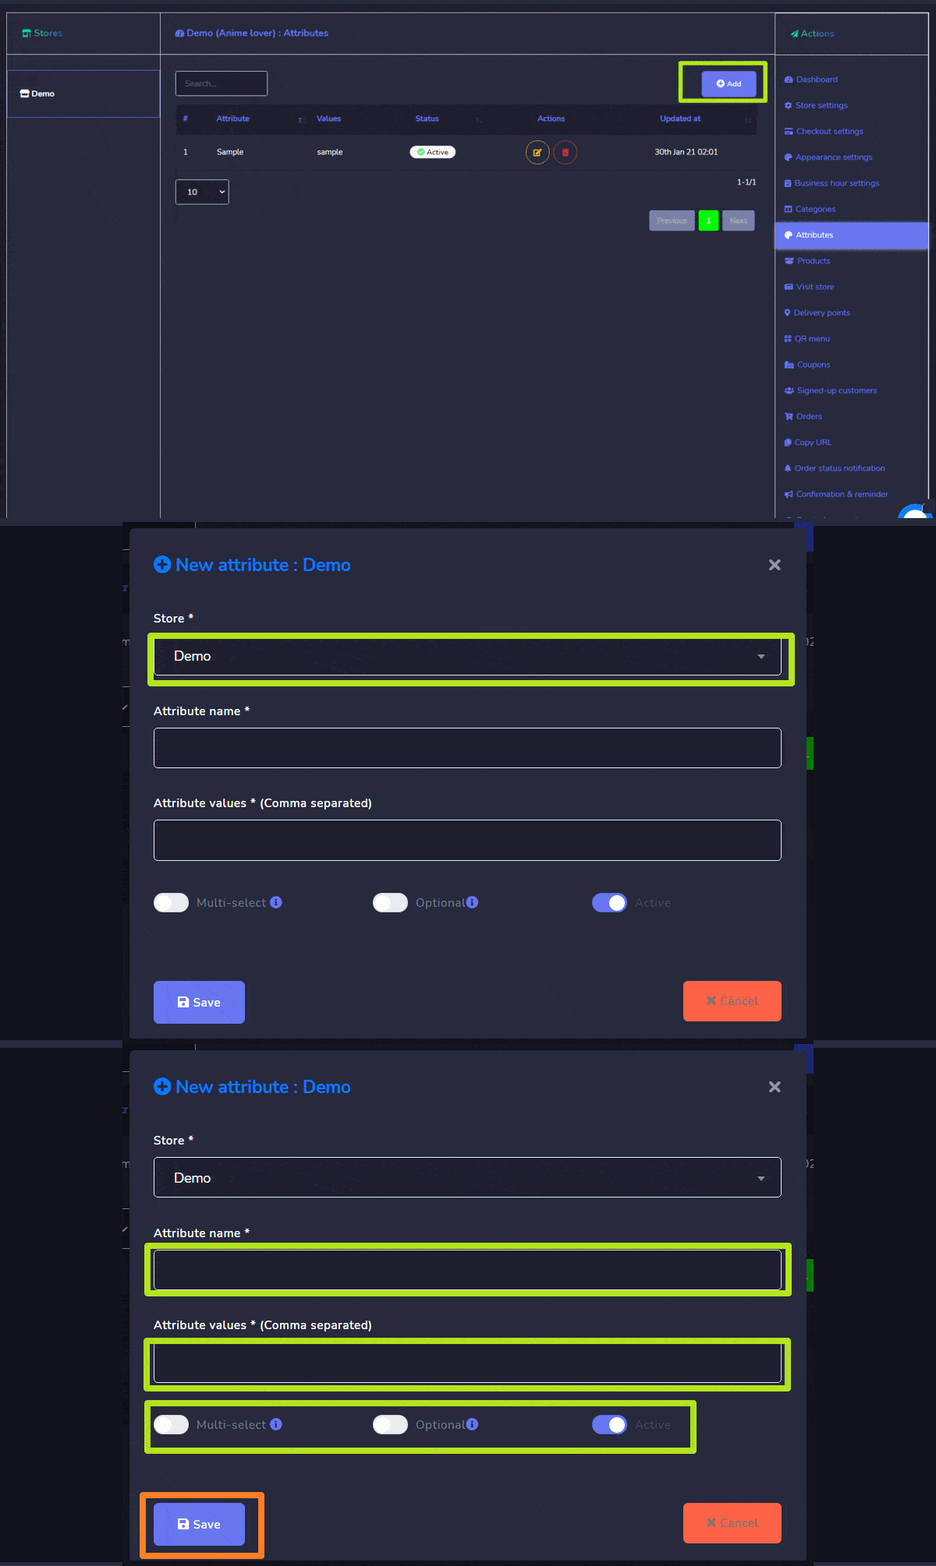
Maaari mo ring magdagdag ng bagong katangian in the database by following the steps given below:
- Pumili
 from the top right of the attributes screen.
 - A new attribute window will appear.
- Choose the tindahan kung saan nais mong lumikha ng mga katangian.
- Choose the pangalan para sa iyong mga katangian.
- Pumili attribute values and separate them with commas.
- Pumili I-save.
Mga Order
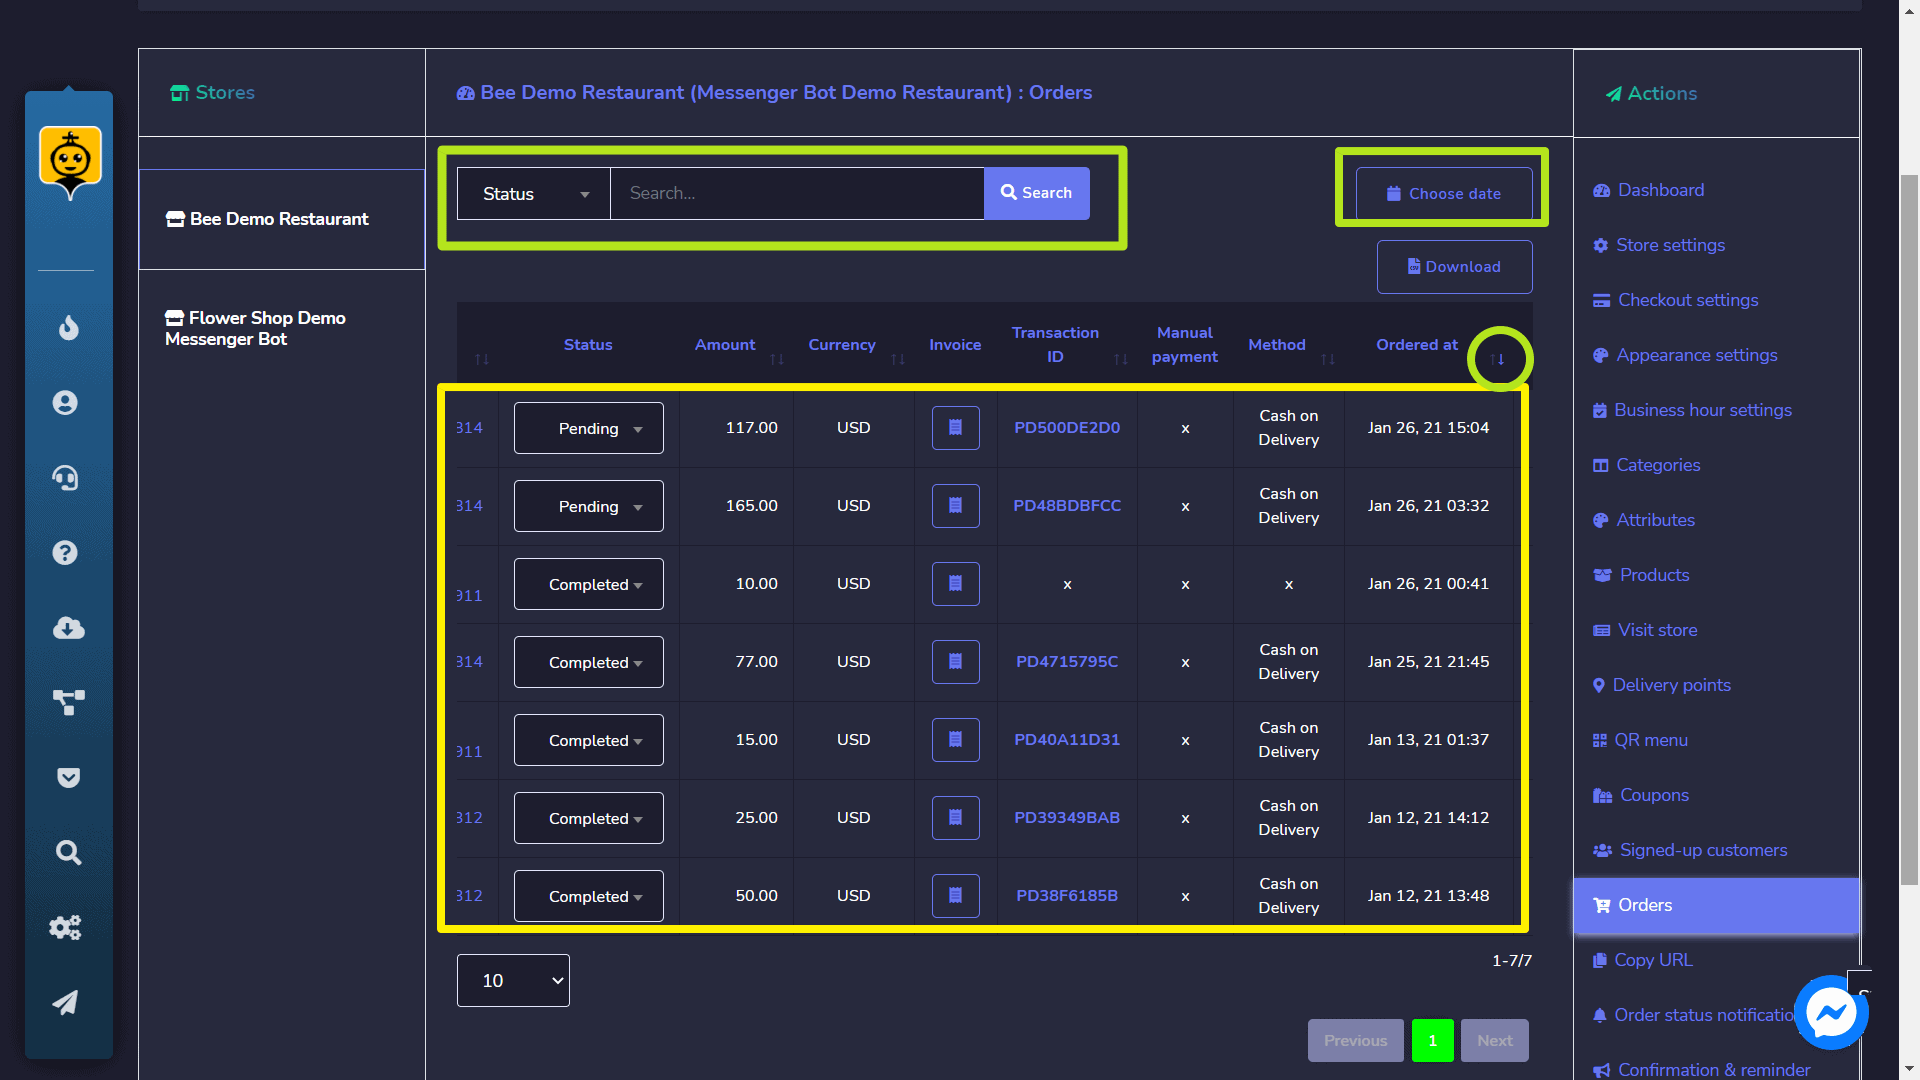
You can view the details of all orders from this screen. You can search for a particular order using the search bar or sort them date wise for narrowed down search. Maaari mong ayusin them in any order by selecting the mga arrow in the header.
Kopyahin ang URL
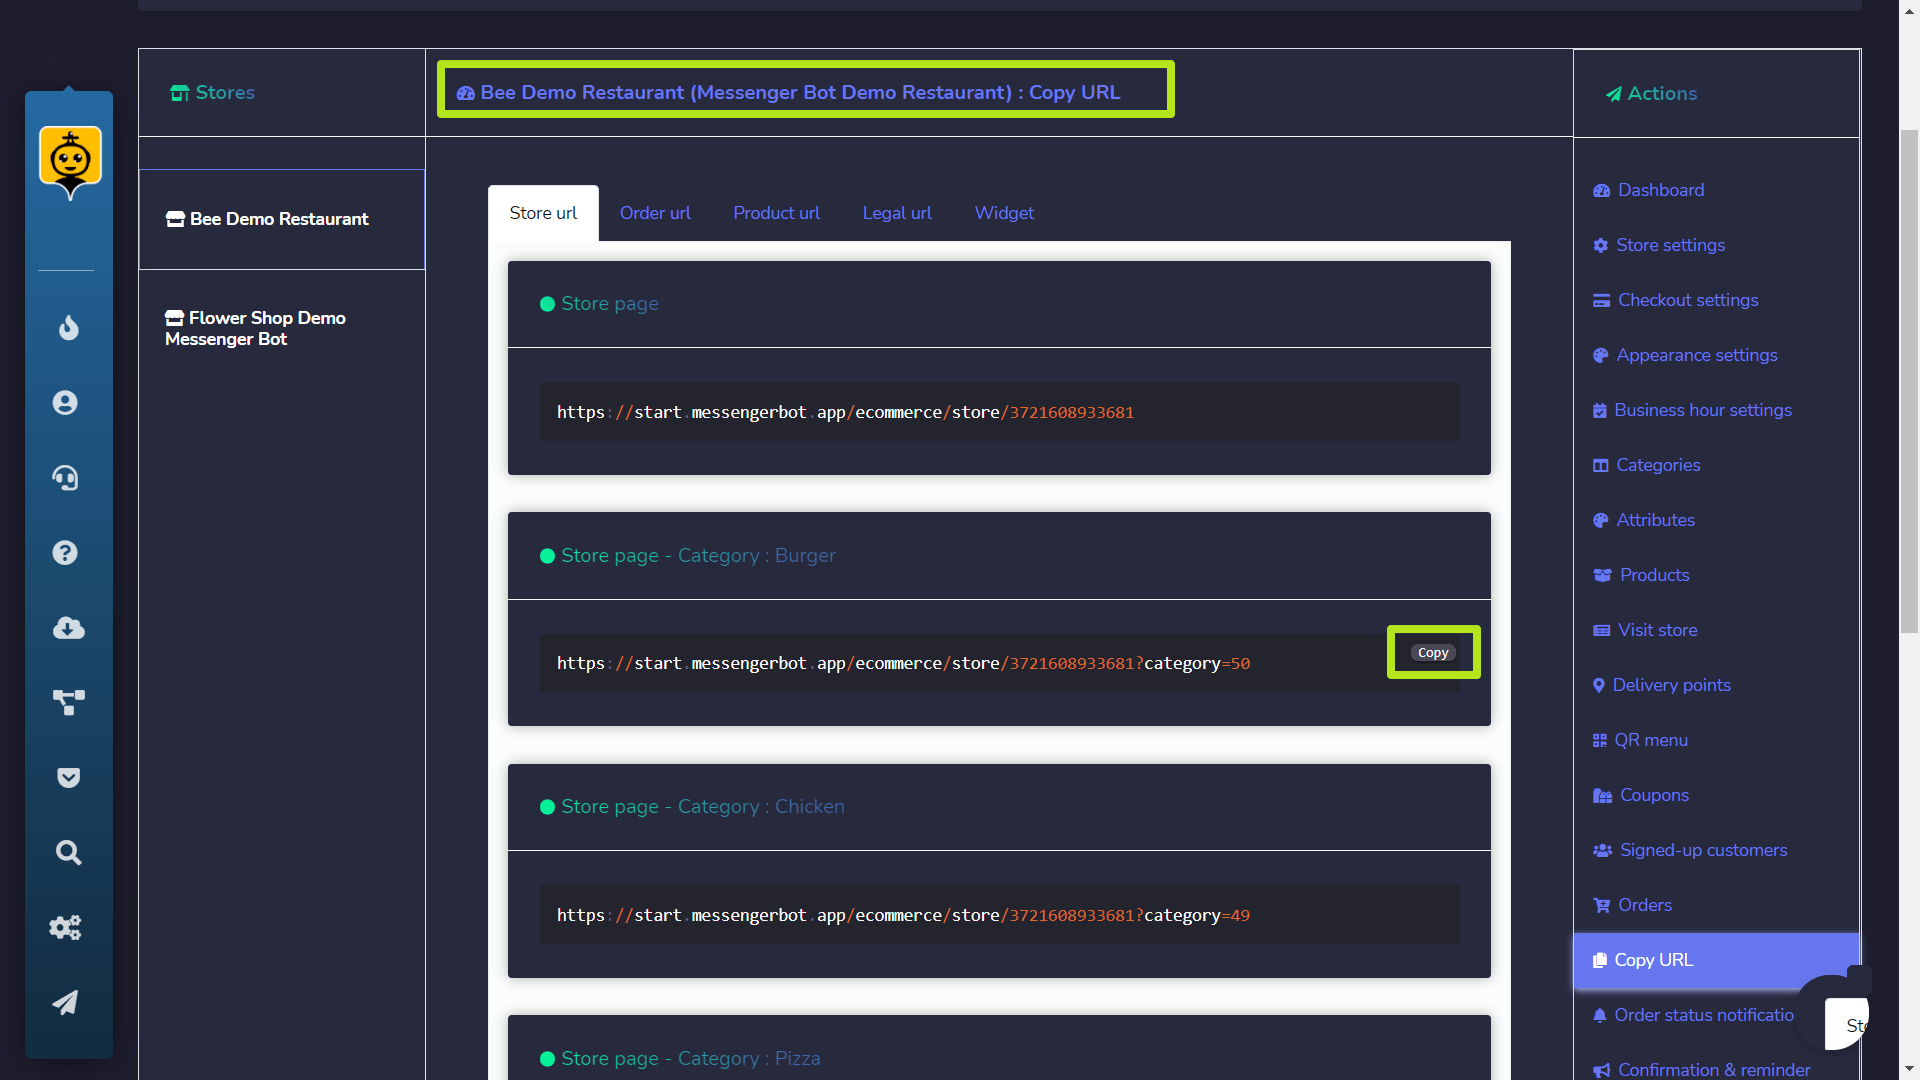
You can copy your sore page, order, and product URL. Hover over the code, then select the Copy option that appears over the code line.
Bumisita sa Tindahan
You can visit the store by selecting this option. It will redirect you to the store.
Store settings
You can edit the store information using this option.
Delete store
You can permanently delete the store from the database by selecting this option.
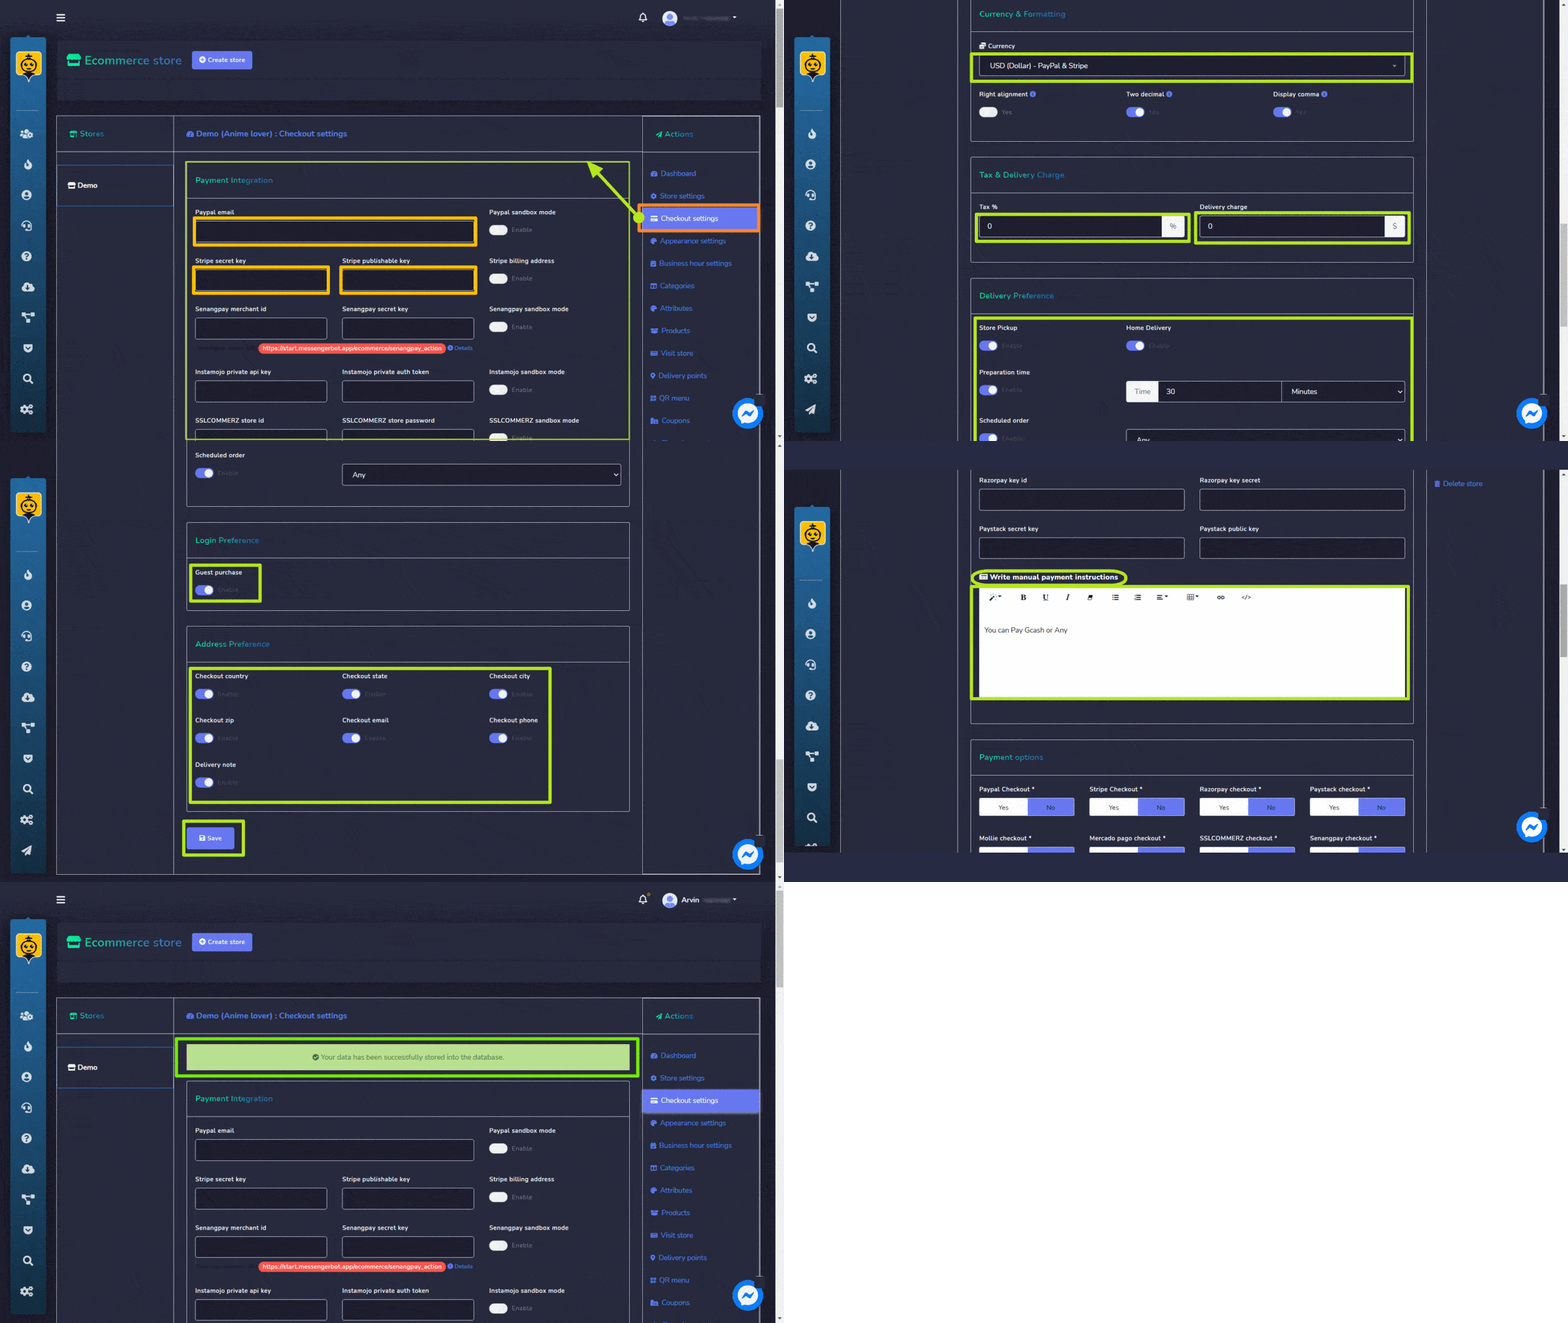
Payments (Checkout Settings)
The payments section allows you to adjust the settings of all payment accounts. You need to follow the steps given below:
- Ibigay ang PayPal email address.
- Ilagay ang isang stripe secret key.
- Ilagay ang isang stripe publishable key. Note: You can also try to use the other mode of payment on the Payment Integration.
- Pumili ng currency, add your tax and delivery charge, modify your delivery preference, login preference, at address preference.
- You can also provide Manual payments instructions in the field available.
- Pumili I-save upang gumawa ng mga pagbabago.
Your data will be updated in the database.
Woocommerce abandoned cart
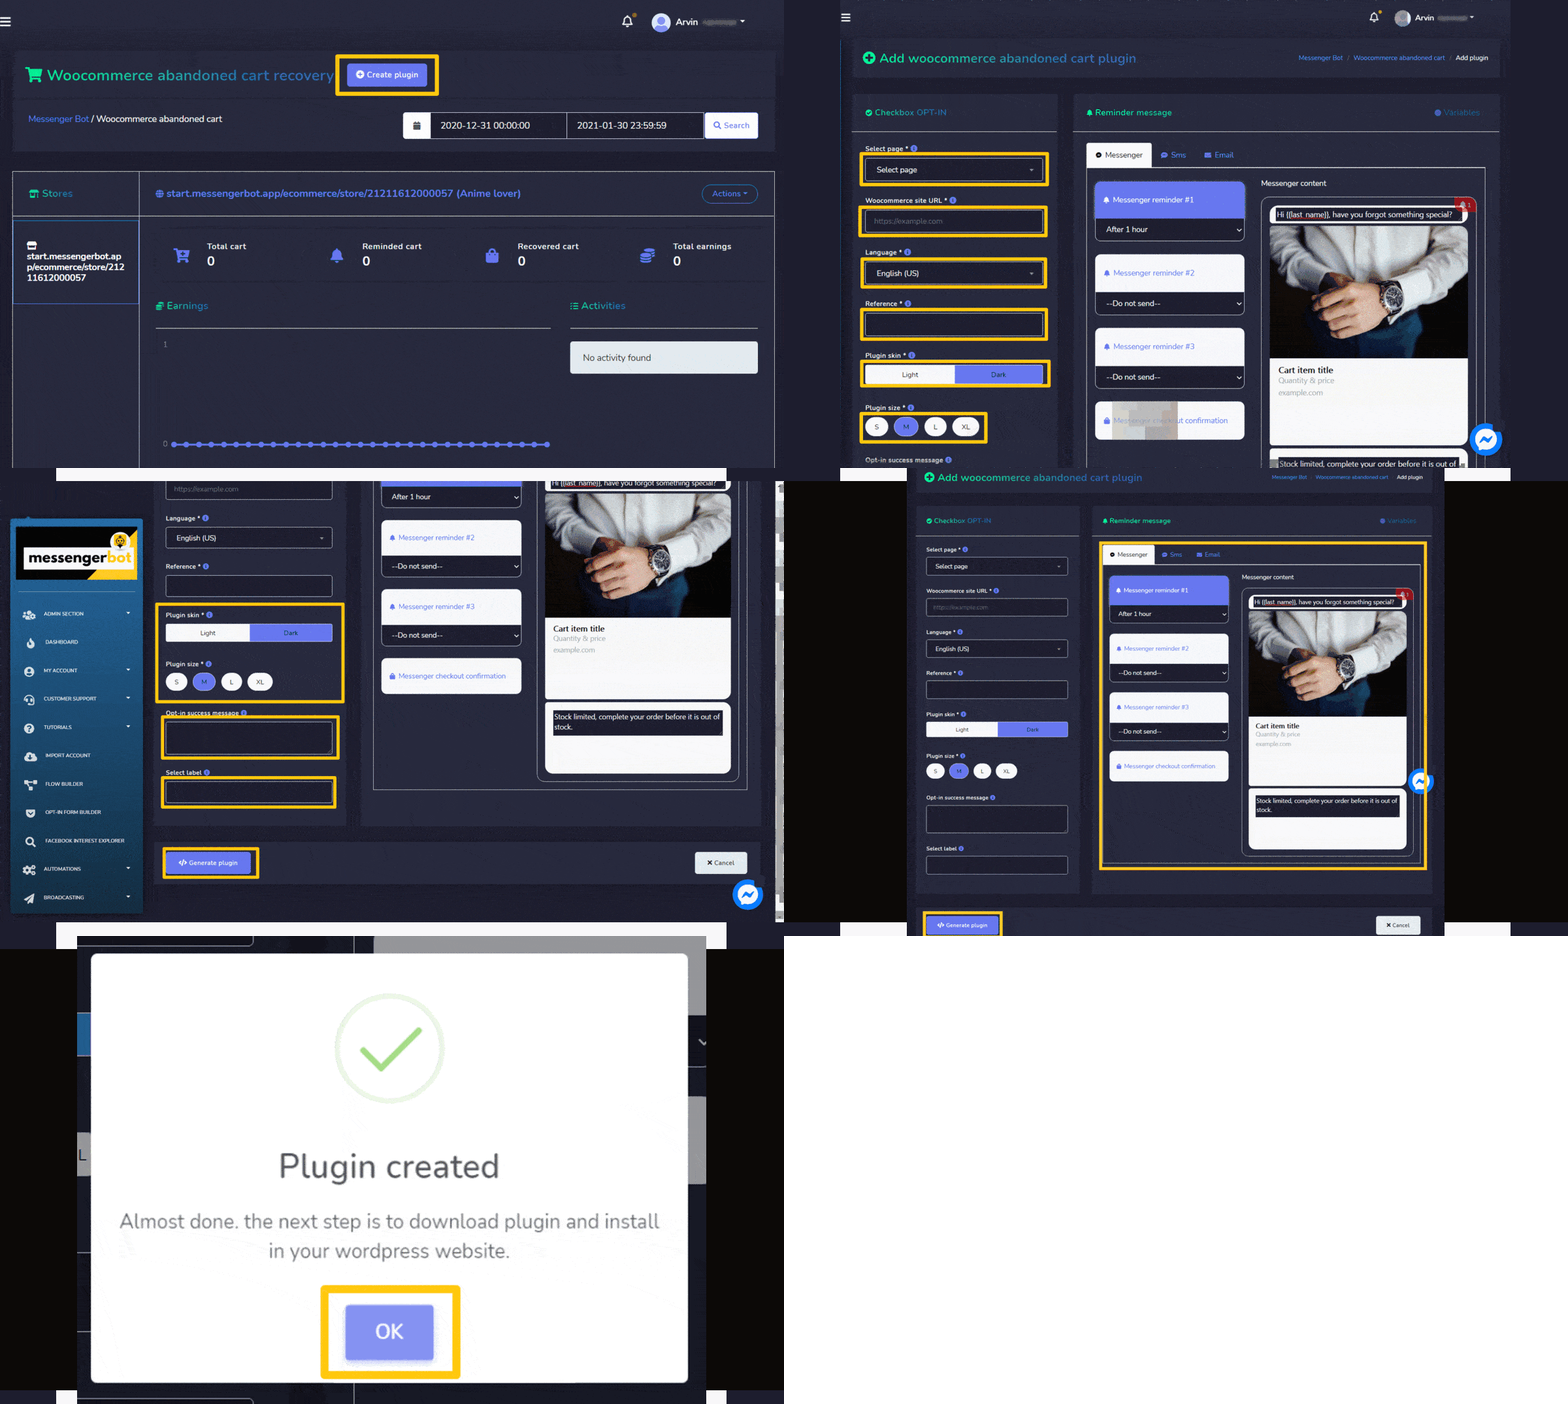
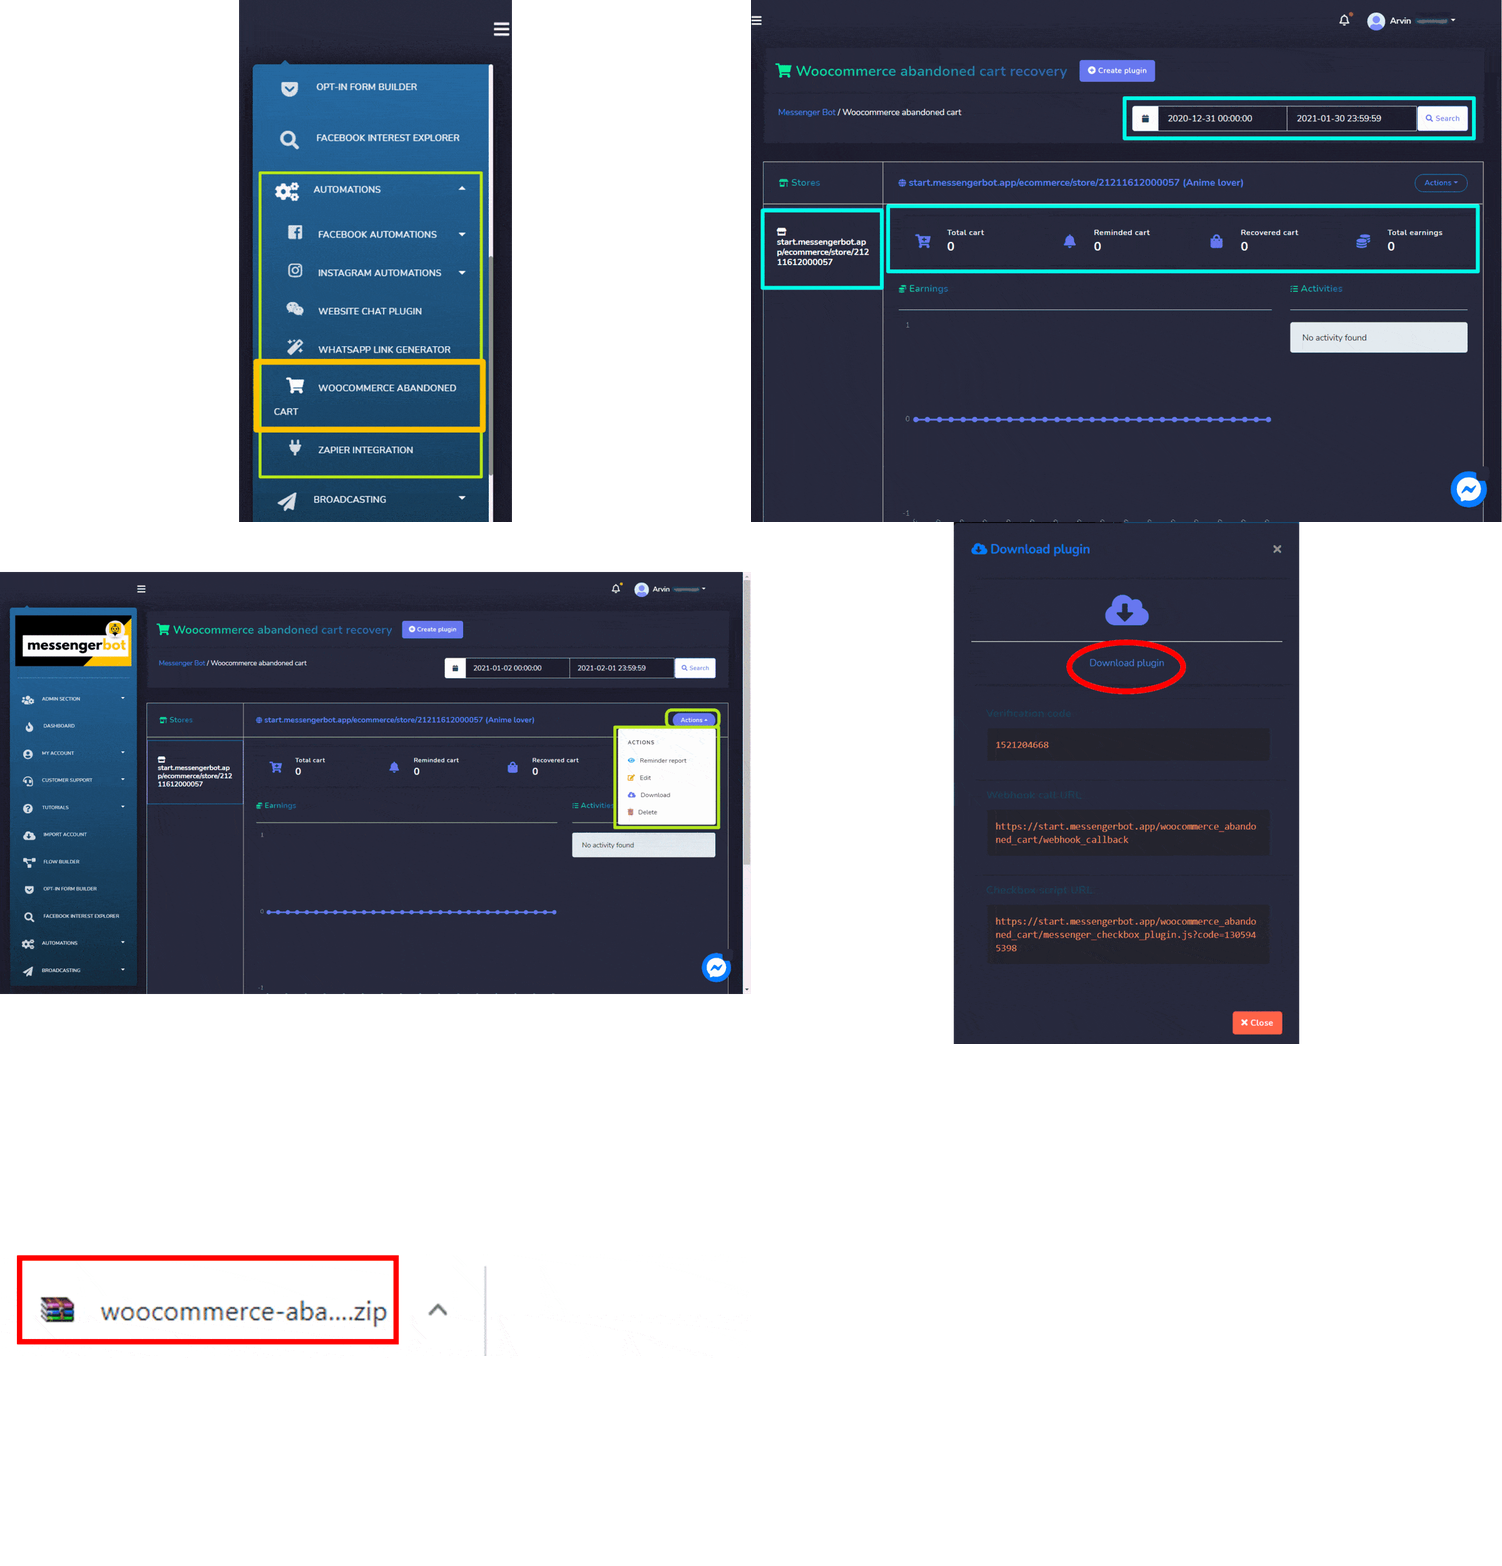
To access the Woocommerce abandoned cart section, select it under the Automations tab on the navigation menu as shown below. Woocommerce abandoned cart section allows you to view the existing carts dashboard. View different carts summary and see all available earnings.
- You can simply apply date filters to track down the narrowed search.
- You can perform actions from Aksyon button like view Reminder Report, Edit, Download the report or Tanggalin the report.
- The dashboard allows you to view Total, Reminded, at Recovered carts.
- It allows you to view the Earnings.
Lumikha ng plugin
- Pumili
 mula sa kanang itaas ng screen.
 - Sa Checkbox OPT-IN section, select the pahina kung saan nais mong idagdag ang plugin.
- Ilagay ang site URL.
- Pumili ng wika.
- Magdagdag Reference.
- Provide the size of the plugin and skin.
- Ibigay ang Opt-in success message.
- Pumili ng isang label.
- Adjust all settings in the Reminder message section based on your requirements.
- Pumili Generate plugin.
