Visual Flow Builder will provide you an overall view of the whole interaction process of building your own bot. In other words, it is a graphical editor where you can control all of the messages, actions, and interactions among them. The whole process accomplishes building a bot on the single graphical editor, without moving to and fro. Visual Flow Builder is easy to use and build, it will serve the Get Started in your Facebook Page and will collect Leads for you.
After you create your Visual Flow Builder, using its components. You will realize that the process is just repeating itself. But before everything else, let’s start with importing your Facebook Account.
I-import ang Account
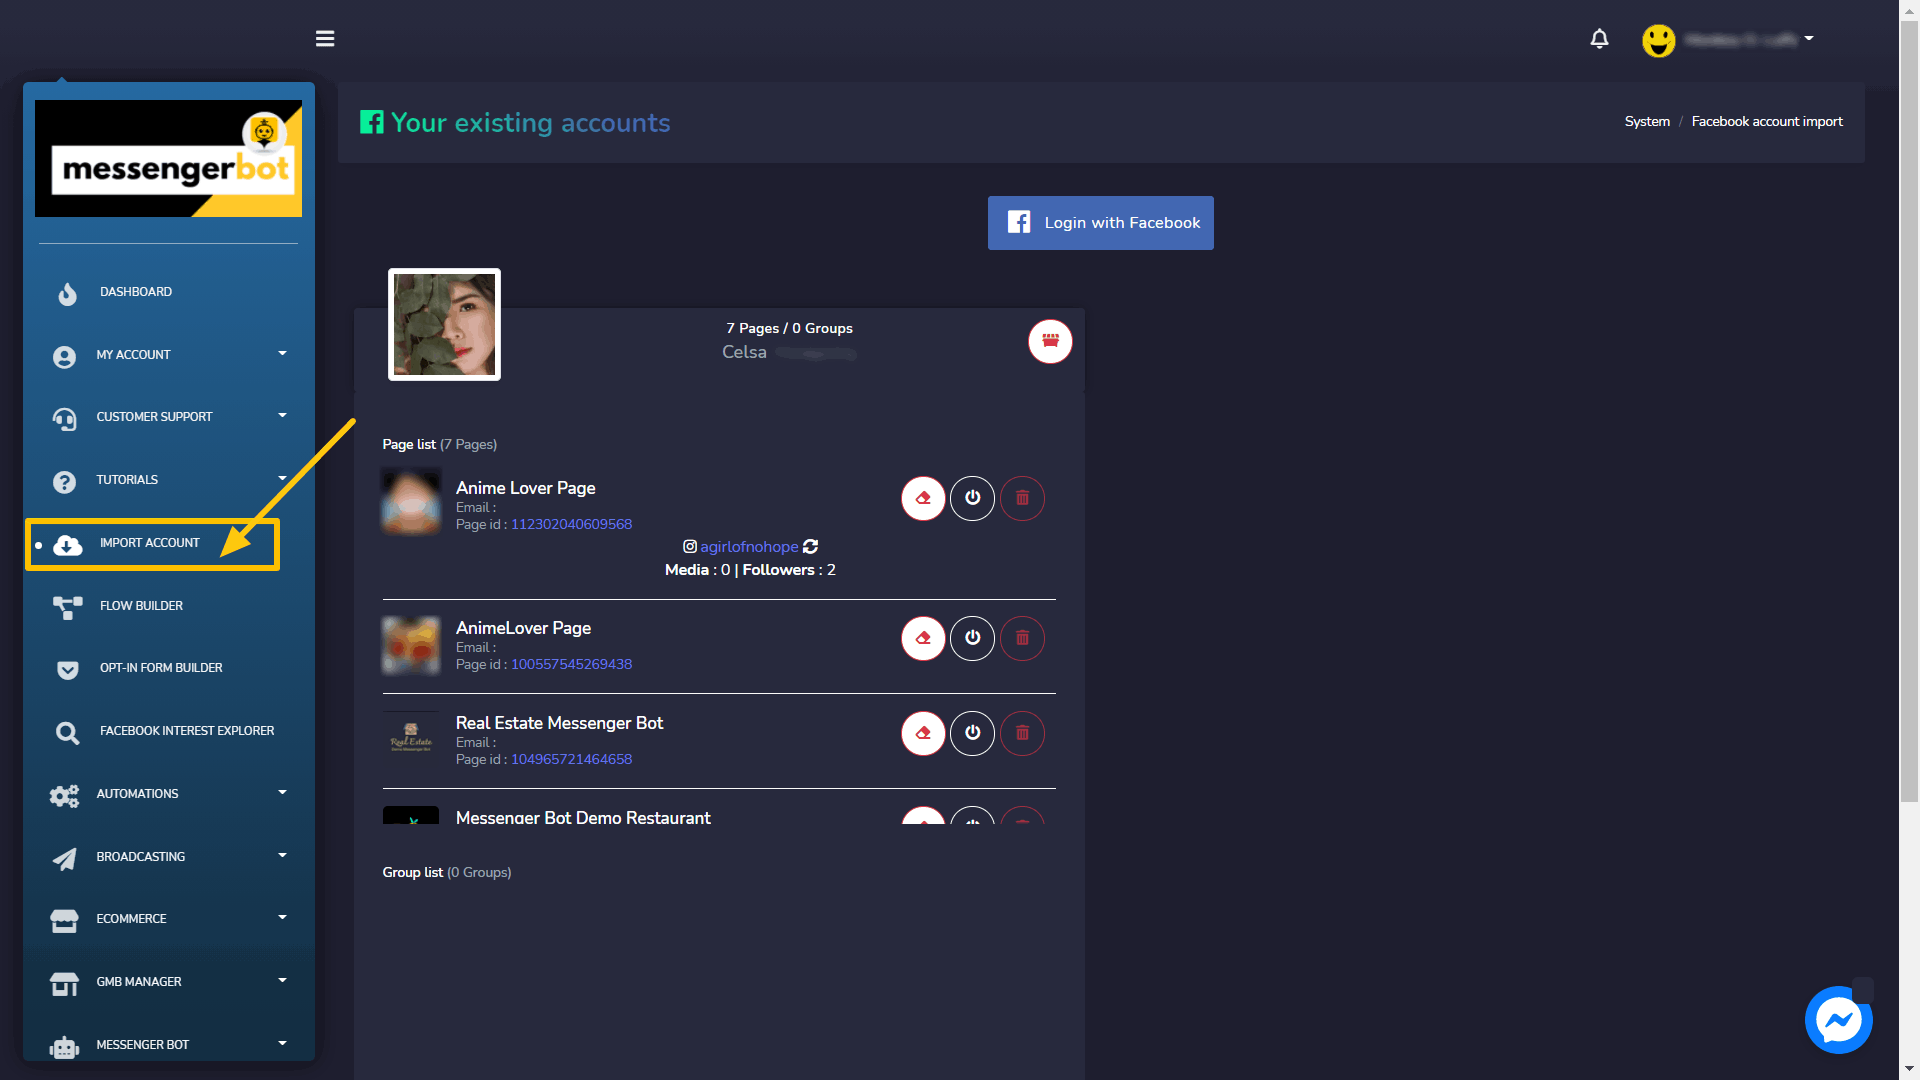
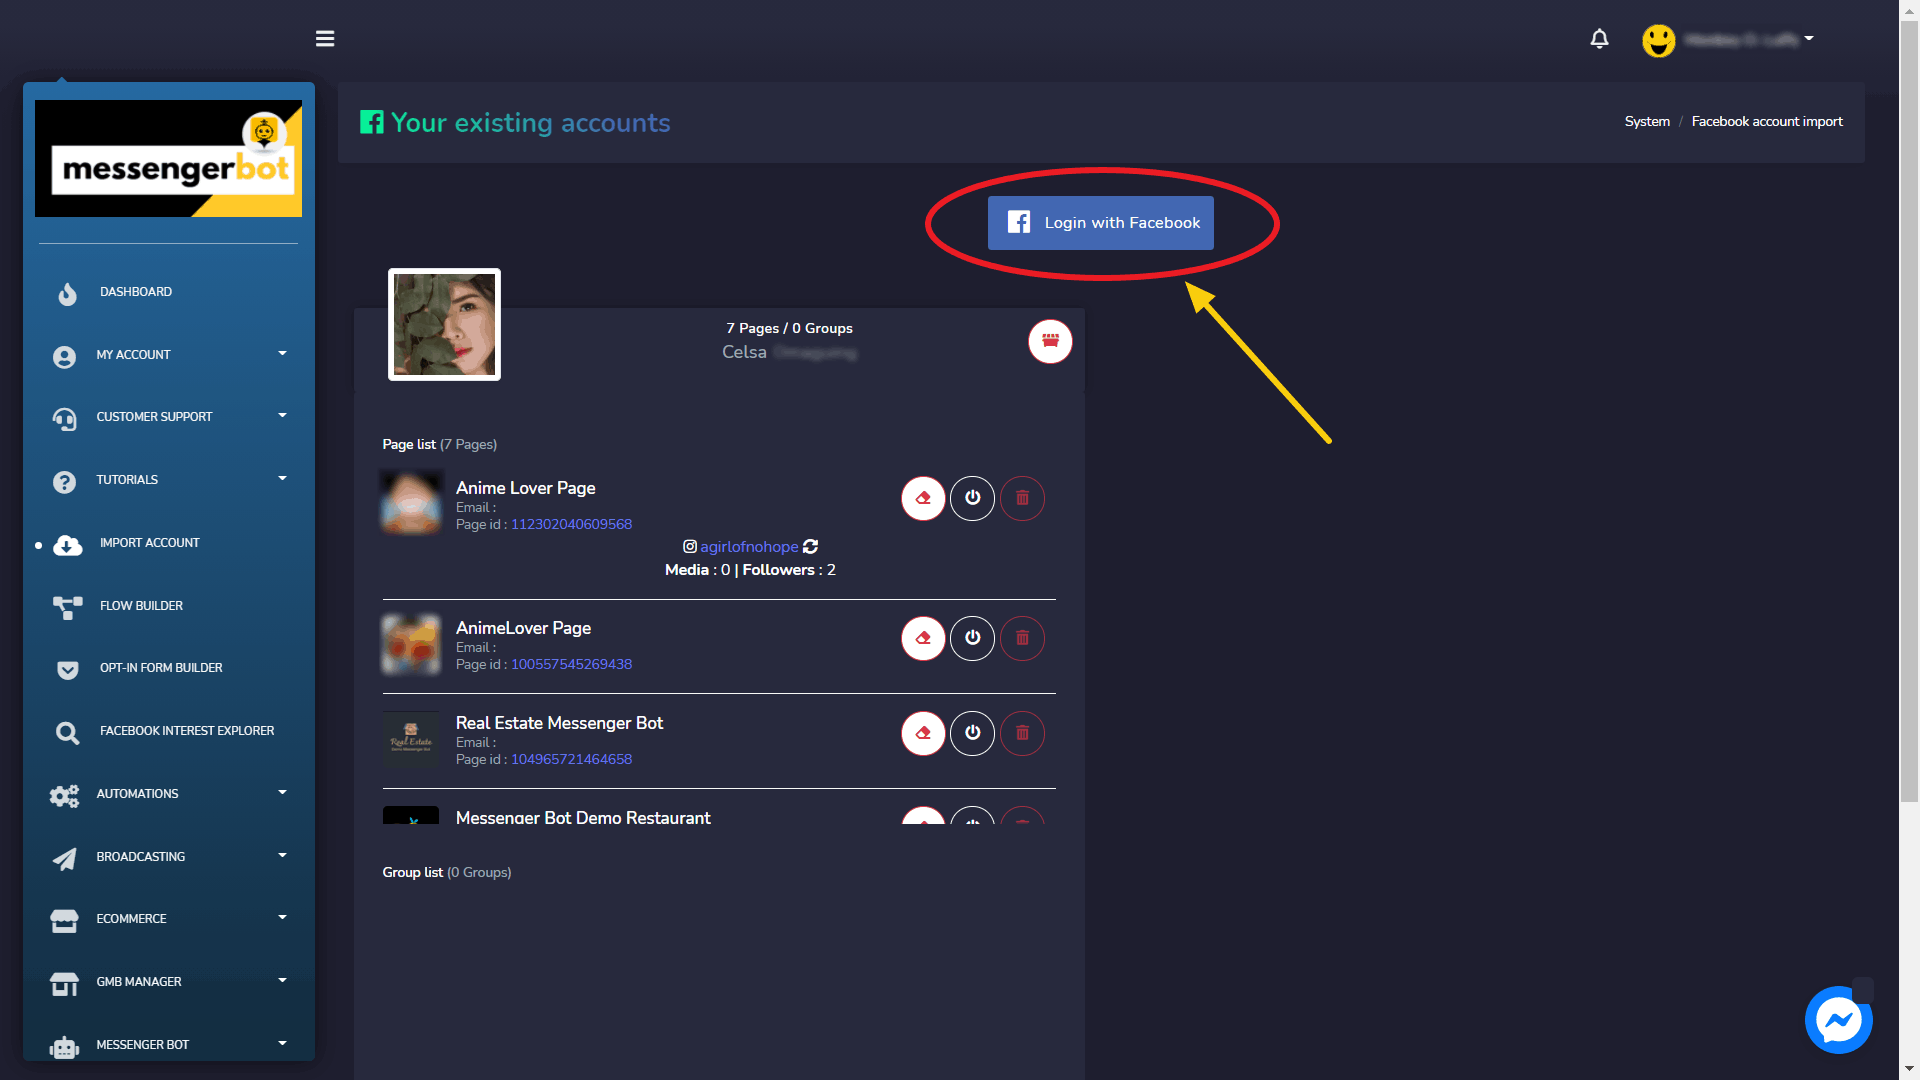
Upang gumana ang aplikasyon ng Messenger Bot, kailangan mong i-import ang iyong account dito. Maaari mong i-import ang iyong Facebook account sa pamamagitan ng pagpili ng opsyon na I-import ang Account mula sa gilid na navigation bar.
- Pumili ng I-import ang Account opsyon mula sa navigation sidebar. Isang screen na naglalaman ng Mag-login gamit ang Facebook ay lilitaw.
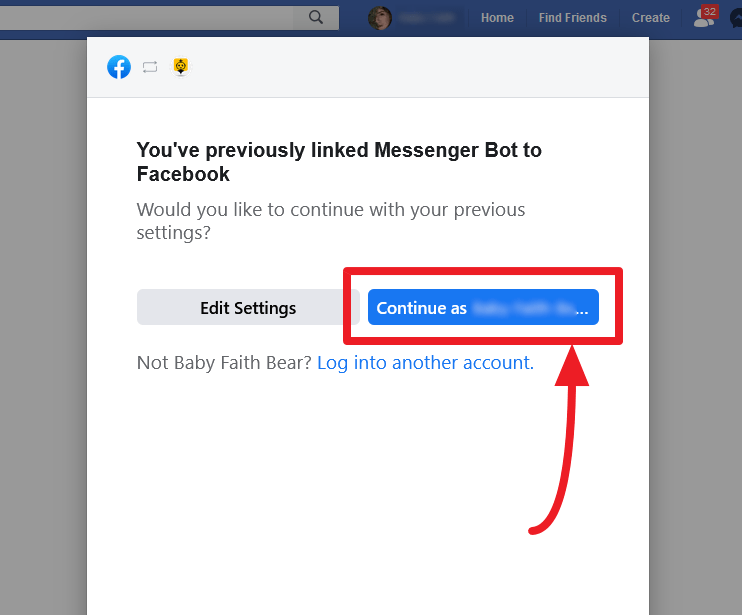
- Pumili Mag-login gamit ang Facebook.
- Magpatuloy gamit ang iyong Facebook user profile.
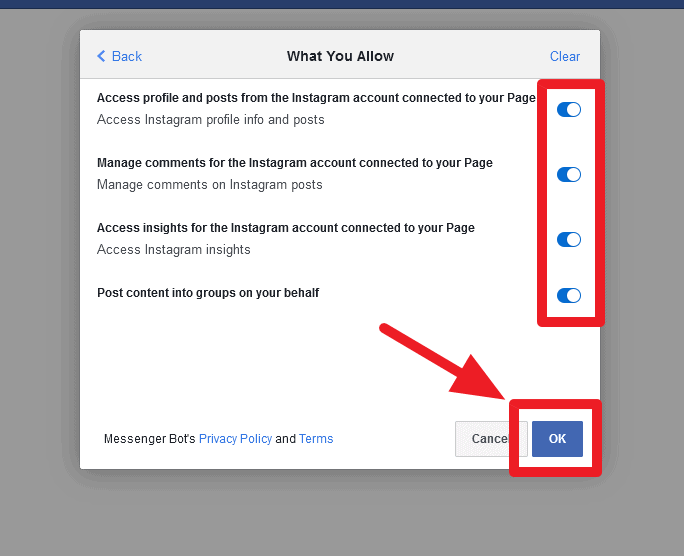
Pahintulutan ang lahat ng bagay na kailangan mo at pagkatapos ay i-click ang “OK”.
| Tandaan: | |
|
|
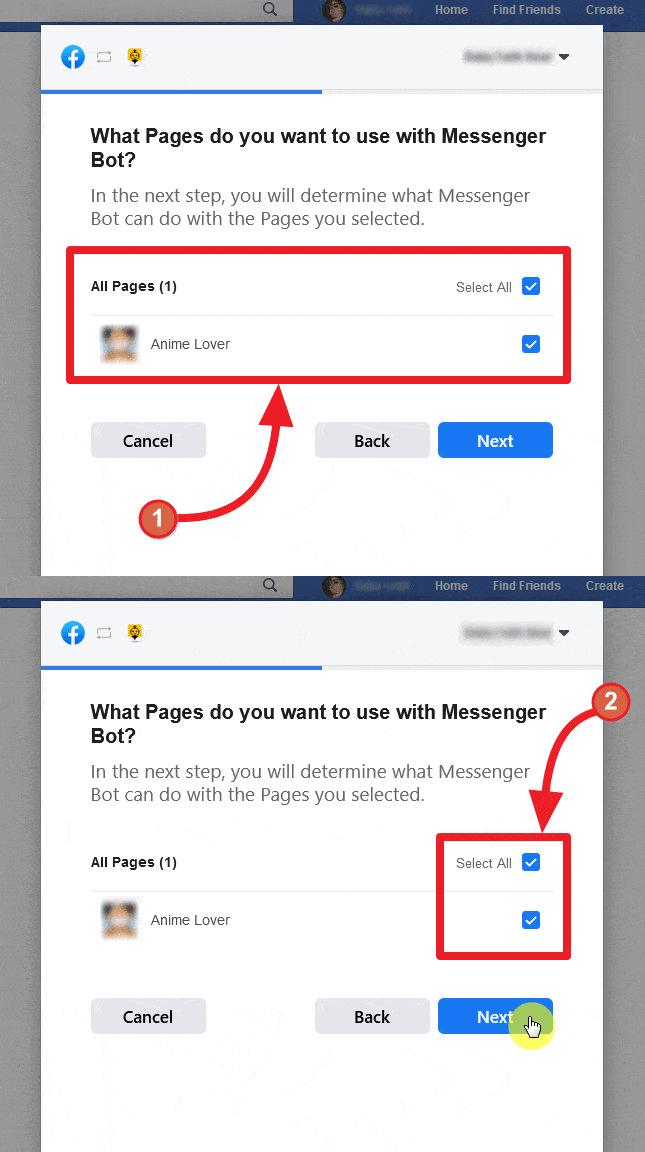
- Kapag naka-login na, lilitaw ang isang listahan ng mga pahina na nauugnay sa iyong na-import na Facebook account. Piliin ang mga pahina na nais mong i-import sa pamamagitan ng pag-click sa mga parisukat na checkbox sa tabi ng mga pangalan ng mga available na pahina. Piliin ang Susunod.
- I-on ang slider button laban sa mga opsyon na nais mong pahintulutan ang Messenger Bot Application na magsagawa ng mga aksyon. Kasama sa mga opsyon ang pagtanggap ng iyong email address, pamahalaan ang iyong mga pahina, at iba pang mga pahintulot na may kaugnayan sa pamamahala.
| Tandaan: | |
|
|
- Kapag naibigay na ang lahat ng pahintulot sa aplikasyon, piliin ang Tapos na
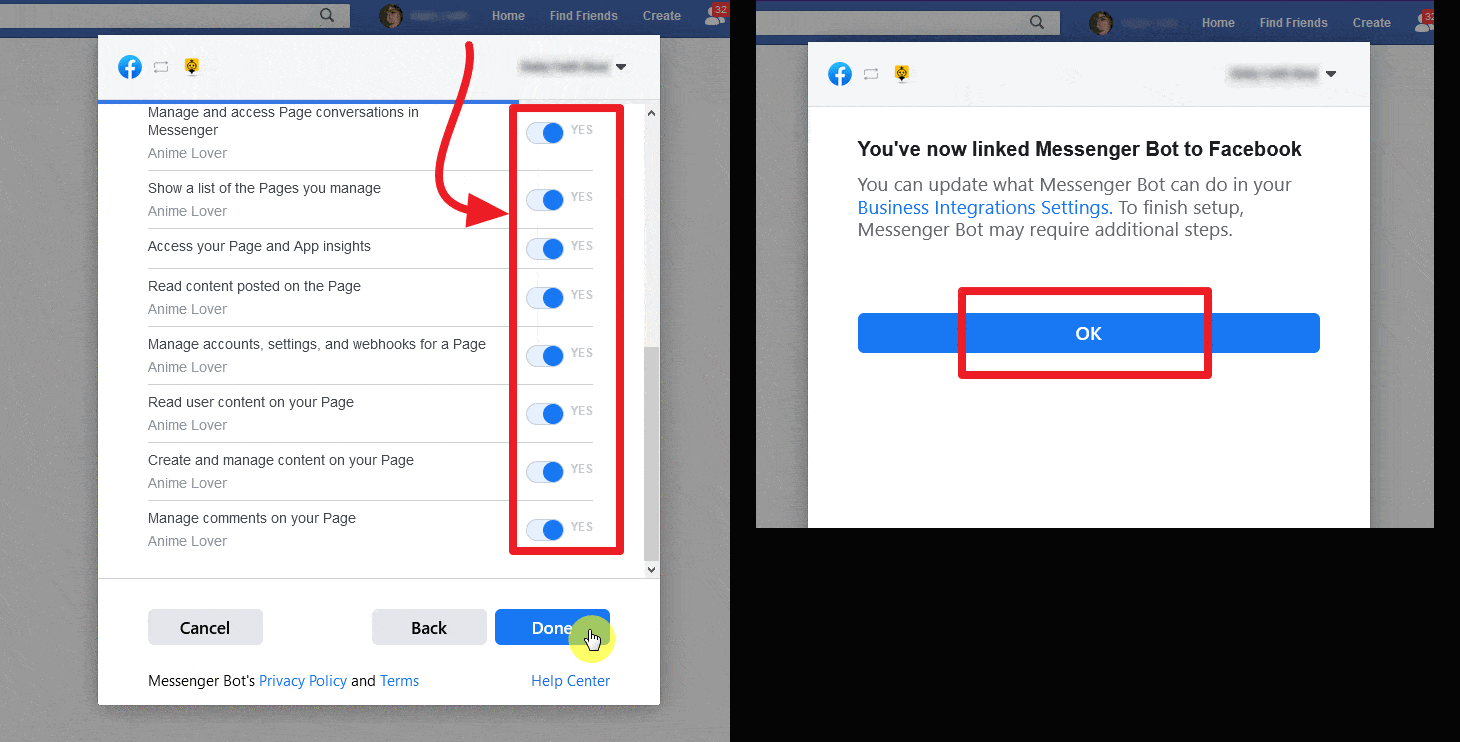
Ang iyong umiiral na Facebook account ay mai-import sa Messenger Bot kasama ang iba't ibang karapatan ng accessibility at integrasyon.
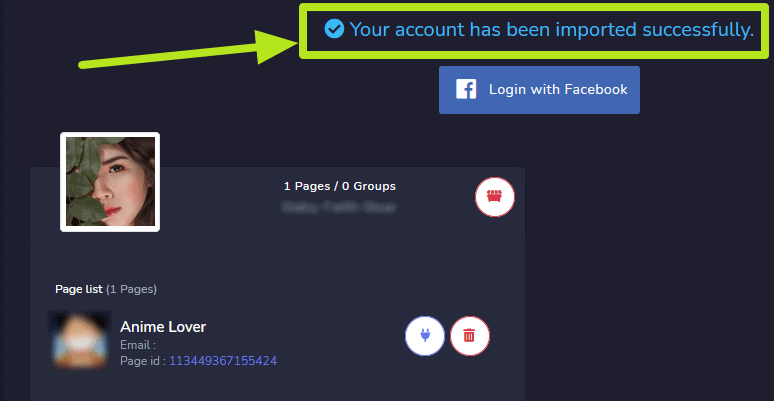
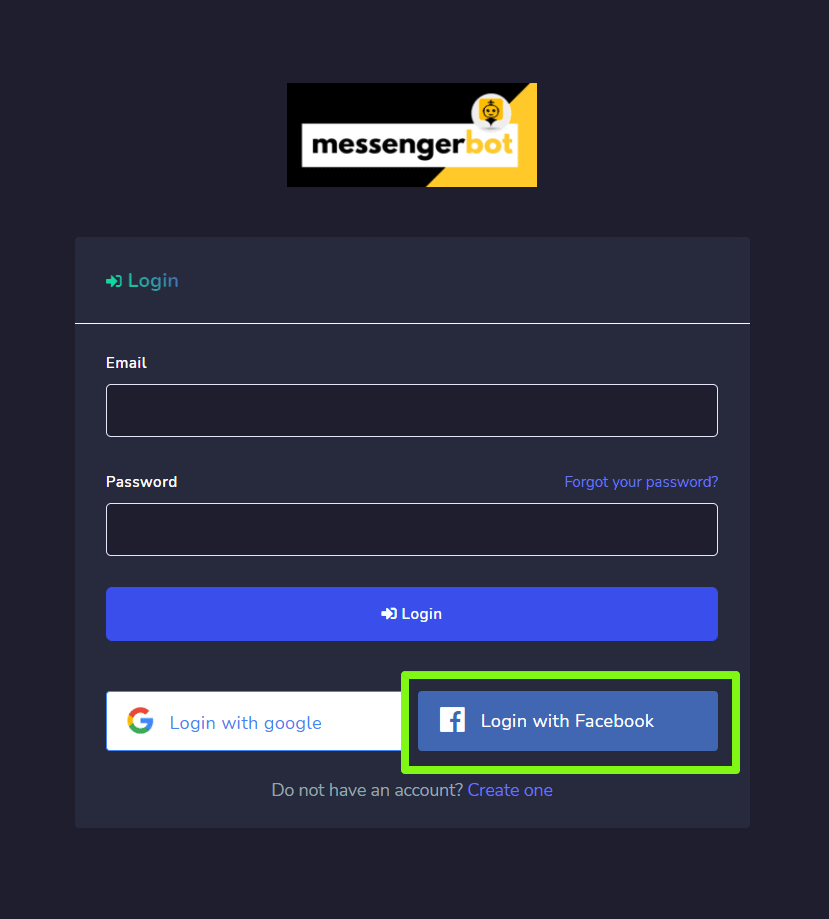
Mag-login gamit ang Facebook
Tulad ng nabanggit sa Pag-access sa Messenger Bot na seksyon, isang paraan upang ma-access ang aplikasyon ng Messenger Bot ay ang mag-login gamit ang iyong Facebook account.
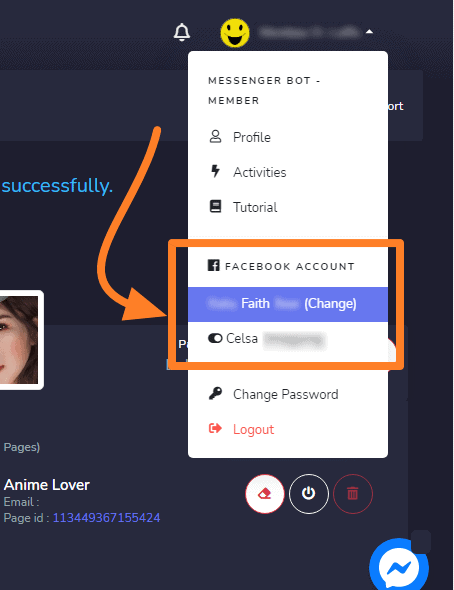
Palitan ang mga account
Kapag naka-log in na gamit ang Facebook, maaari mo ring pamahalaan ang maraming account. Piliin ang iyong account profile mula sa kanang itaas ng screen. Isang dropdown menu ang lilitaw na naglalaman ng maraming account na naka-log in na. Maaari mong piliin ang alinman sa iyong mga account batay sa iyong mga kinakailangan at pamahalaan ang mga setting ng bot.
I-enable ang Messenger Bot
Kapag na-import na ang account, kailangan mong i-enable ang Messenger Bot application.
- Pumili ng
 icon sa tabi ng pangalan ng pahina.
 - Isang dialogue box ang lilitaw, pagkatapos ay piliin ang OK upang magpatuloy.
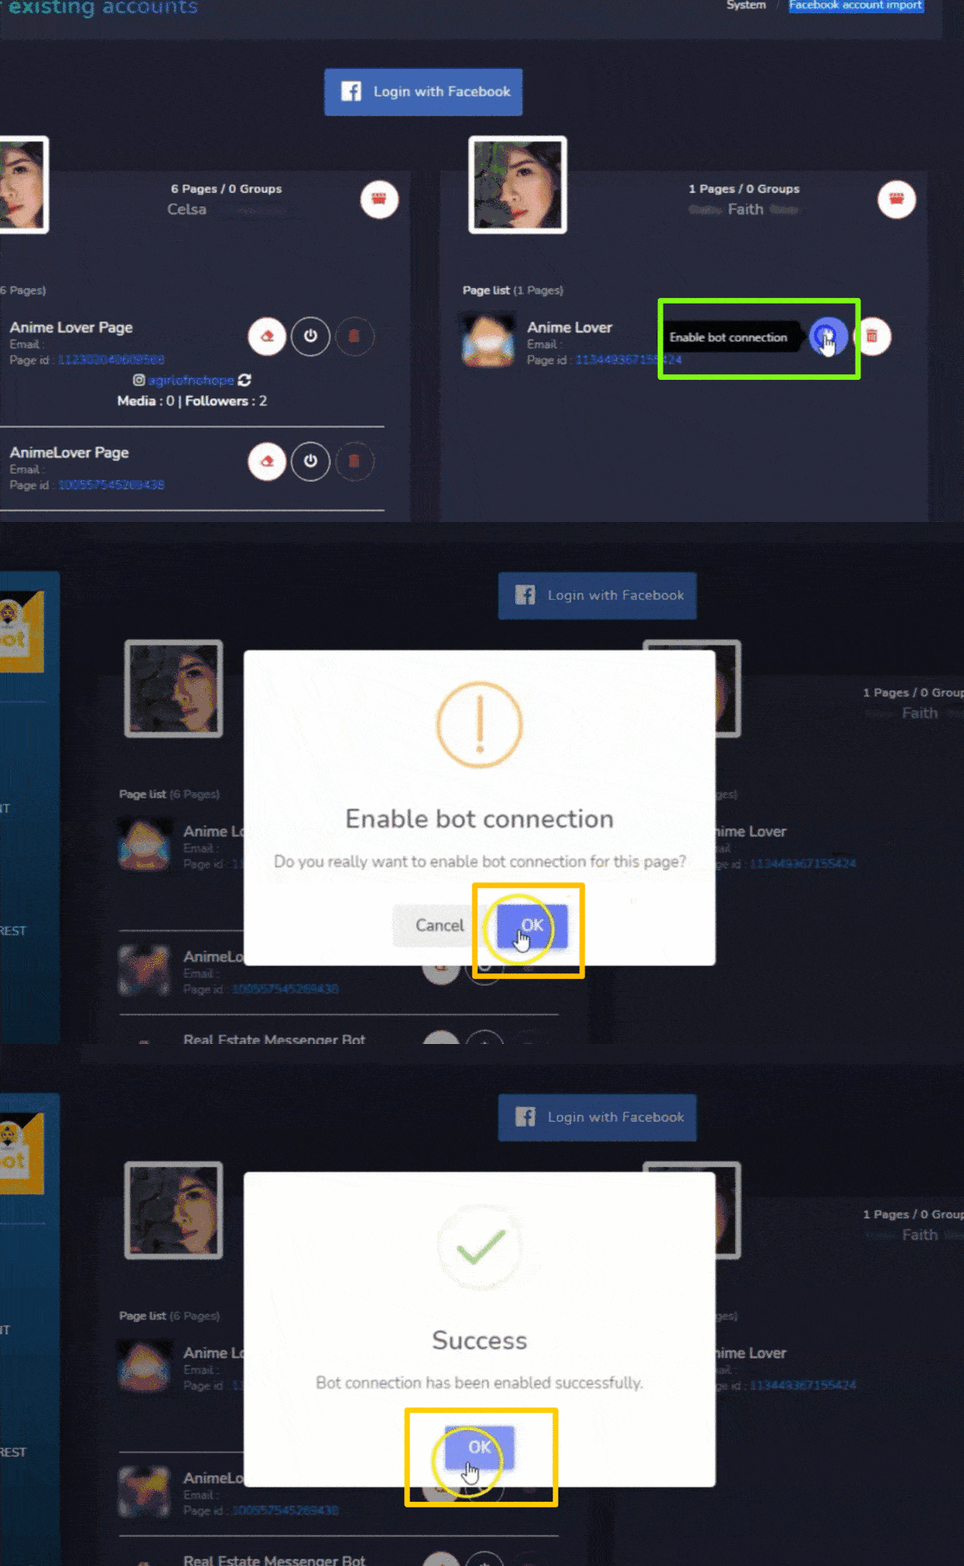
Ang koneksyon ng bot ay ngayon magiging enabled.
I-disable ang koneksyon ng bot
Upang i-disable ang koneksyon ng bot, kailangan mong piliin ang ![]() icon sa tabi ng pangalan ng iyong Facebook page.
icon sa tabi ng pangalan ng iyong Facebook page.
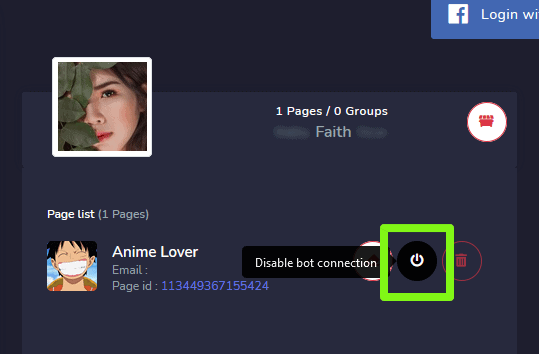
Ang koneksyon ng bot ay ngayon magiging disabled.
Tanggalin ang koneksyon ng bot
Maaari mong tanggalin ang lahat ng koneksyon ng bot at i-reset ang mga setting muli sa pamamagitan ng pagpili ng ![]() icon sa tabi ng pangalan ng iyong Facebook page.
icon sa tabi ng pangalan ng iyong Facebook page.
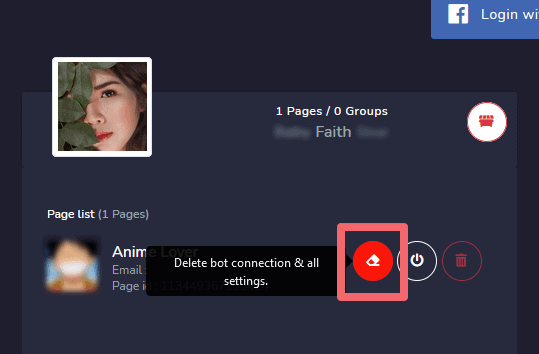
Tanggalin ang Facebook Page
Maaari mong tanggalin ang iyong pahina mula sa database sa pamamagitan ng pagpili ng ![]() icon laban sa pangalan ng pahina sa listahan ng pahina.
icon laban sa pangalan ng pahina sa listahan ng pahina.
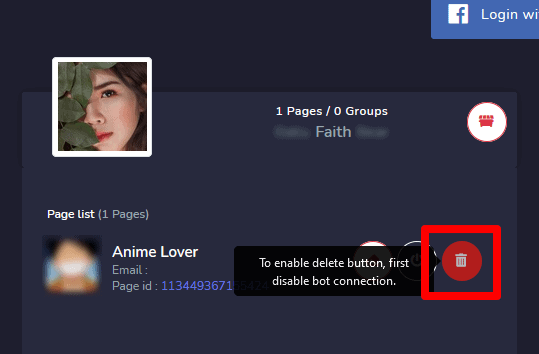
| Tandaan: | |
|
|
Tanggalin ang Facebook account
Upang tanggalin ang Facebook account, piliin ang ![]() icon, sa tabi ng username ng account. Ang pagtanggal sa user account ay aalisin din ang mga pahinang nauugnay sa account na iyon.
icon, sa tabi ng username ng account. Ang pagtanggal sa user account ay aalisin din ang mga pahinang nauugnay sa account na iyon.
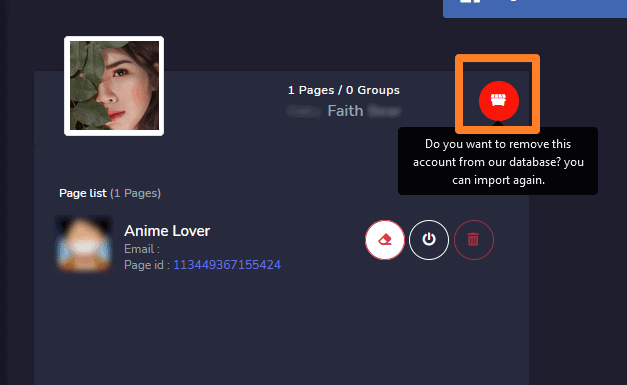
| Tandaan: | |
|
|
Integrasyon ng Messenger Bot mula sa Facebook
Upang i-integrate ang Facebook account at pamahalaan ang mga pahintulot ng Messenger Bot mula sa Facebook platform, sundin ang mga hakbang na ibinigay sa ibaba:
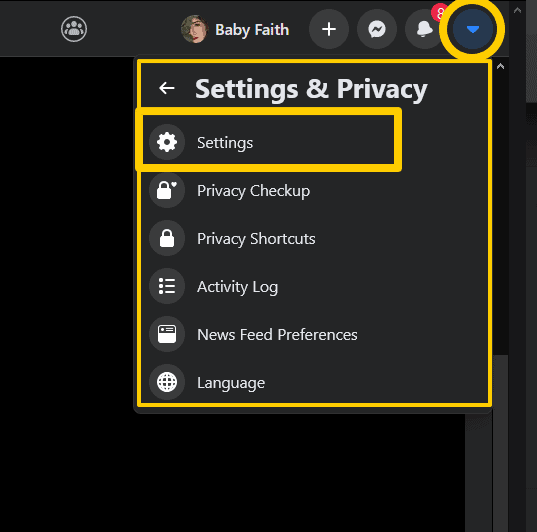
- Mag-log in sa Facebook at i-click ang
 sa kanang itaas ng Facebook.
 - I-click Mga Setting.
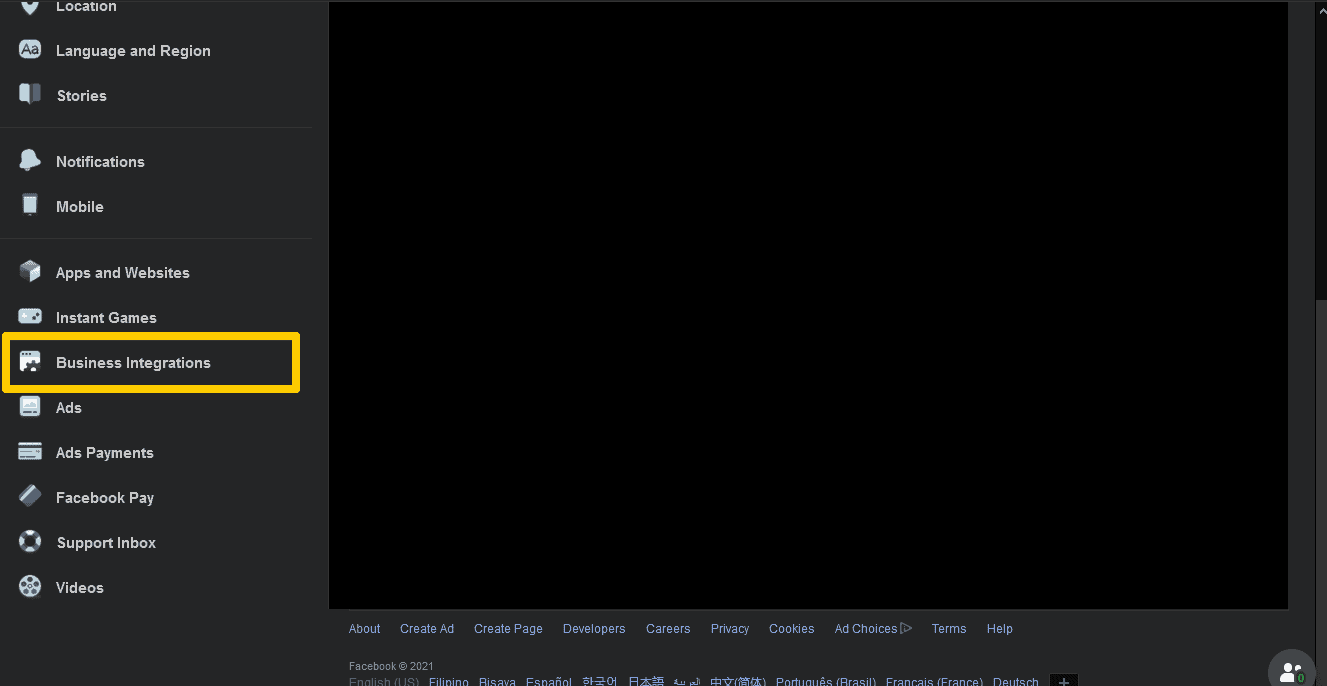
- I-click Mga Apps at Website sa kaliwa.
- I-click Mga Business Integration sa kaliwang bahagi.
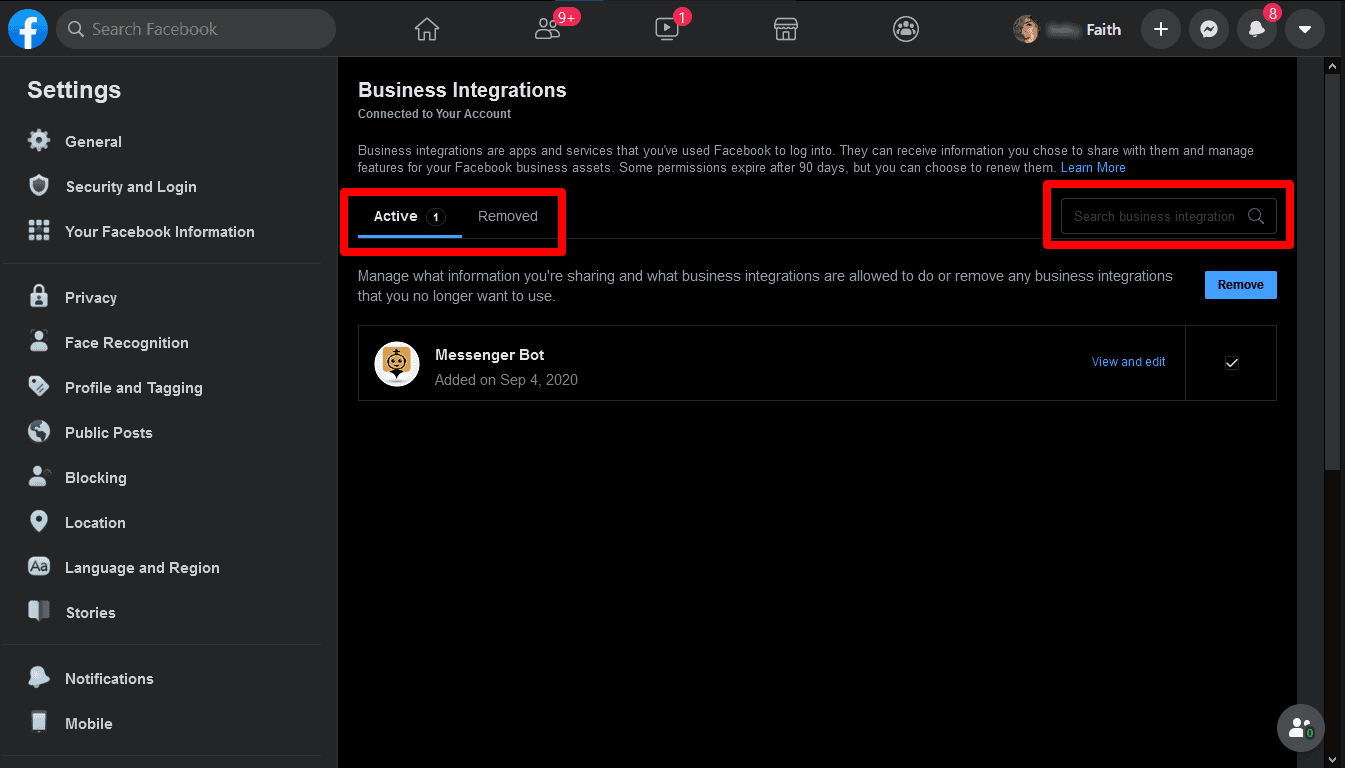
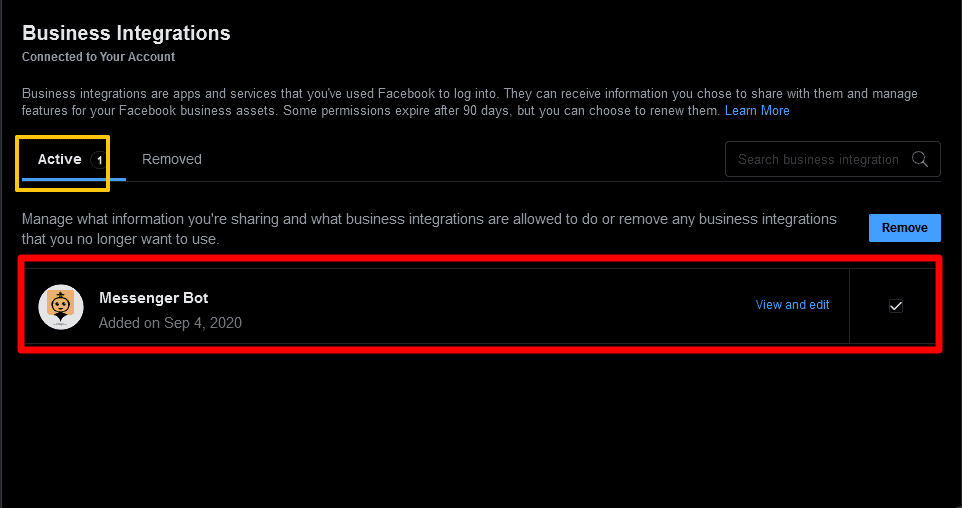
- I-filter sa pagitan ng Aktibo o Tinanggal sa itaas, o maghanap para sa business integration ng Messenger Bot gamit ang search bar sa kanan.
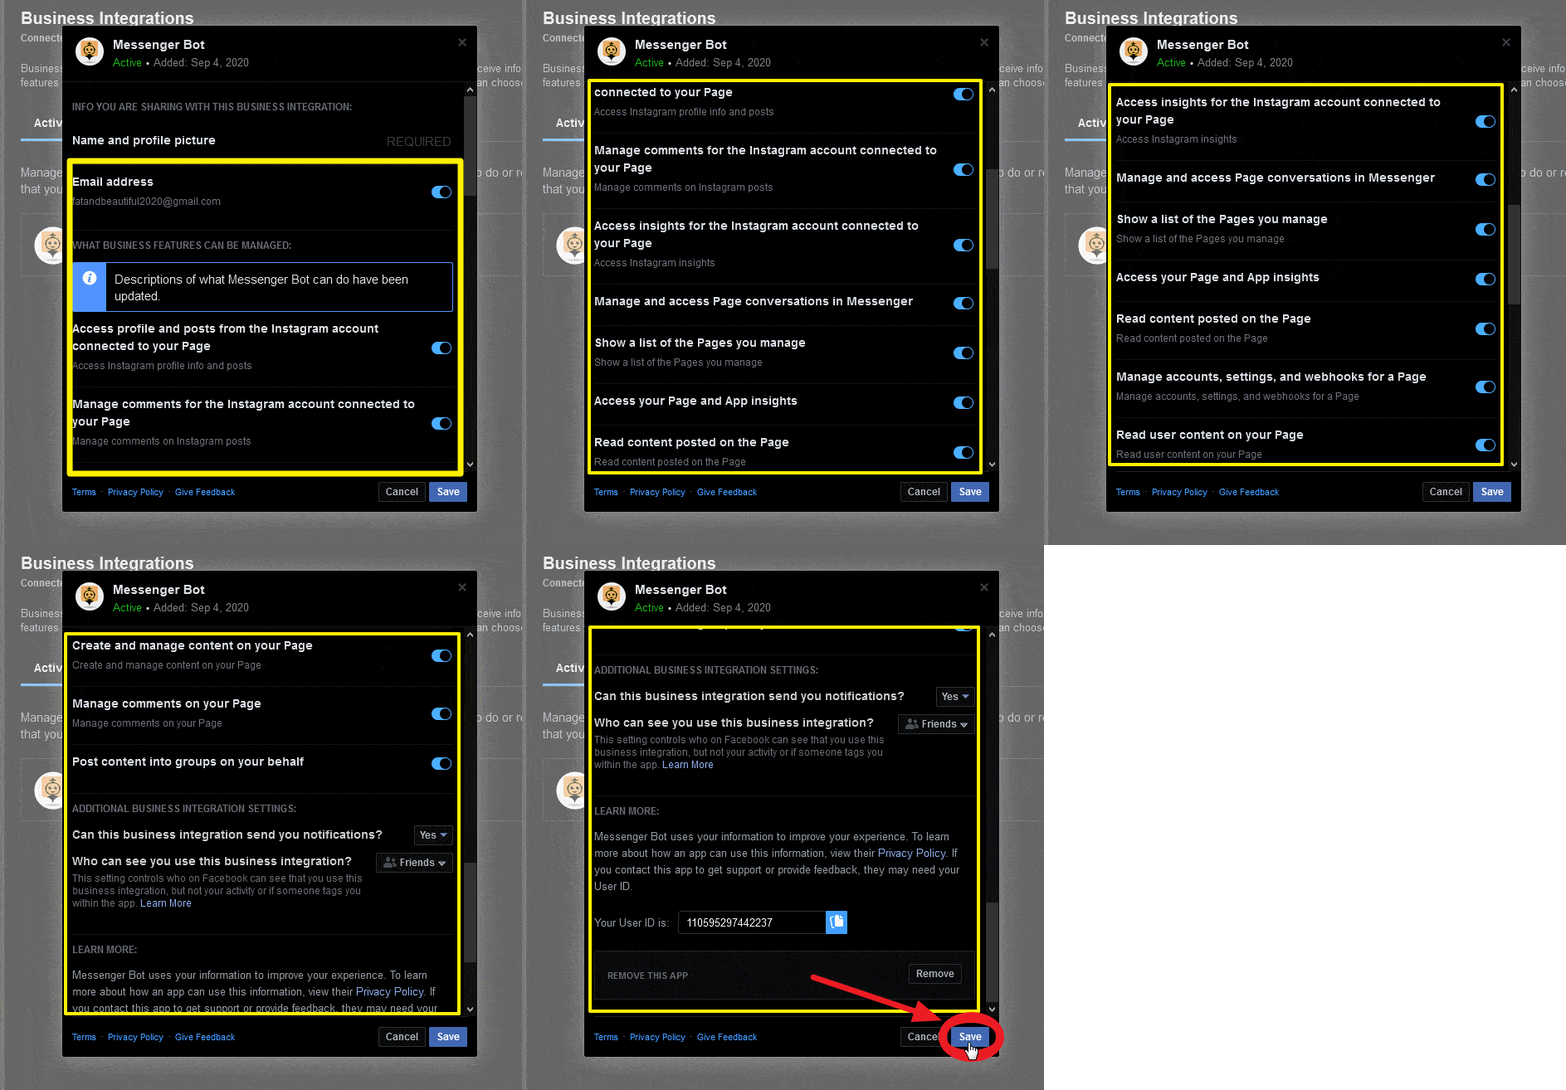
- I-click Tingnan at I-edit katabi ng integrasyon ng Messenger Bot sa negosyo upang kontrolin ang impormasyong mayroon ito.
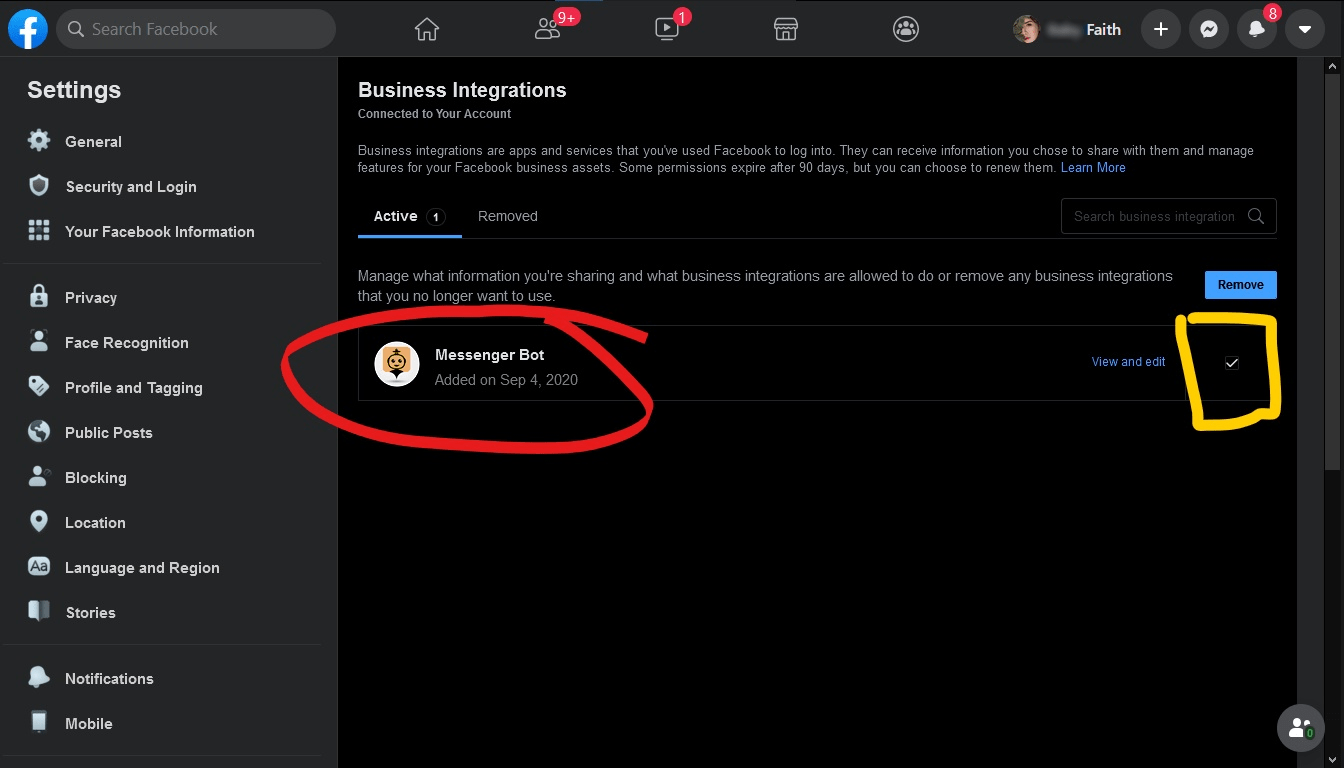
- I-adjust ang iyong mga setting sa pamamagitan ng pag-check o pag-uncheck ng mga kahon sa tabi ng iyong impormasyon o gamit ang mga dropdown menu, at pagkatapos ay i-click ang I-save.
Tanggalin ang integrasyon ng Messenger Bot
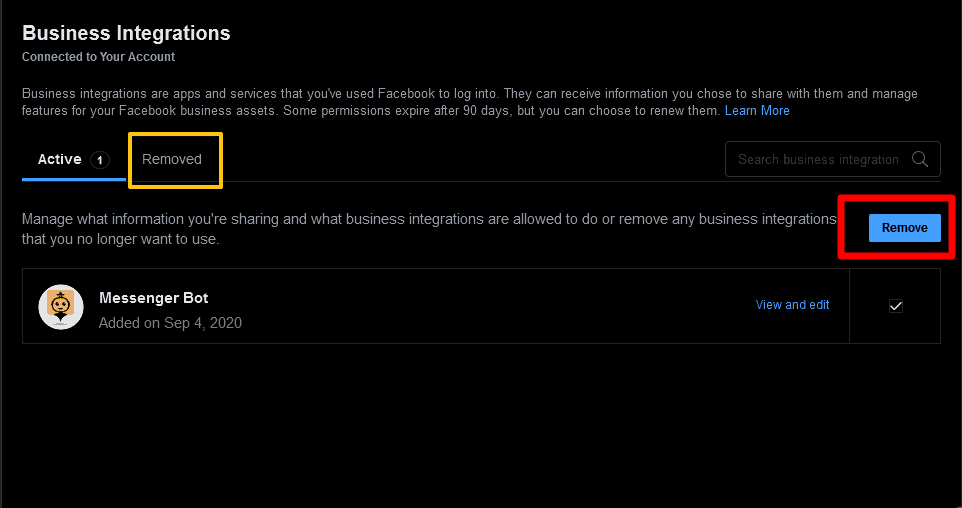
Upang alisin ang integrasyon ng Messenger Bot, piliin ang Messenger Bot at pagkatapos ay i-click ang Alisin > Alisin.
Kung ang isang integrasyon ng negosyo ay:
- Aktibo: Ikaw ay nakakonekta sa integrasyon ng Messenger Bot sa iyong account. Maaaring pamahalaan ng Messenger Bot ang iyong mga ad, Pahina, grupo, kaganapan, mensahe, o iba pang impormasyon sa negosyo.
- Tinanggal: Ikaw ay naka-disconnect sa integrasyon ng Messenger Bot mula sa iyong account. Hindi na nito maipamahala ang iyong mga ad, Pahina, grupo, kaganapan, mensahe, o iba pang impormasyon sa negosyo. Hindi na rin ito makakapag-request ng pribadong impormasyon tungkol sa iyo, ngunit maaaring mayroon itong impormasyong dati mong ibinahagi.
Now let’s start creating flow.
Create a flow
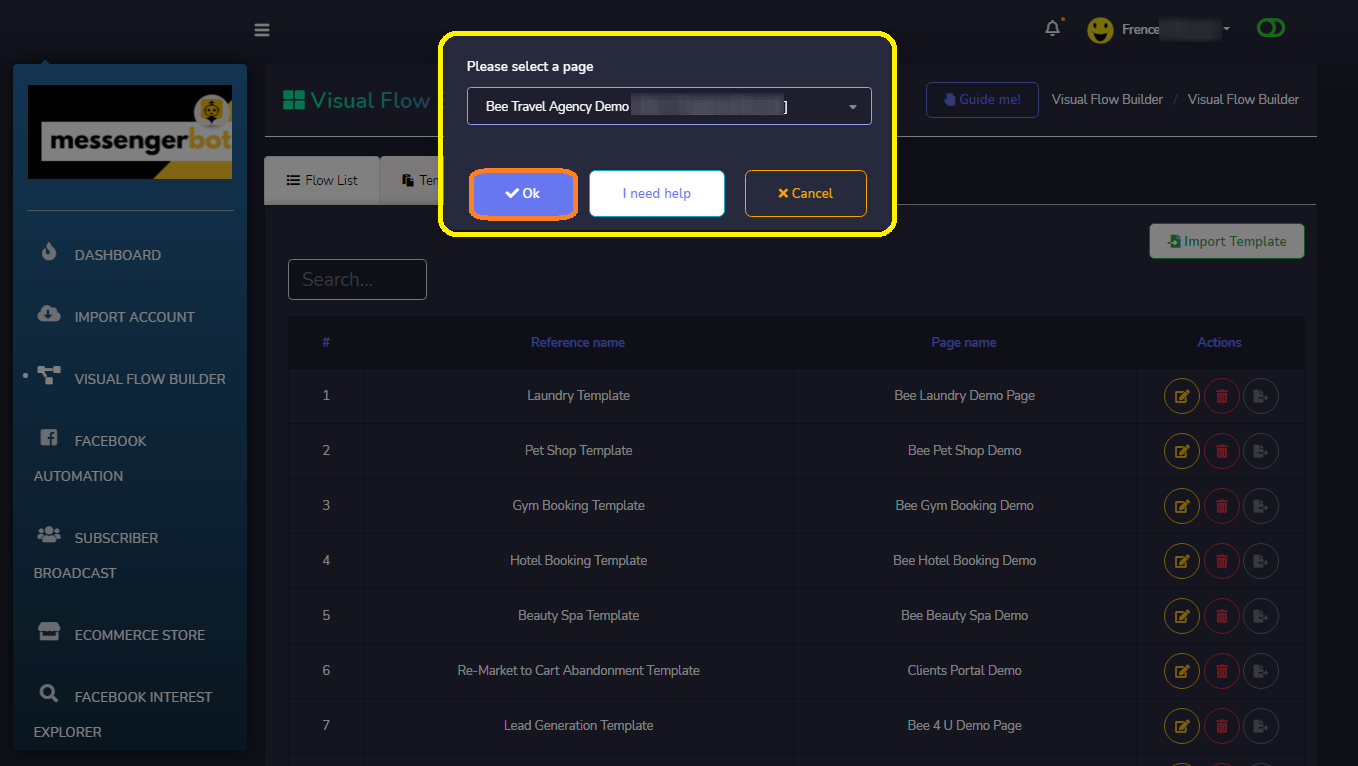
I-click ang Visual Flow Builder menu in your dashboard on your left. Click, the Create new flow button and select the Facebook Page you want to create the visual flow. Now, click on the Ok button. It will then take you to the visual flow builder interface. It also has the buttons for I need help at cancel.
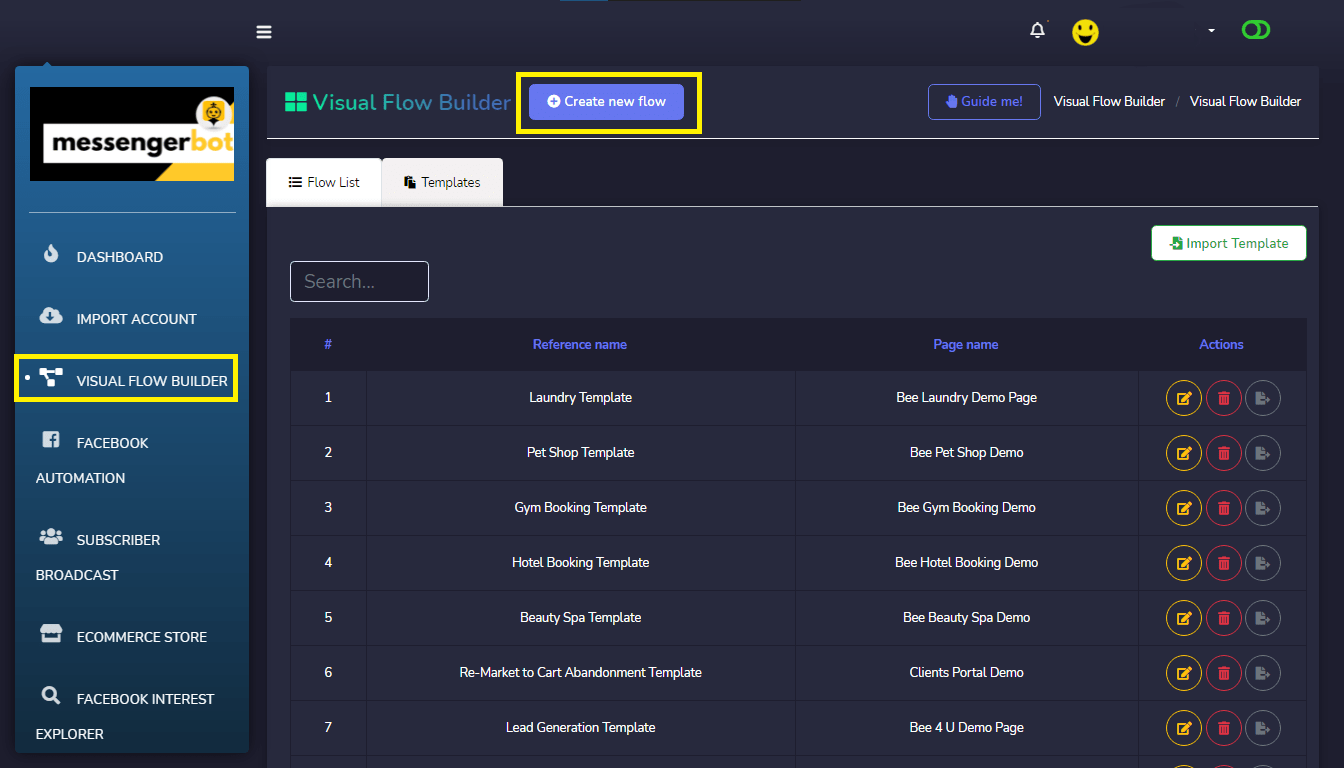
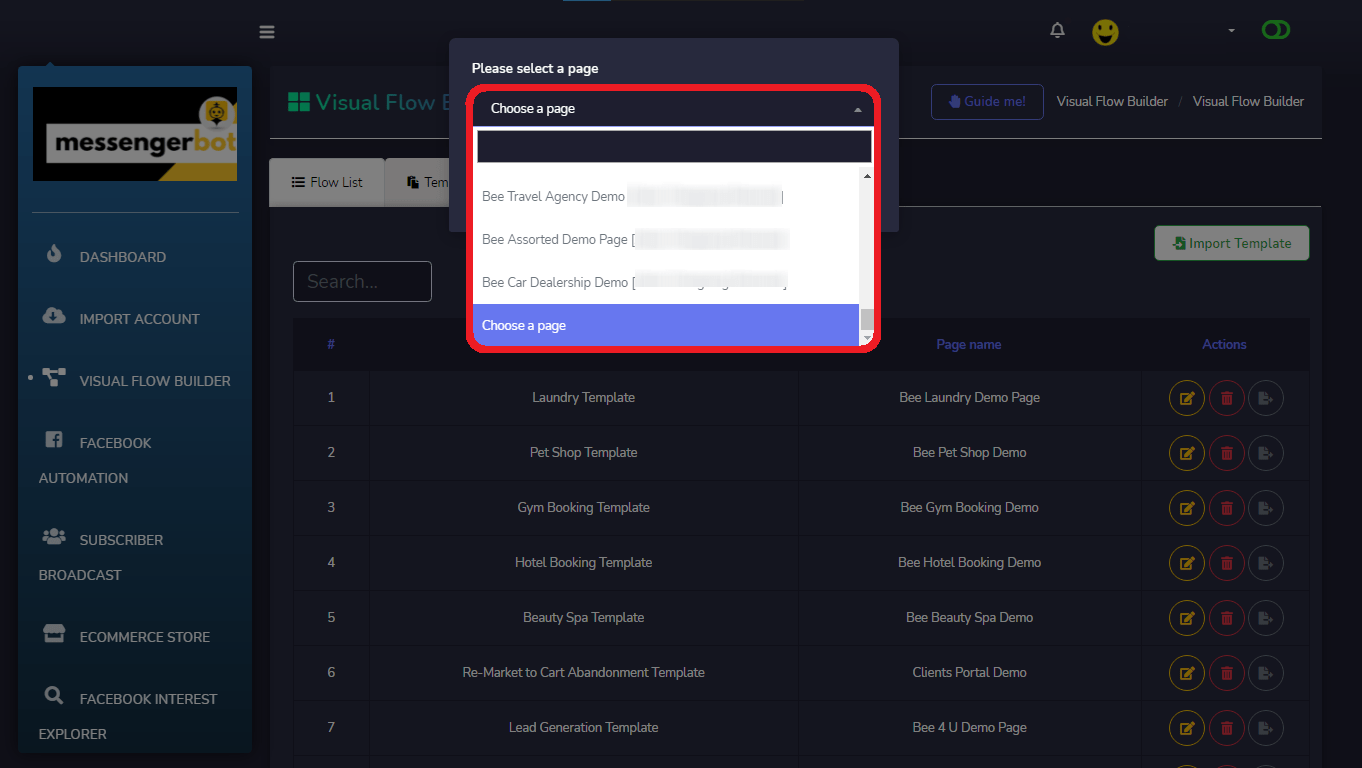
Now, click on the Ok button. It will then take you to the visual flow builder interface. It also has the buttons for I need help and cancel.
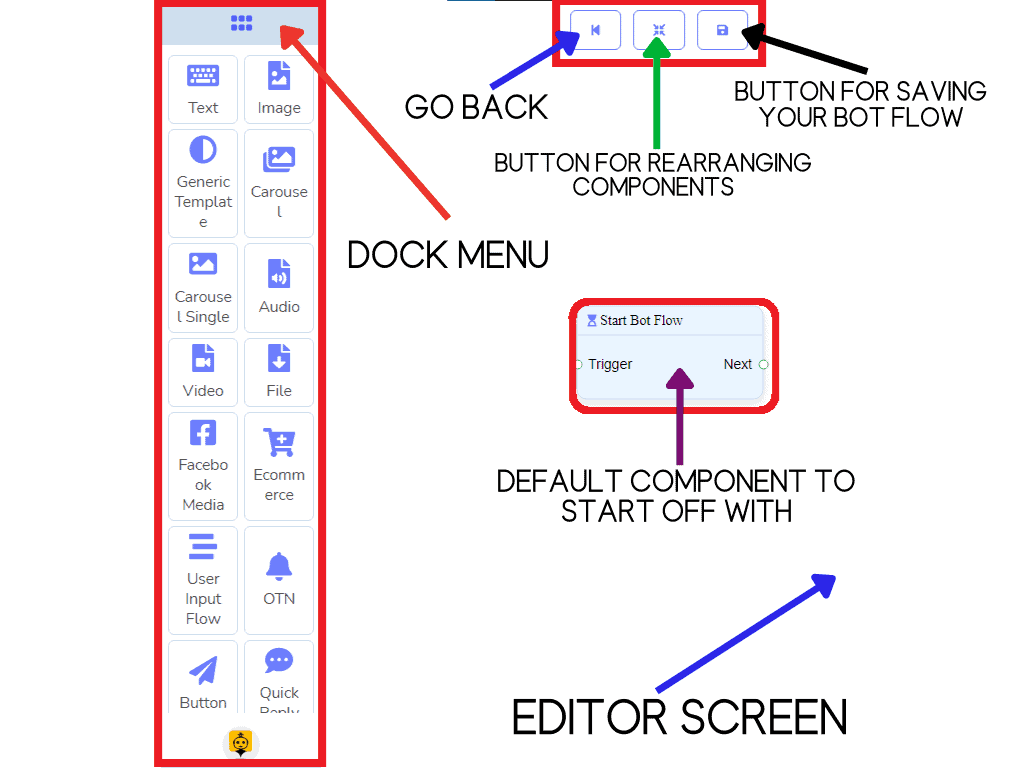
Now, you can see the dock menu, you can drag any component and drop it on the editor screen at any place you like.
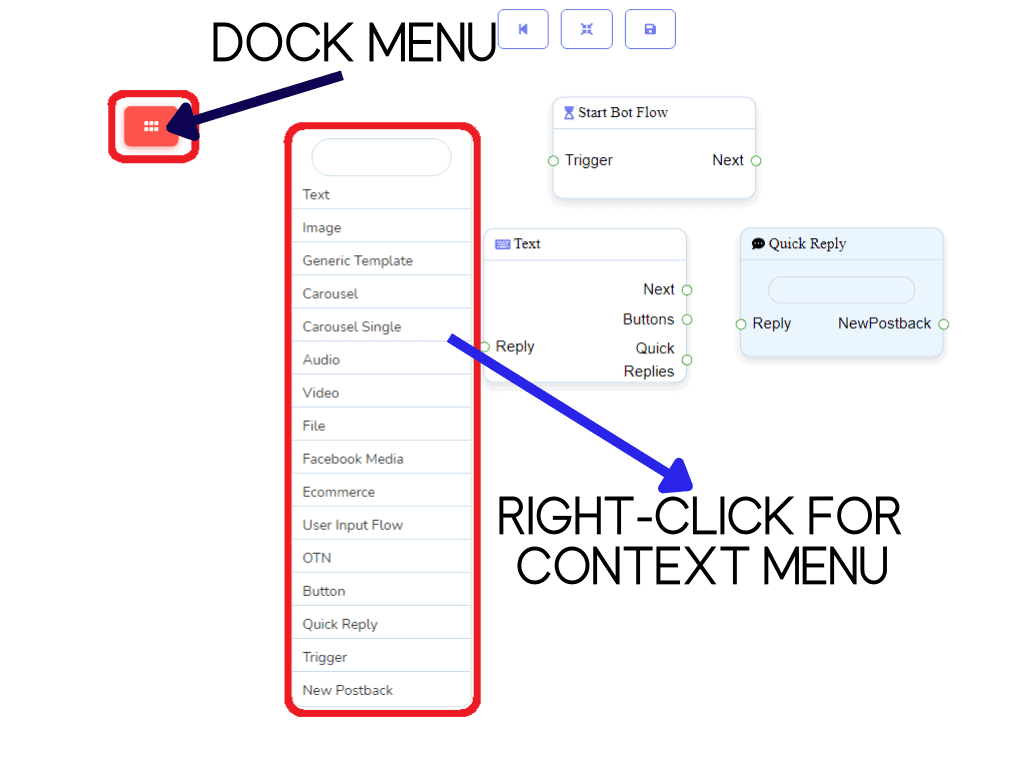
You can also minimize and maximize your Dock Menu, then right-click for your Context Menu.
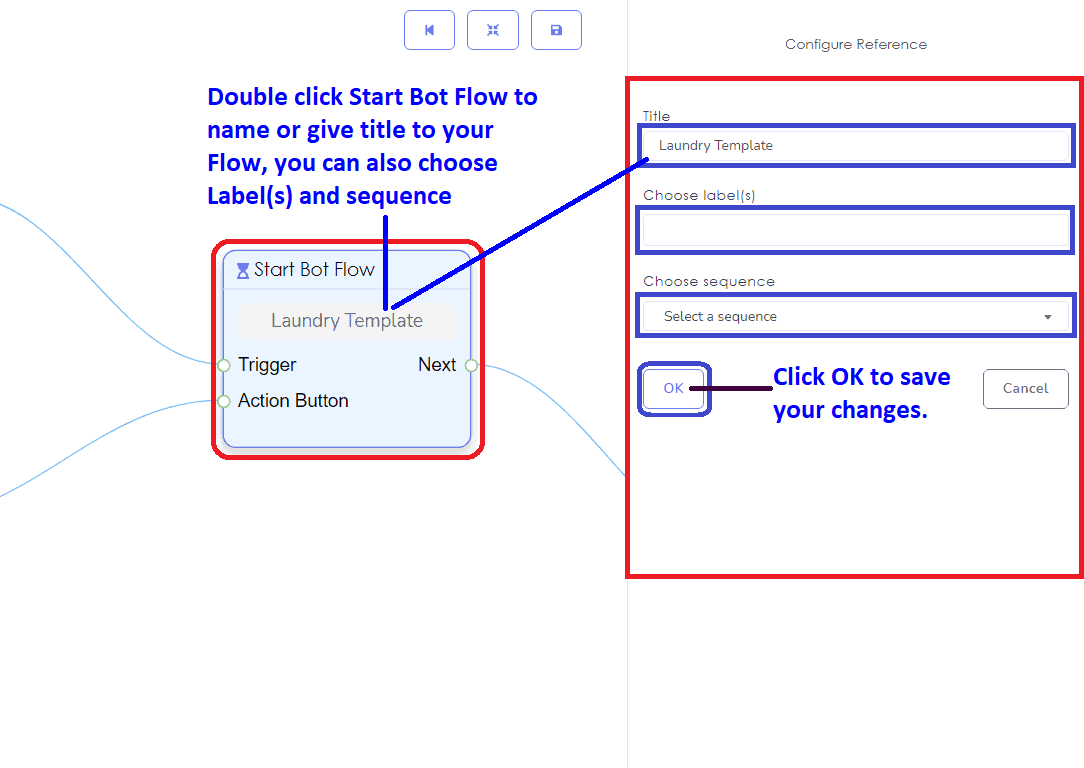
First, you need to name your Start Bot Flow. This is the name of your Visual Flow Builder.
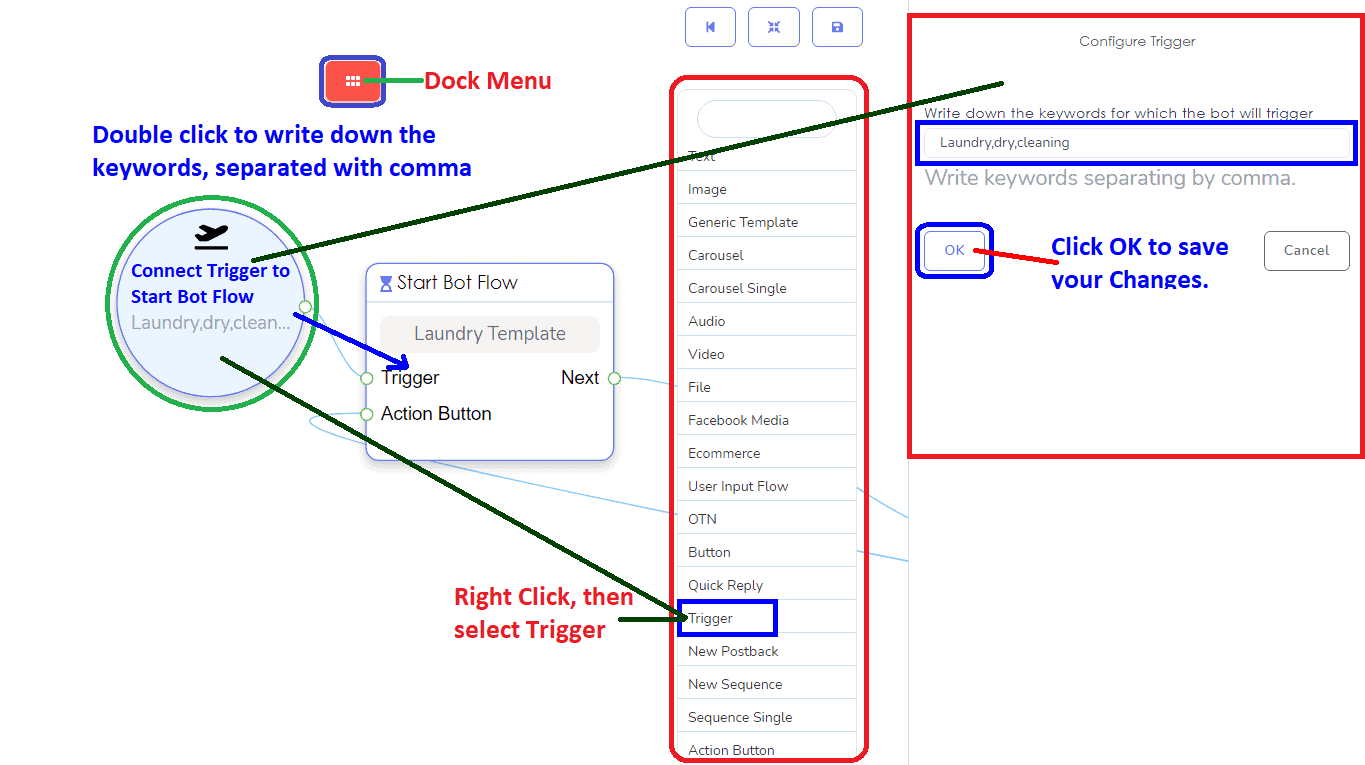
You also need to set up your Trigger Component and write down the keywords for which the bot will trigger. The trigger keyword should be at least inlined,
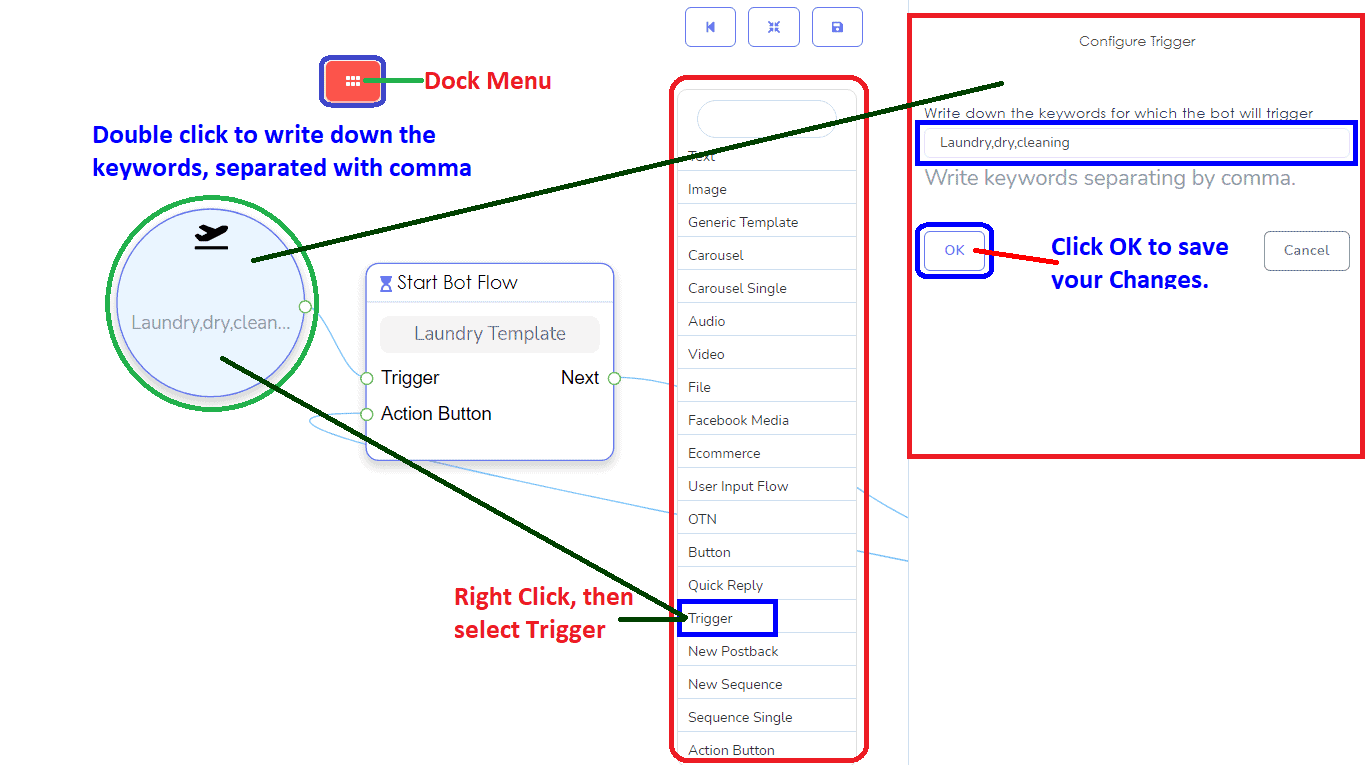
with your Facebook Page description so that it’s easy for the subscriber to message you, each keyword should be separated with a comma.
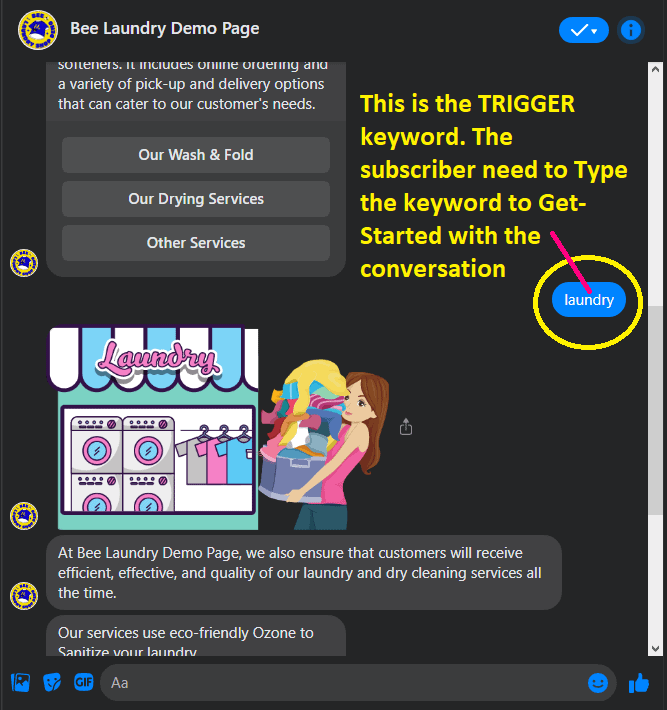
Ito ang sample flow of the TRIGGER. It also serves as your Get-Started, if you did not use Action Button or if the subscriber wants to start from the Start. Just key in the keyword to go back from the beginning.
Add the component of the Action Button for your Get Started button on your Facebook Page.
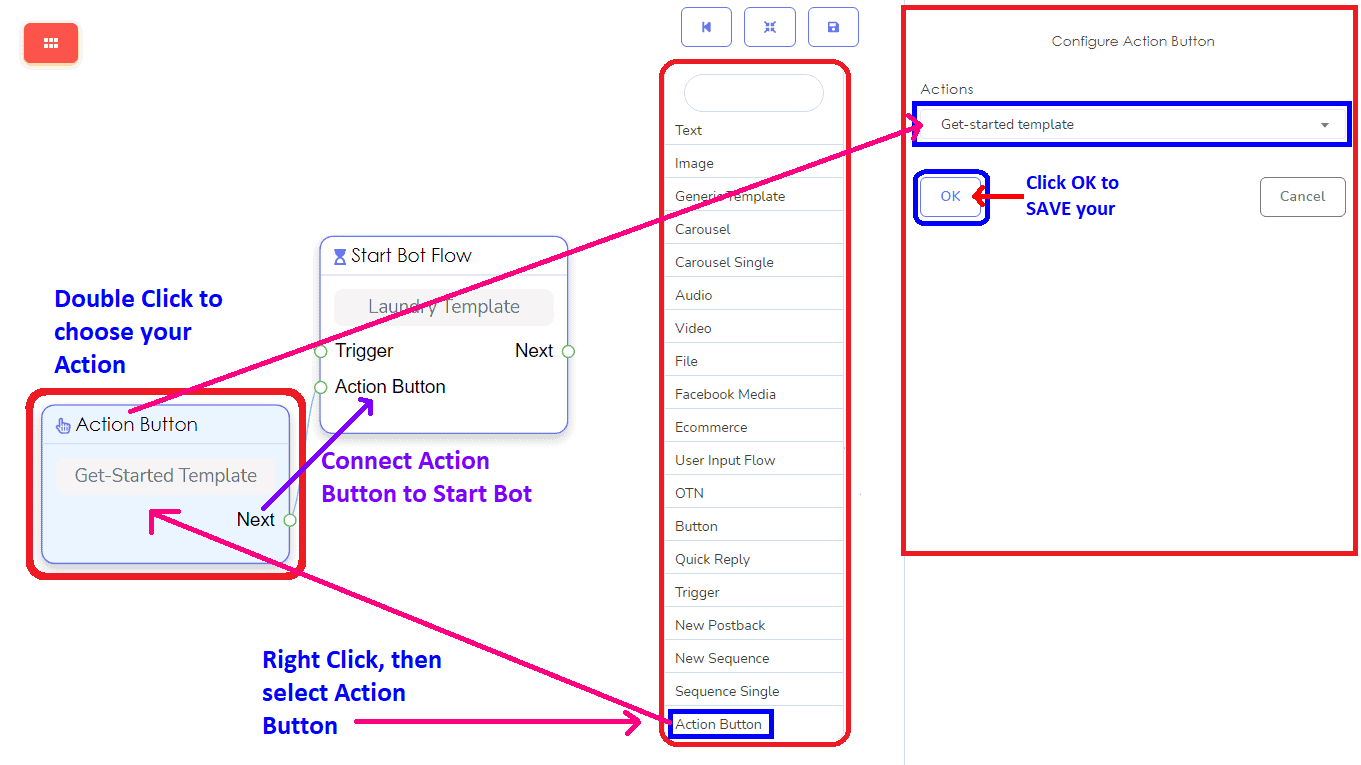
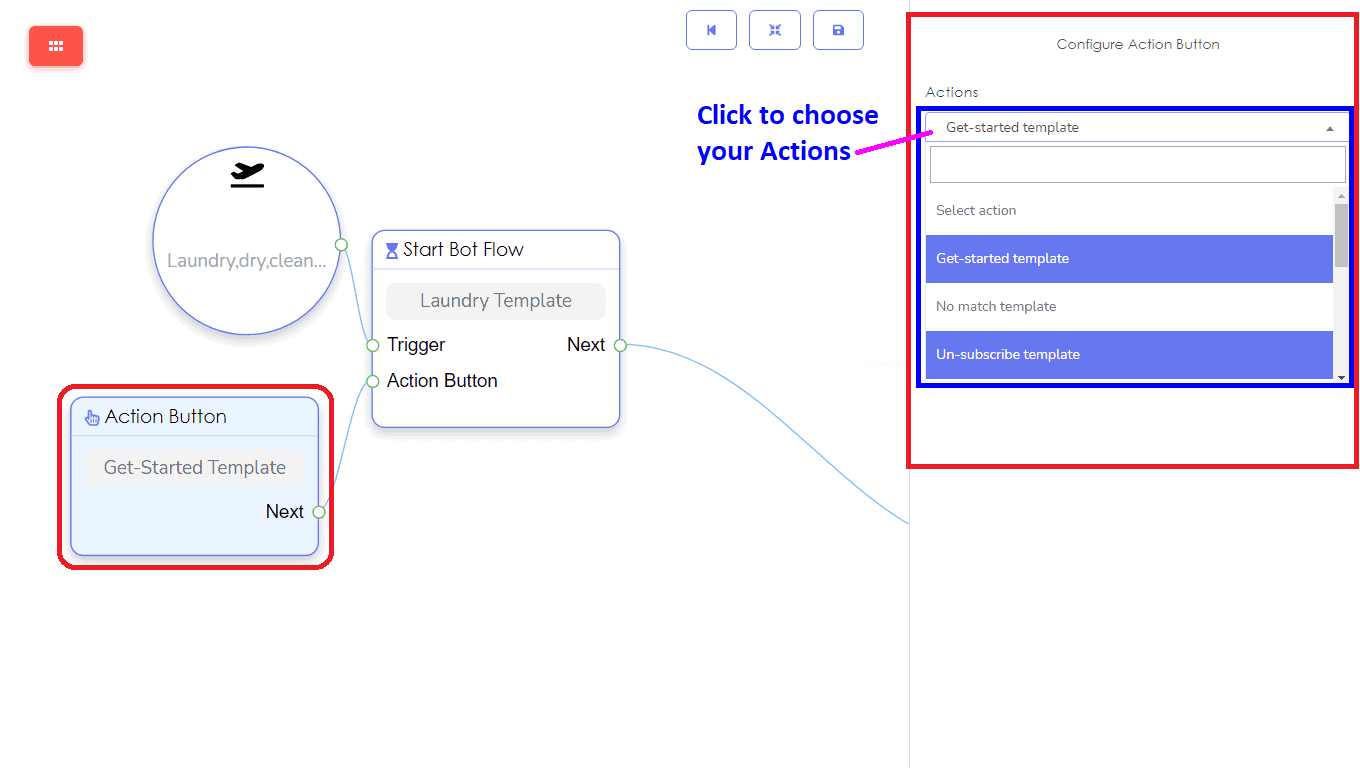
Choose your Action Template. You have many actions to choose on what actions you will perform. Such as Get Started, No Match, Un-subscribe, Re-subscribe, Email Quick Reply, Phone Quick Reply, Location Quick Reply, Birthday Quick Reply, Chat with Human and Chat with Robot template.
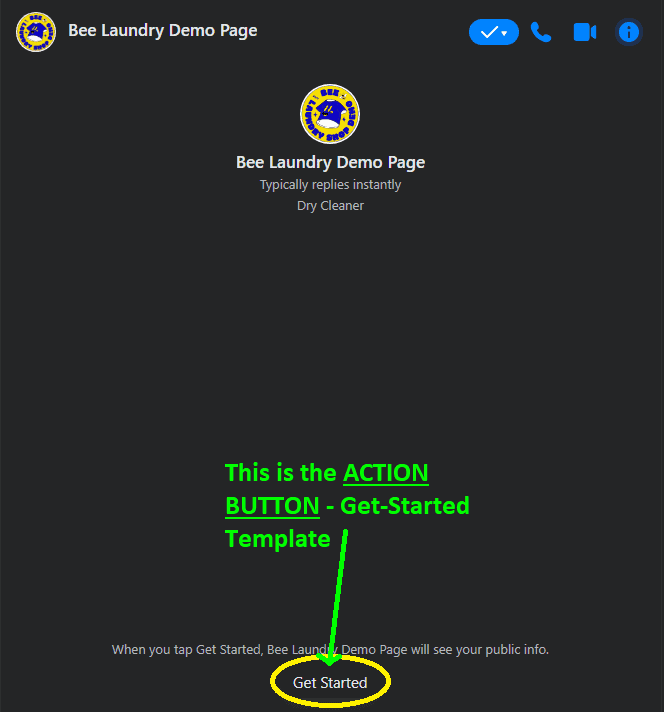
This is the actual Action Button on your Facebook Page Messenger.
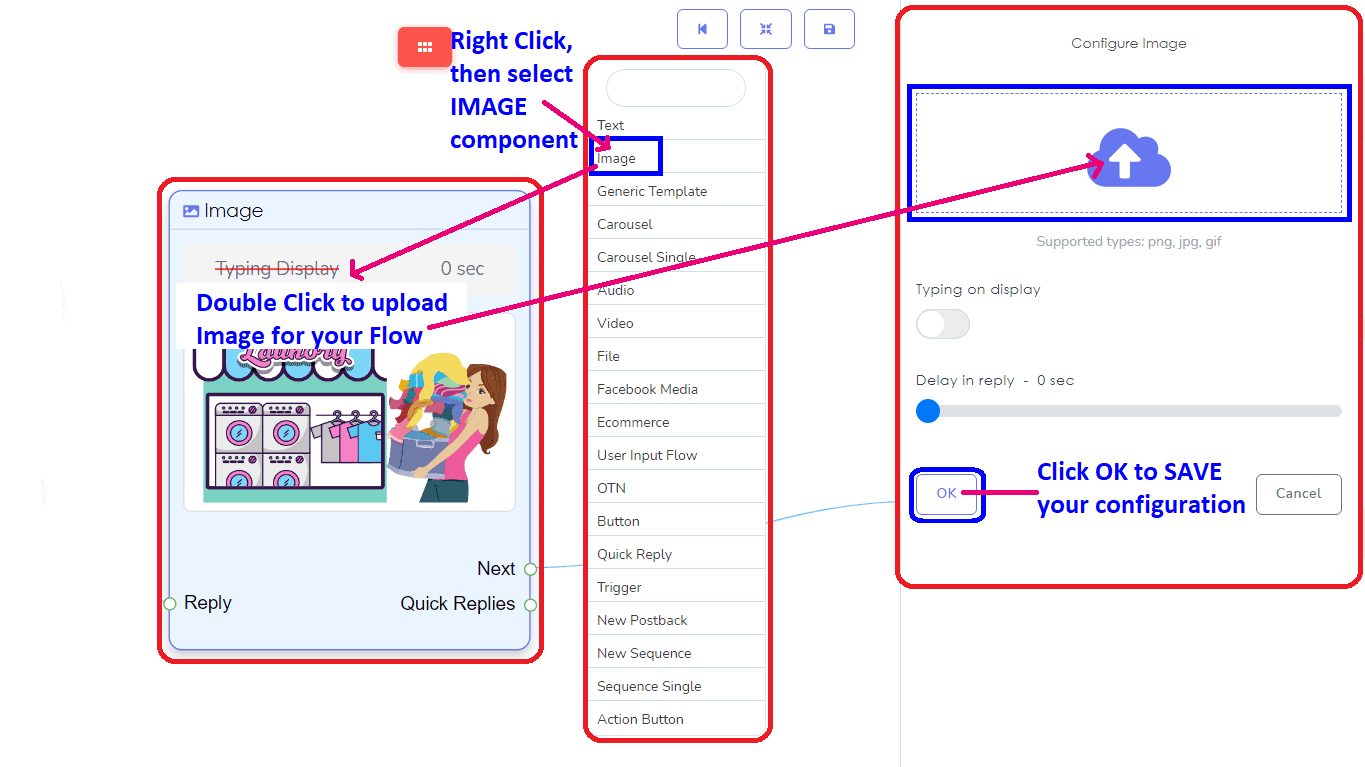
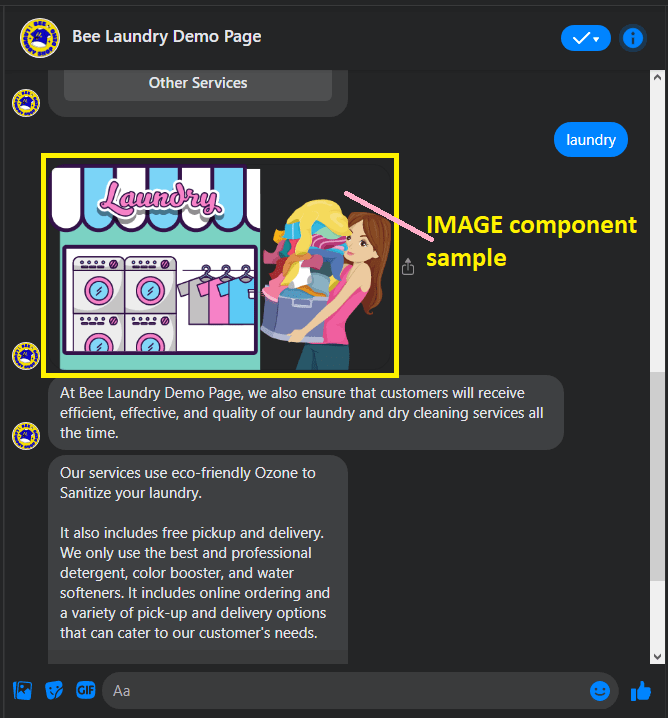
Add Image component for your welcome banner or for your Page logo.
This is the IMAGE component example in your Facebook Page Messenger.
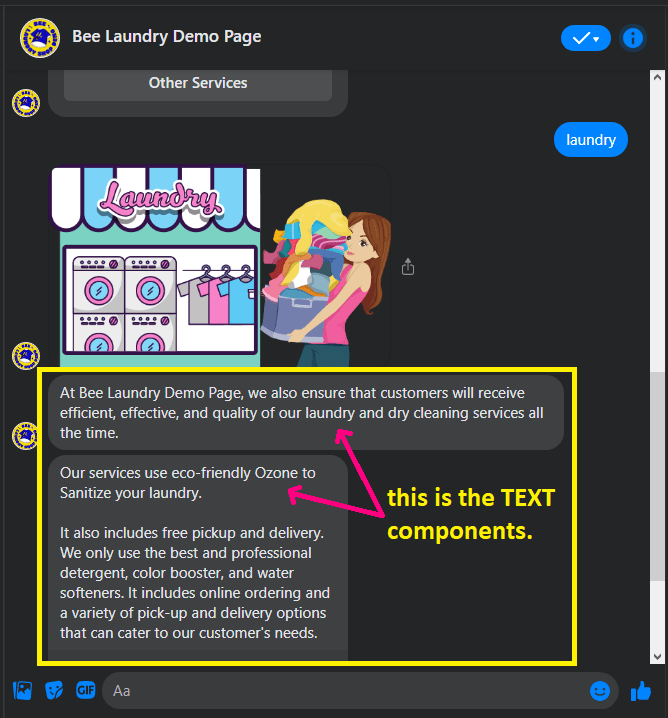
Then, add your TEXT component for your Facebook Page details or any information you wanted to share with your subscriber. You can create more than 1 TEXT reply.
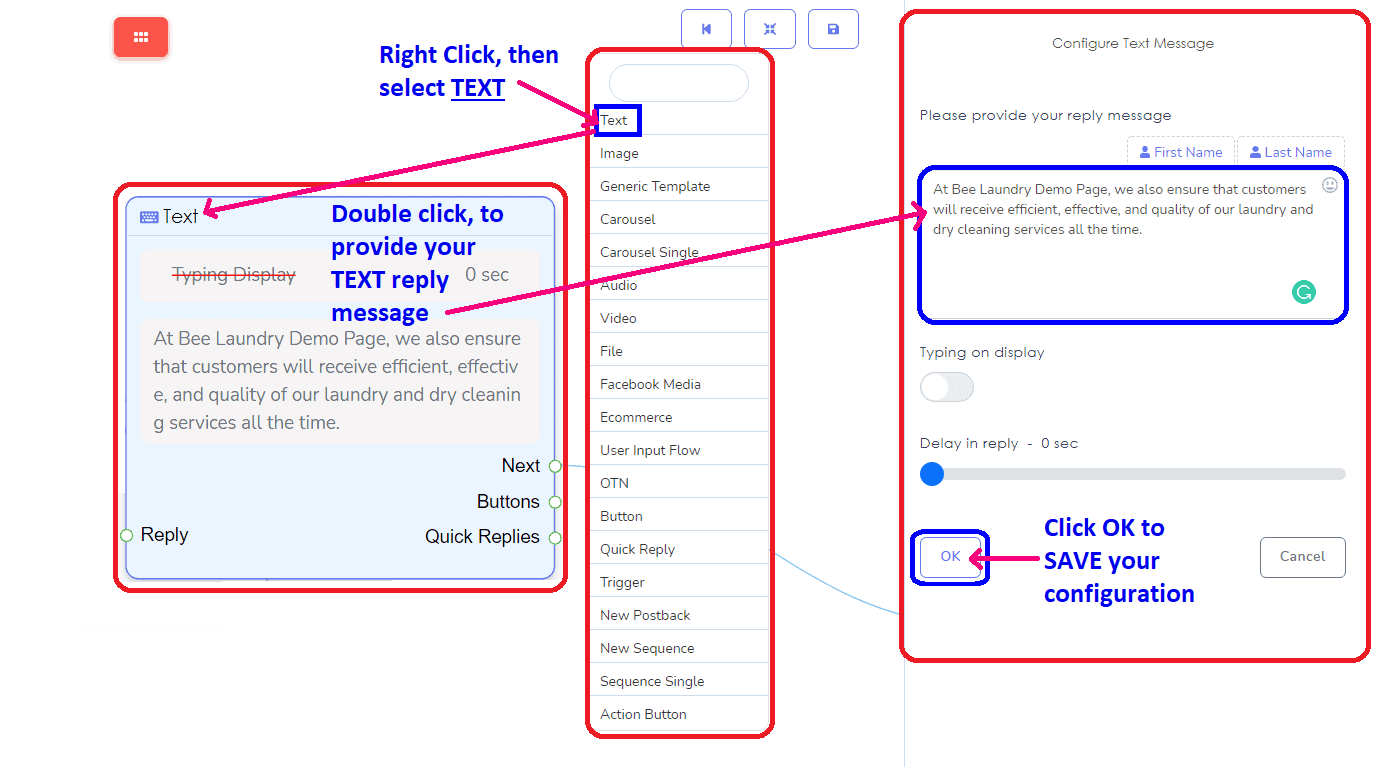
TEXT Reply can be created as more than 1 and can be created as the NEXT reply. It can be TEXT to TEXT reply.
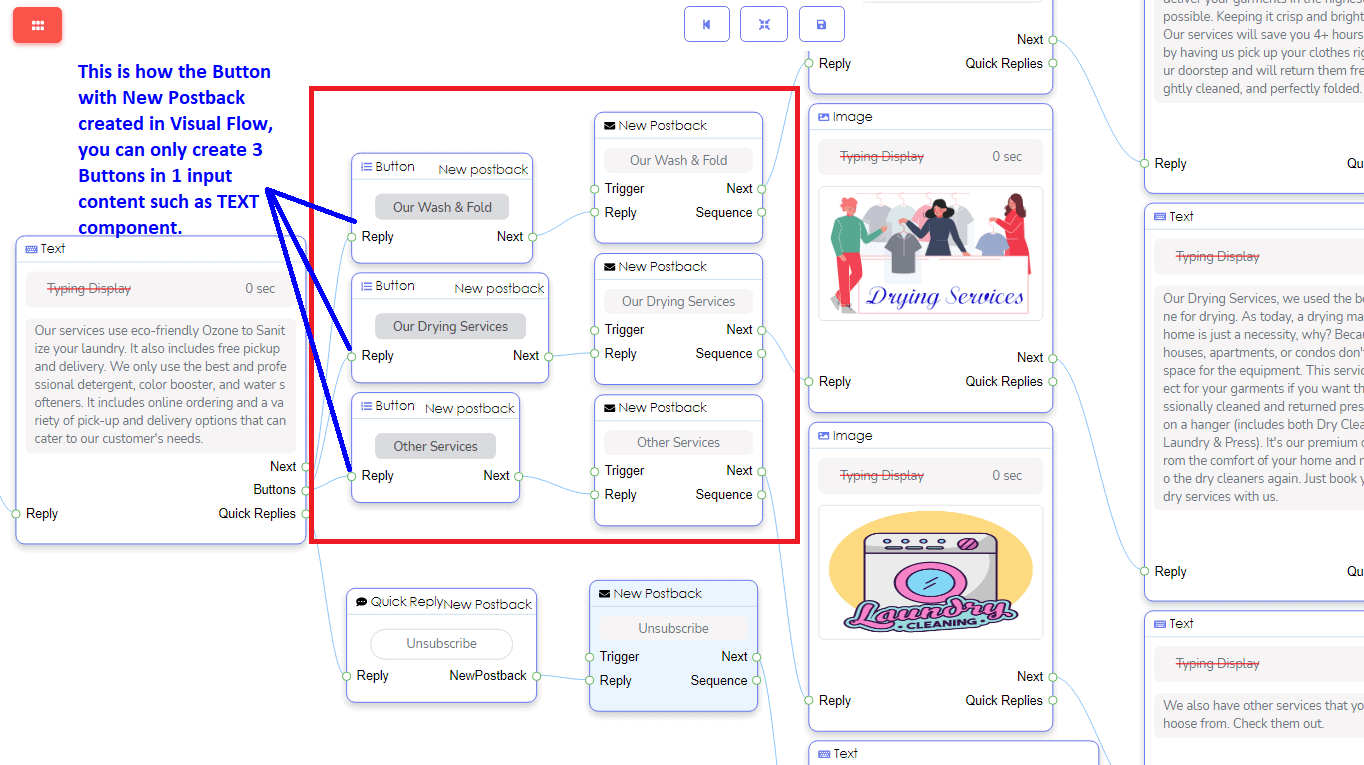
Add a Button for the next step of your option or selection. The button component will allow you to reply with a Button. Then, click your Button Type to choose what postback you wanted to perform. In every button, you can only create three types of button choices.
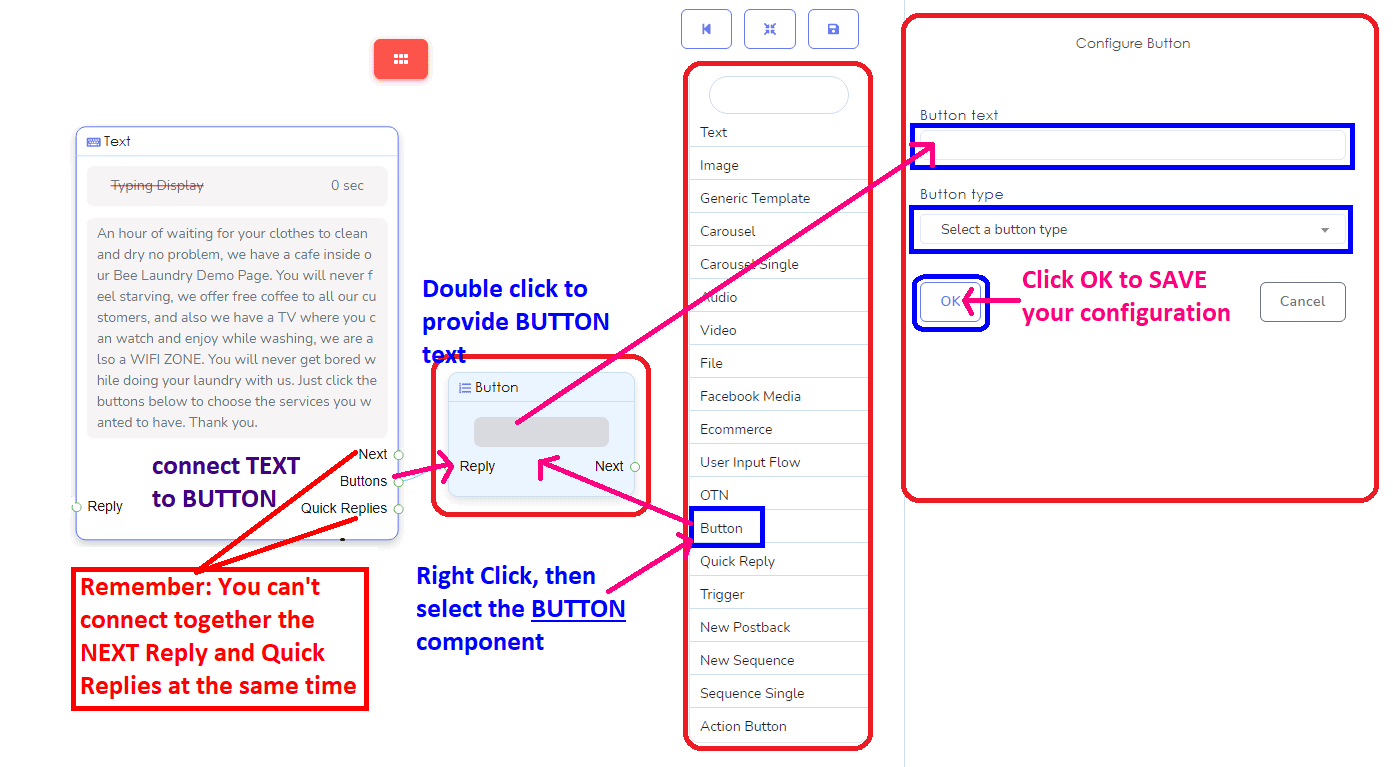
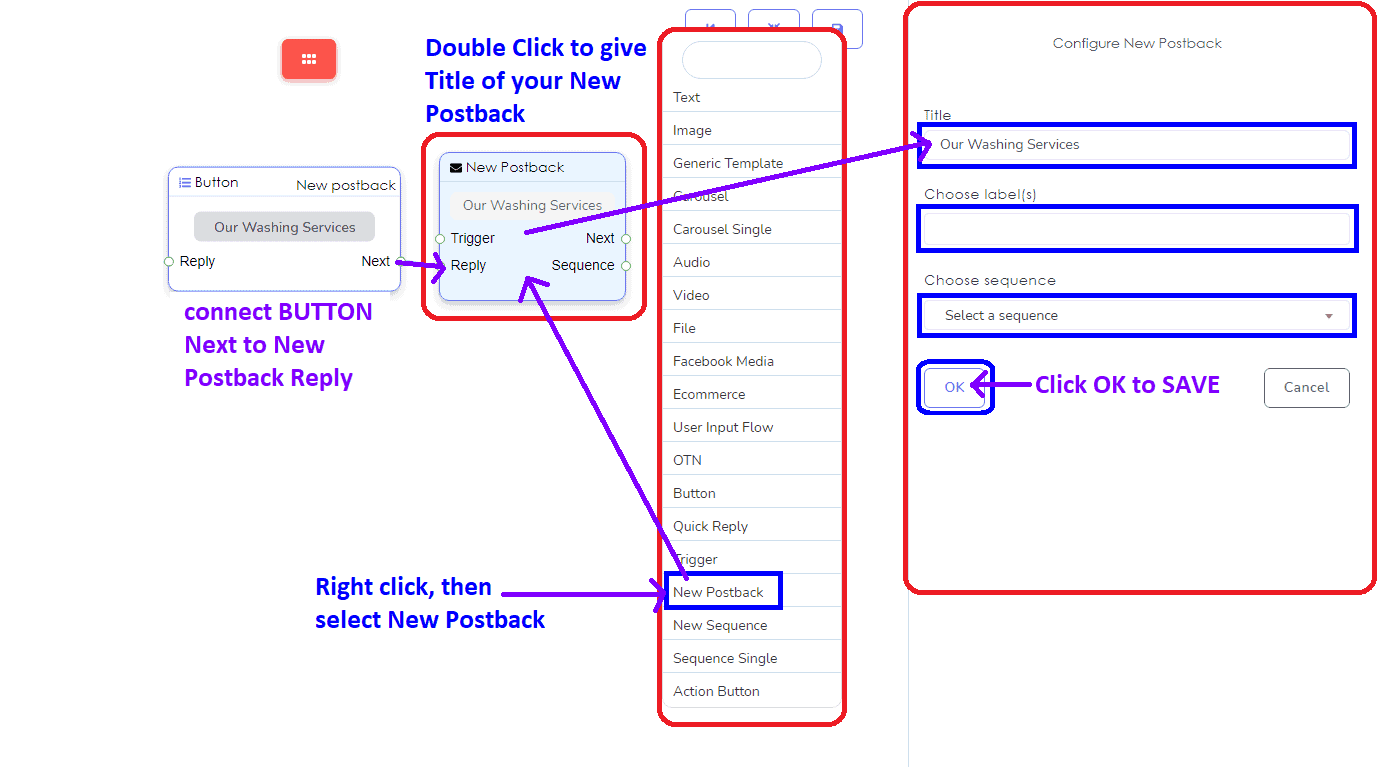
If you choose the New Postback, you can copy or name it as your BUTTON’s Title. Maaari mo ring select your label and sequence in this component.
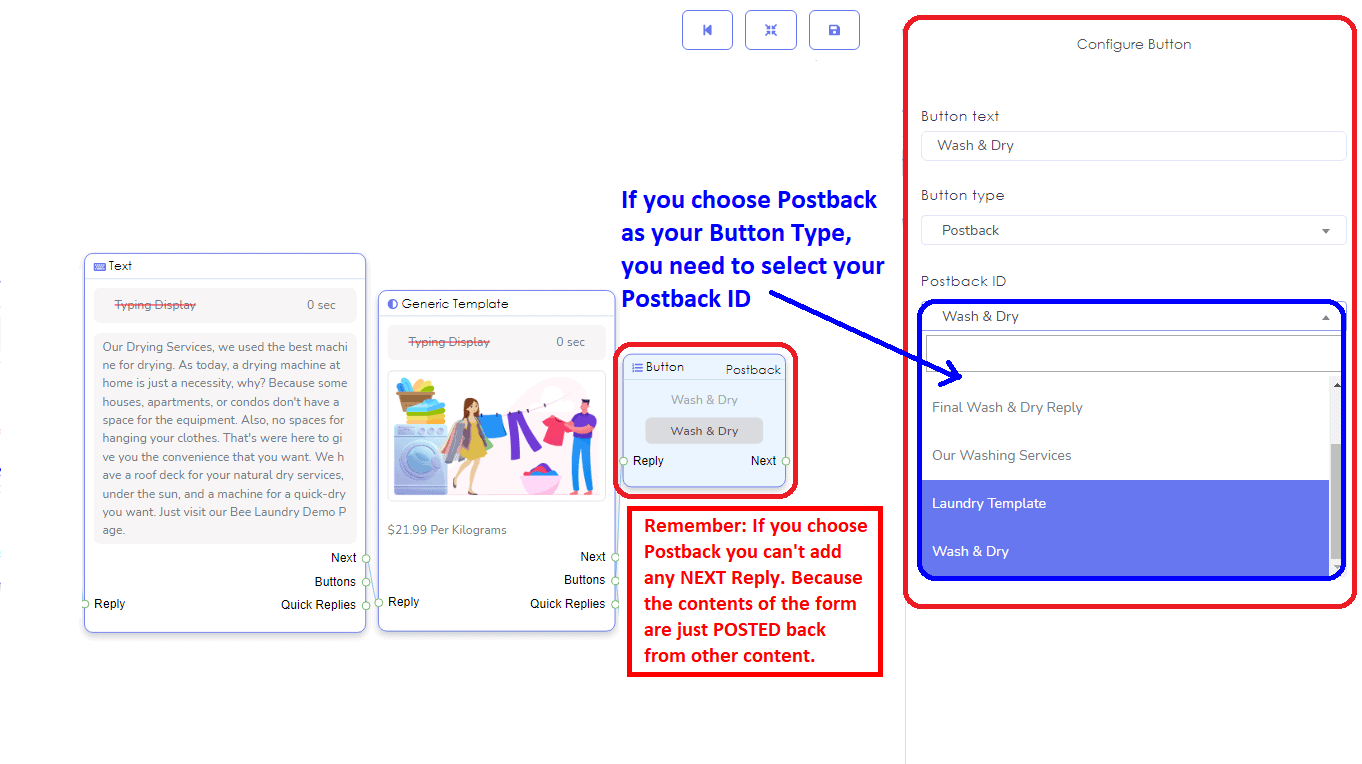
Sa iyong Button component, you can also select the Postback, if you want to post back the content or form from other content you already created or use.
These are the 3 buttons in 1 input.
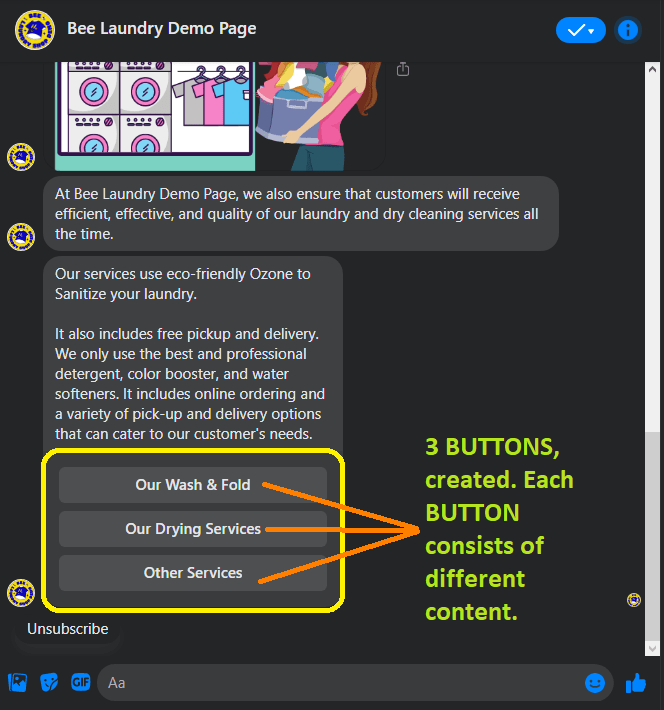
This is how BUTTONS appear in your Facebook Page Messenger.
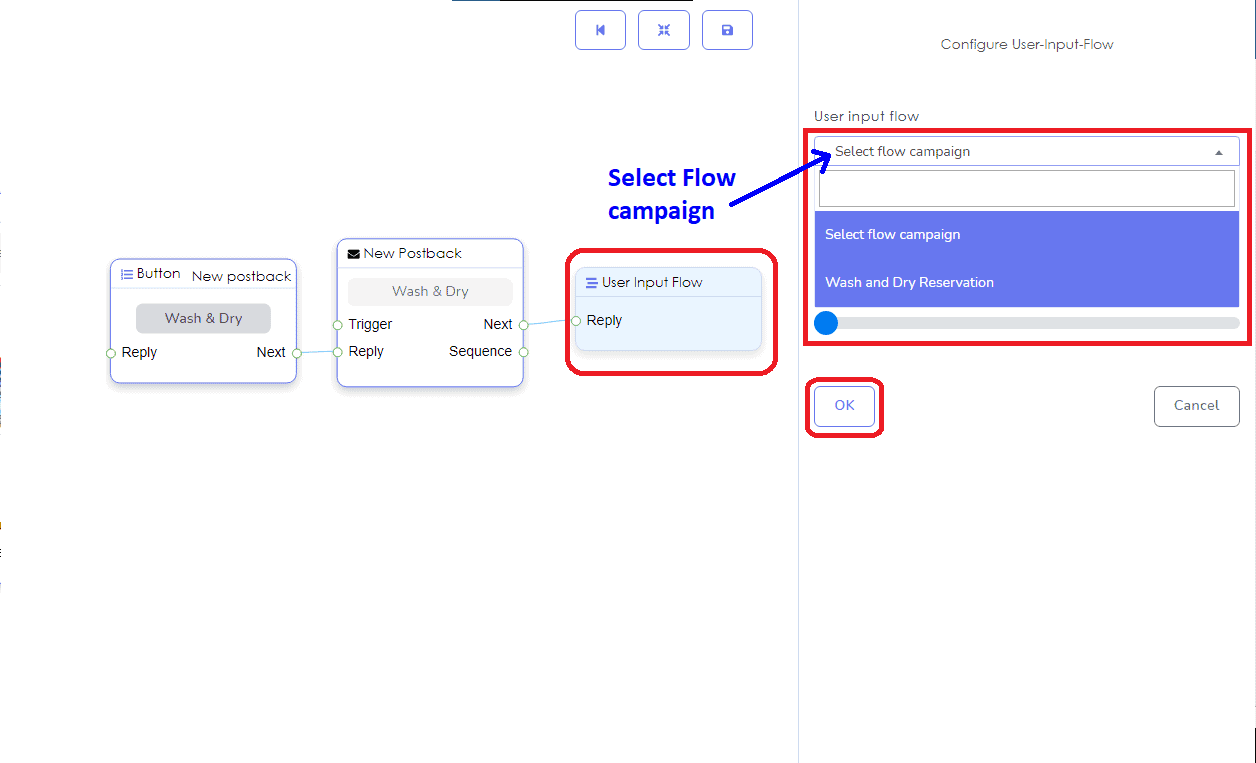
You can also Add User-Input-Flow, to collect important details from your subscriber. It connected from any inputs, such as TEXT, IMAGE, GENERIC TEMPLATE, CAROUSEL, AUDIO, VIDEO, FILE, FACEBOOK MEDIA, ECOMMERCE, and NEW POSTBACK.
What is User Input Flow?
With this flow, you can ask a single or series of questions from users inside Messenger. Once users give any answer, the next question will be sent if there is any. These answers will be saved in the database.
How to make your User Input Flow?
Now, go to Messenger Bot. Select User Input Flow & Custom Field and click on Actions then Click on User input flow campaign.
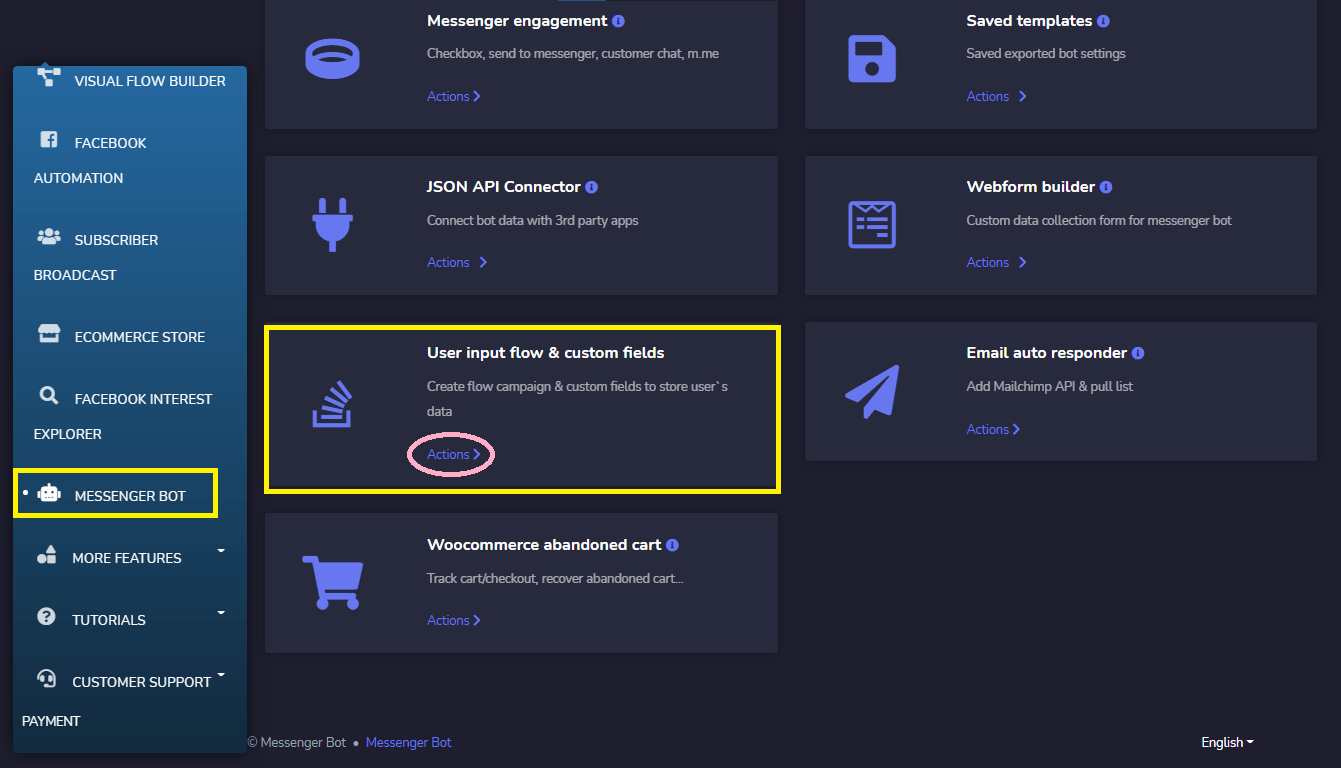
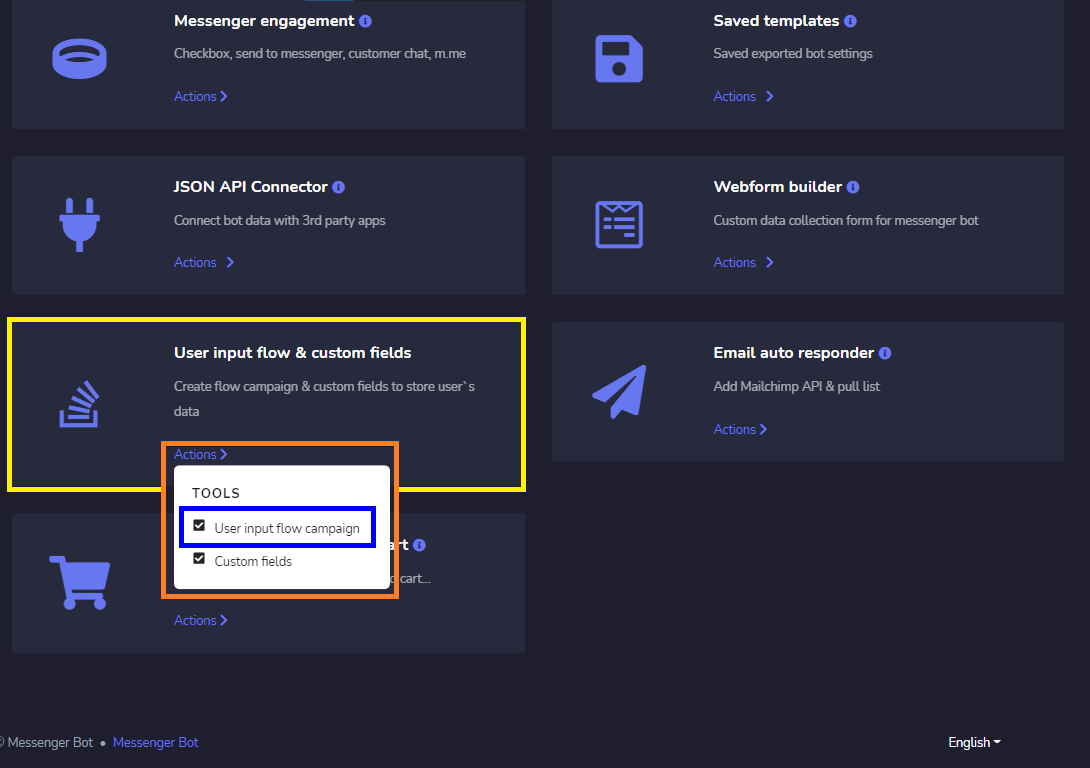
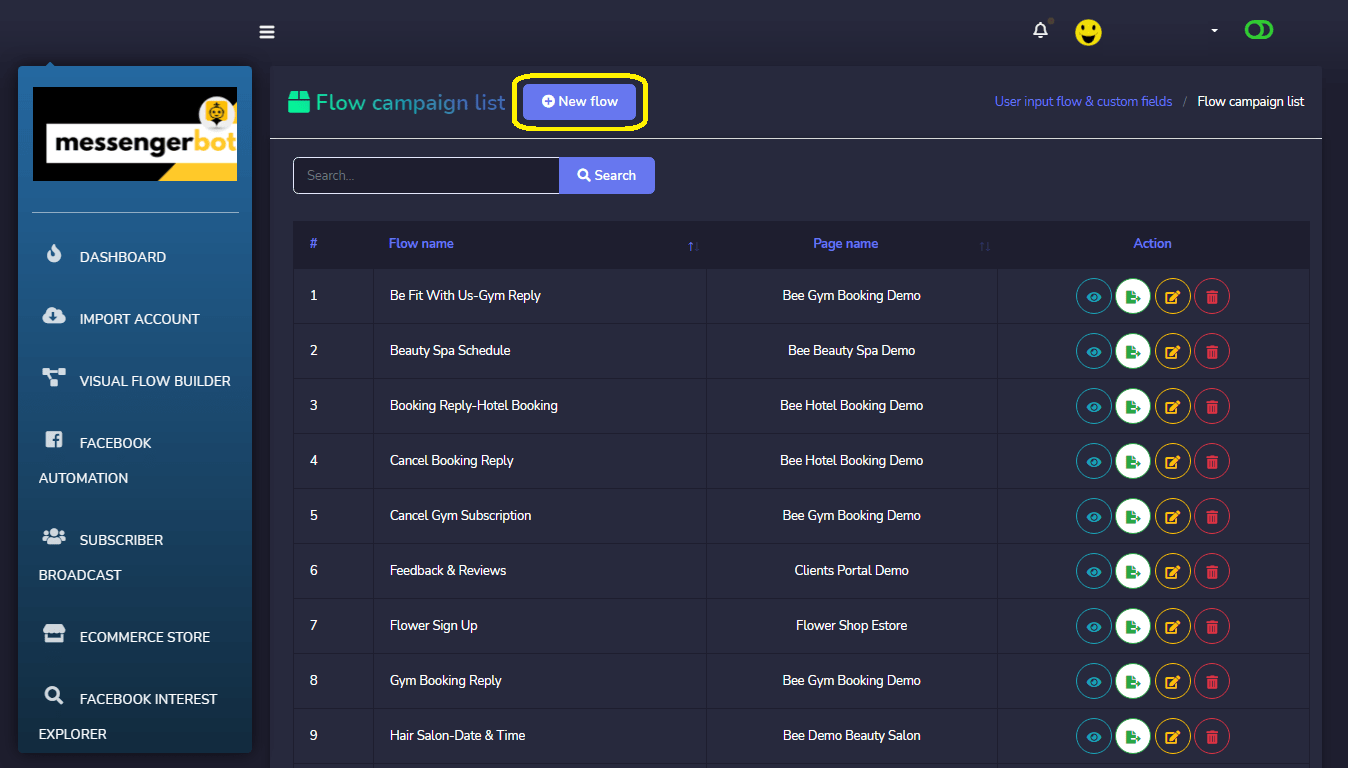
When you click on the User input flow campaign, the Flow Campaign list interface will appear. At the top left corner, you can see a button named New Flow, Click on this button to create a new User Input Flow.
An interface to create a new user input flow will appear. Give the campaign a name and choose the Facebook page for which you want to create the User Input Flow. We can select 2 types of user input flow, one is Free keyboard input, and the other one is Multiple choice.
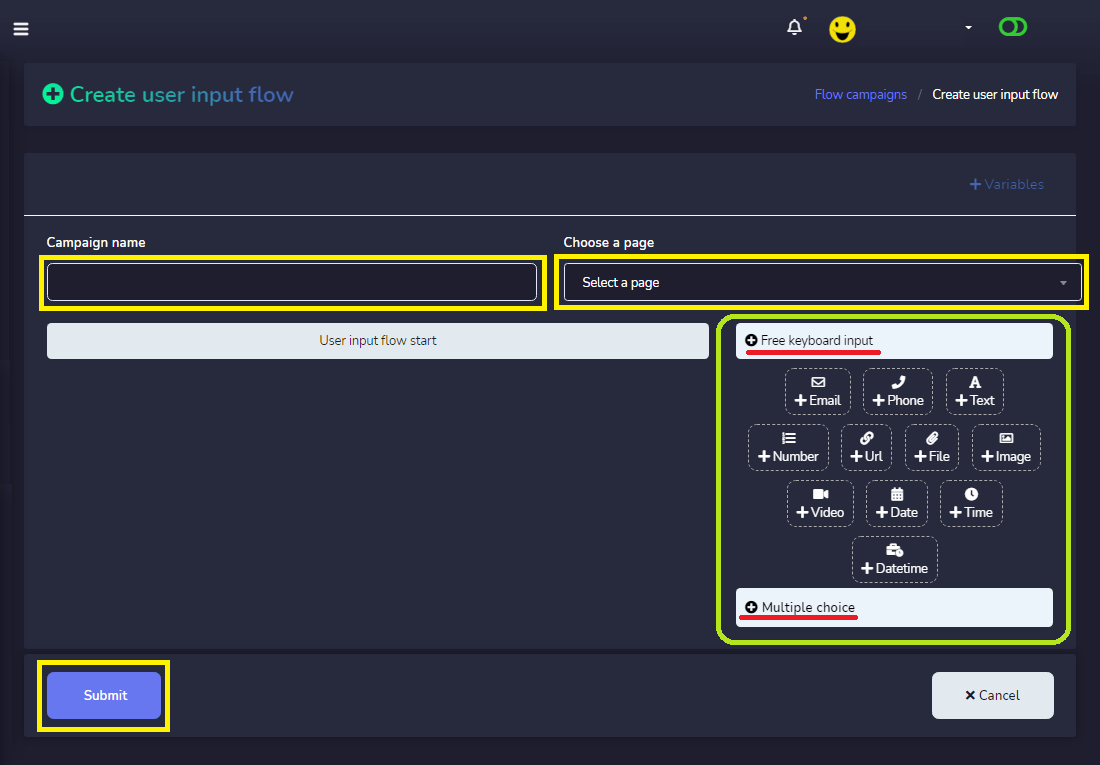
You can find these options on the right side of the interface. Under Free Keyboard input we have Email, Phone, Text, Number, URL, File, Image, Video, Date, Time, and Datetime. Just drag and drop them to the User input flow start and create your desired questions to collect. You can add as many questions as you want.
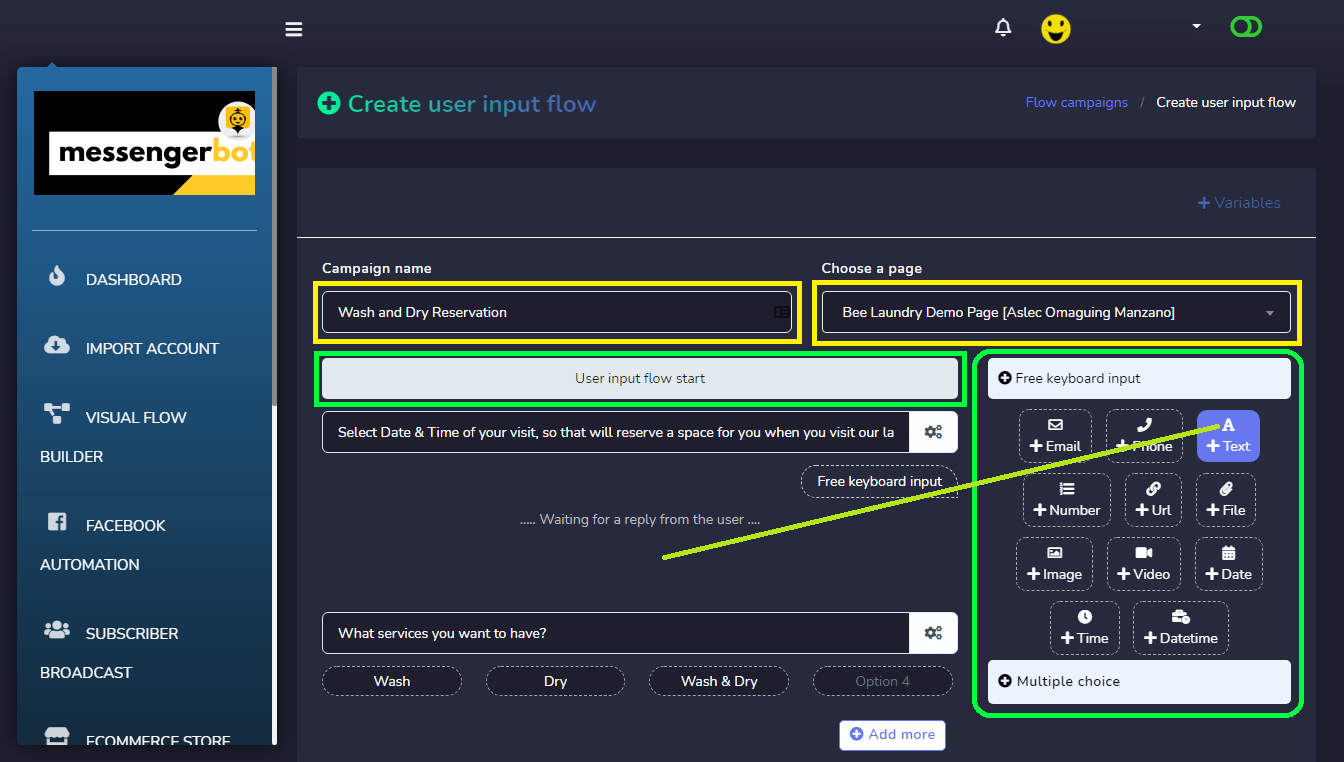
Finally, select a final reply template when you are done with questions. You can create a new Final reply template by clicking on the Add button.
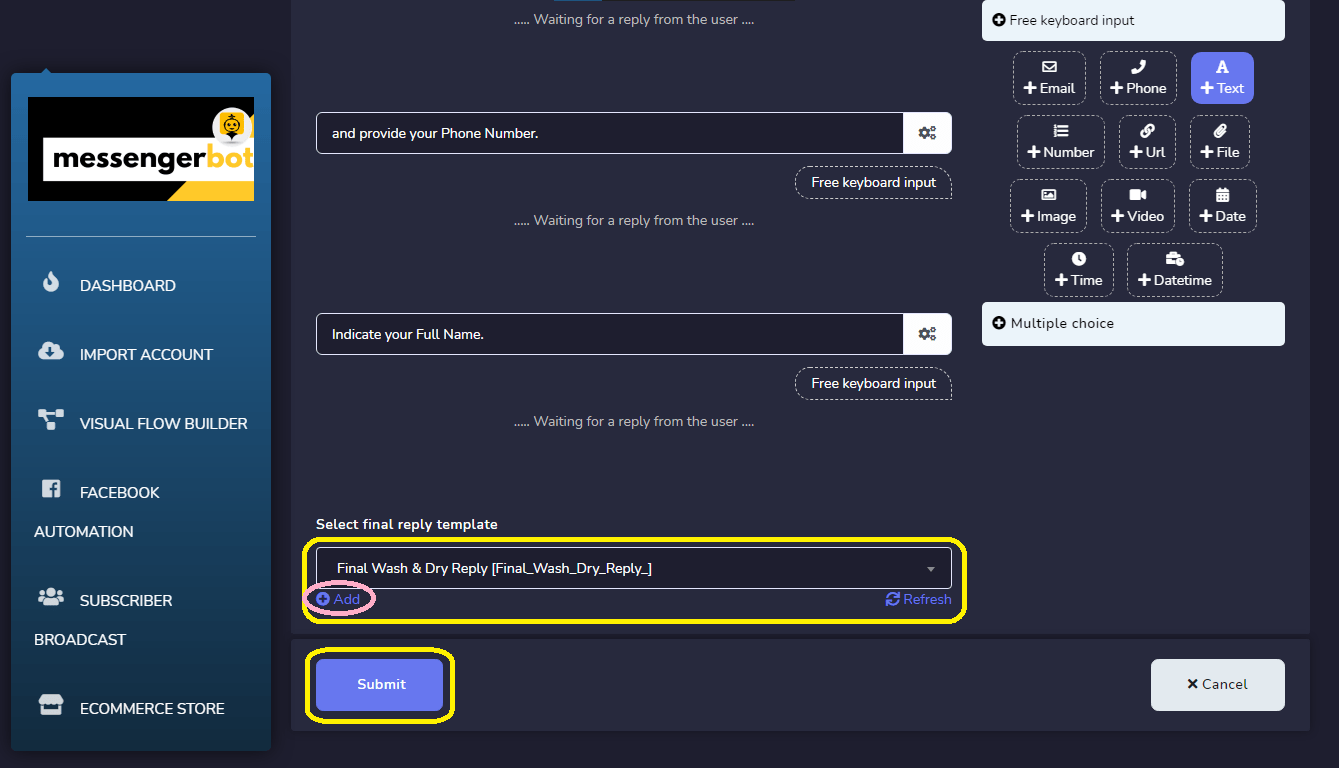
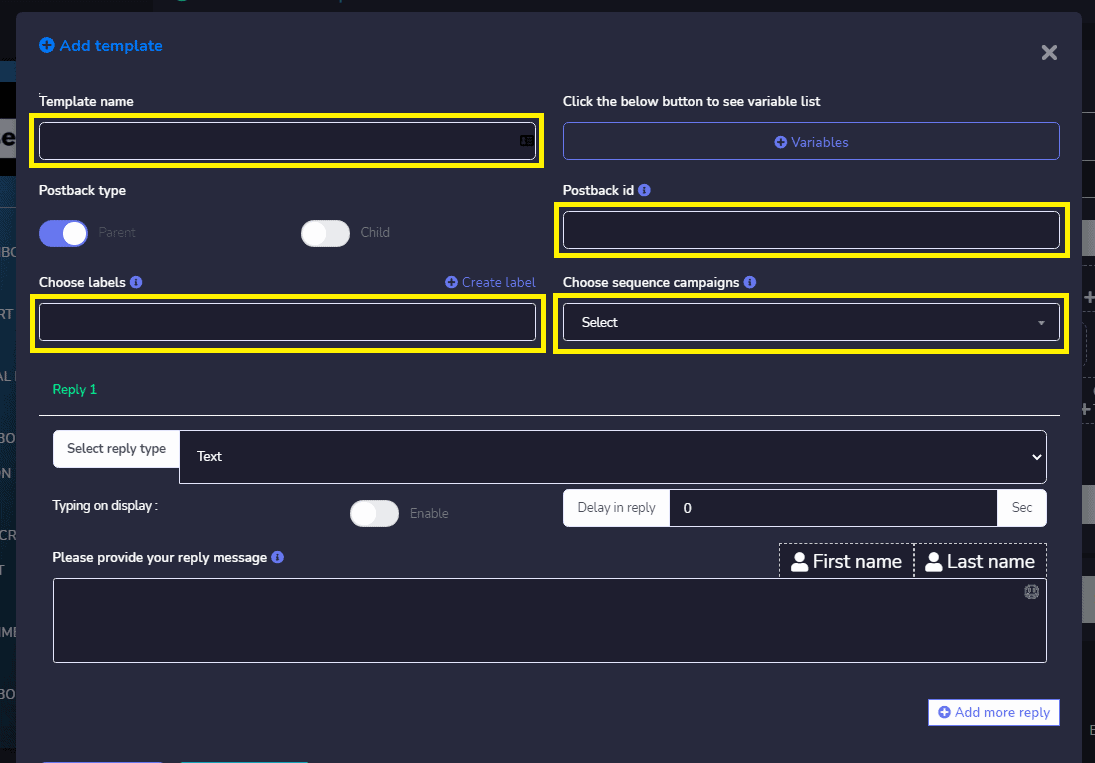
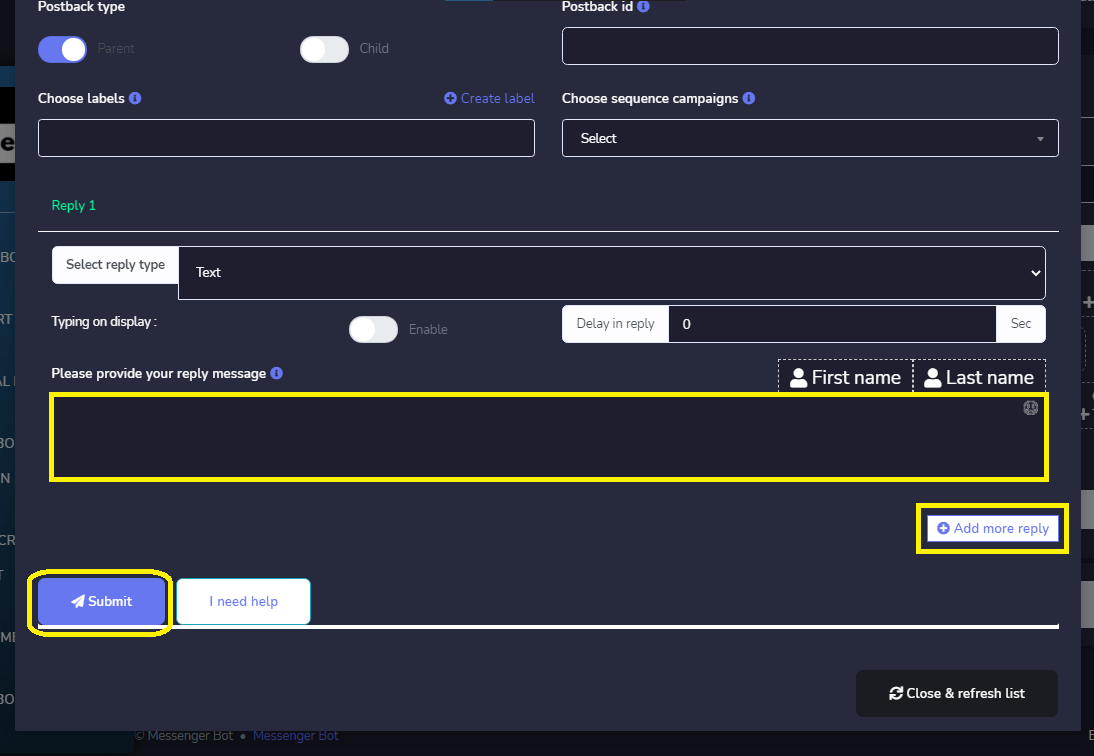
Ibigay ang iyong Template Name, choose labels, and sequence campaigns.
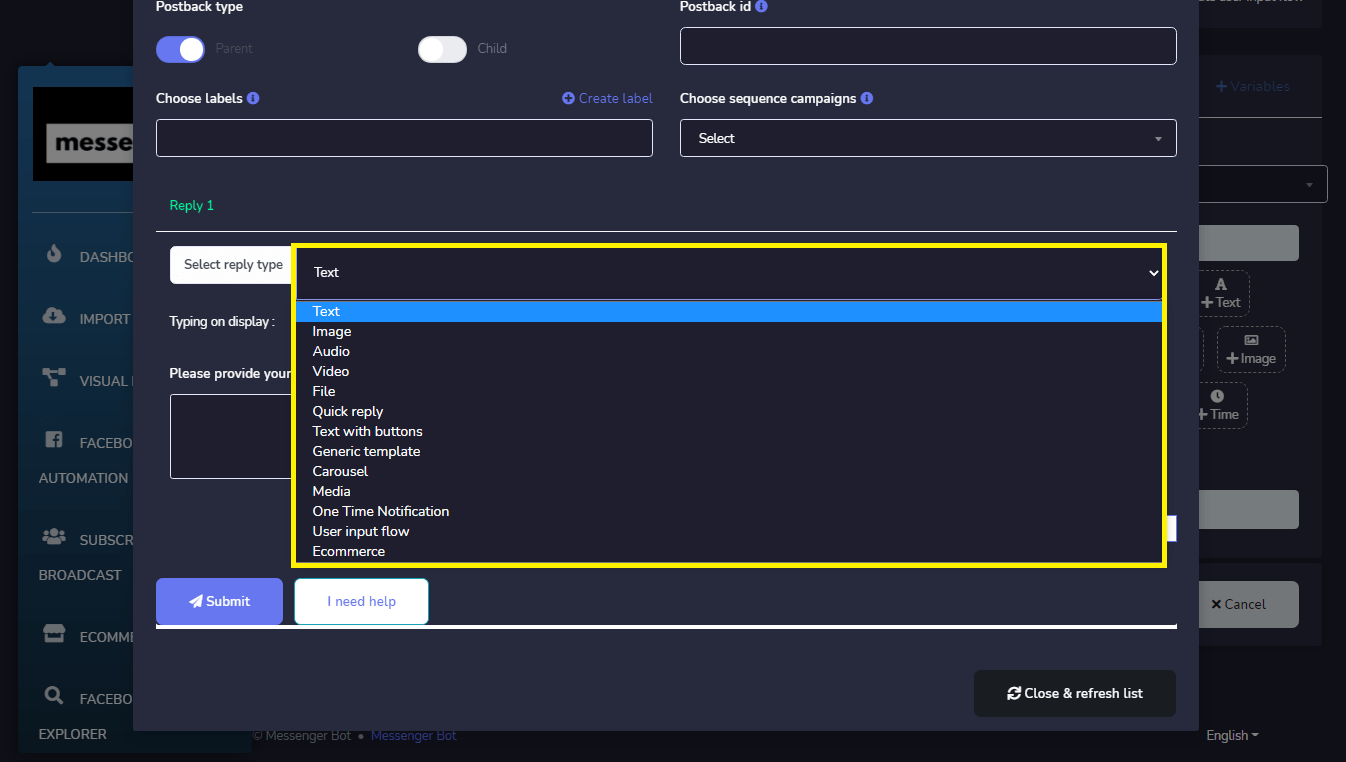
Piliin ang iyong Reply Type. Such as Text, Image, Video, File, Quick Reply, Text with Buttons, Generic Template, Carousel, Media, One Time Notification, User Input Flow, and Ecommerce.
And provide your reply message. You can also Add more replies if you want. Click, Submit to save your Postback Reply.
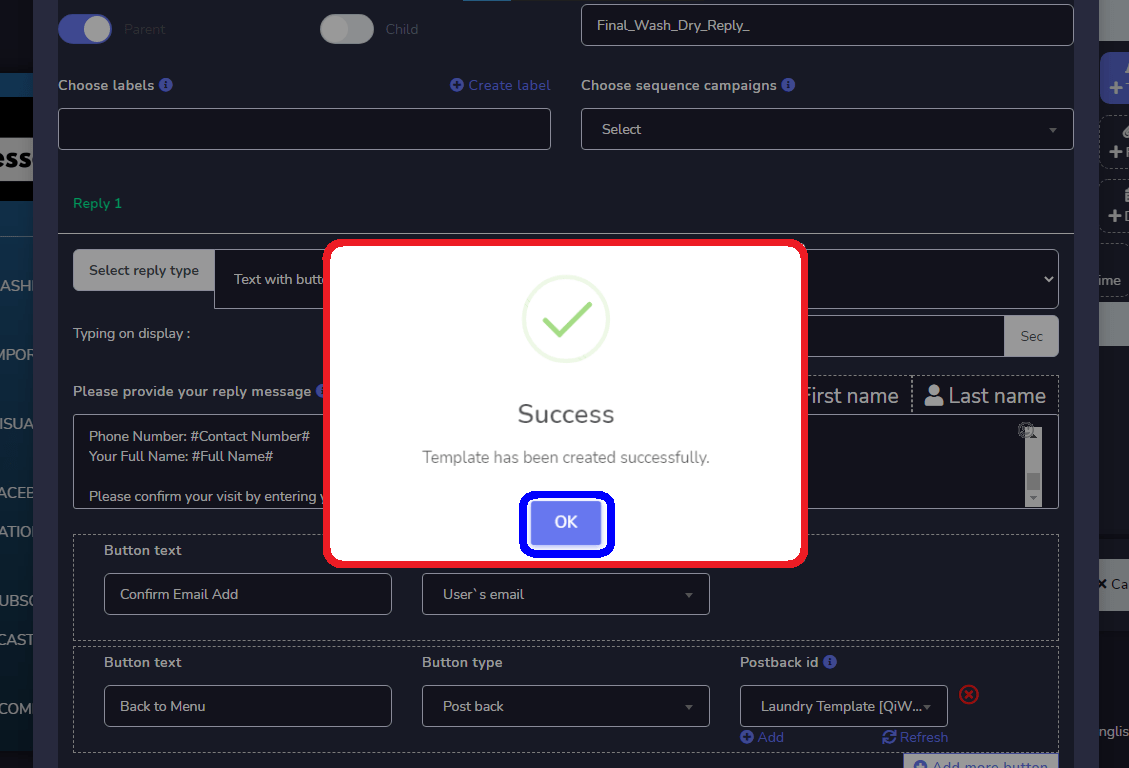
Your template has been created successfully and click OK.
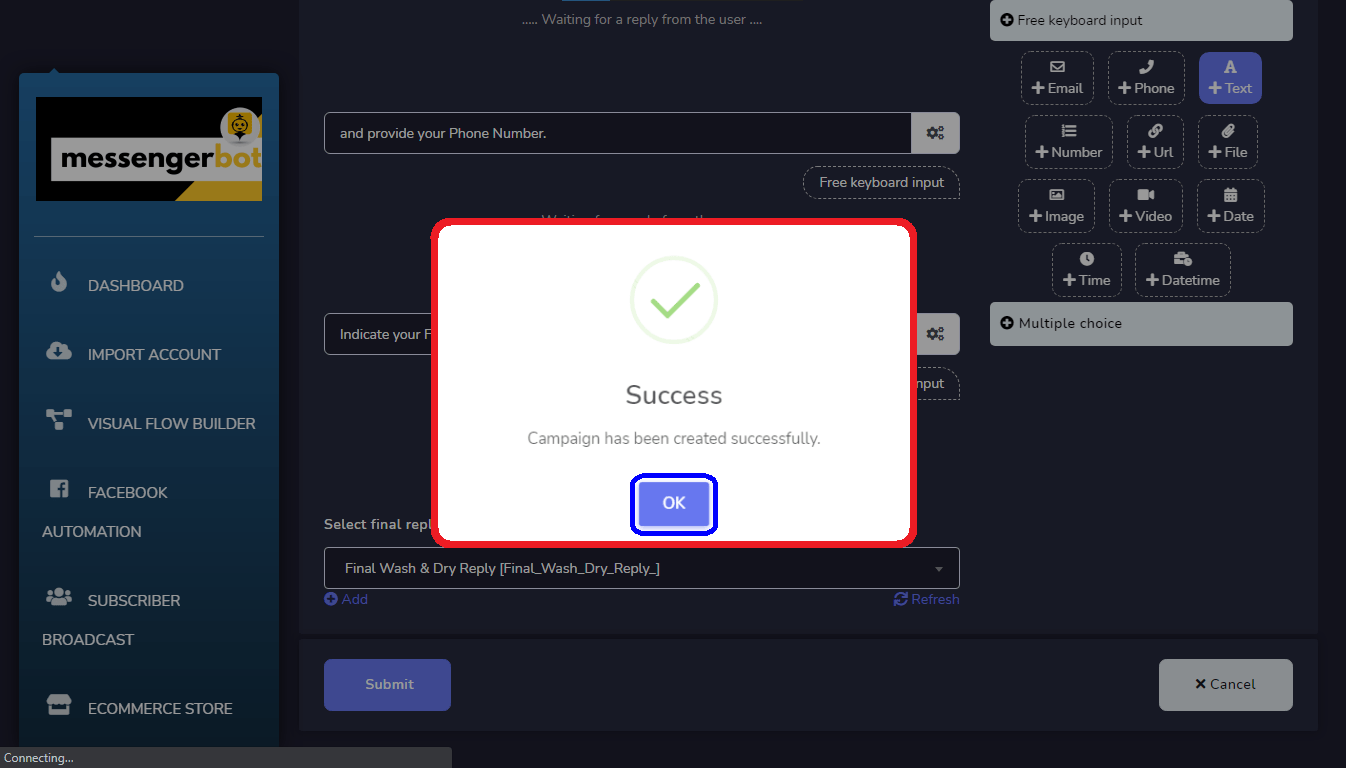
When you are done with all the questions for your flow, click on the Submit button hanggang save your campaign.
After creating your User Input Flow. You can now Select your Flow Campaign.
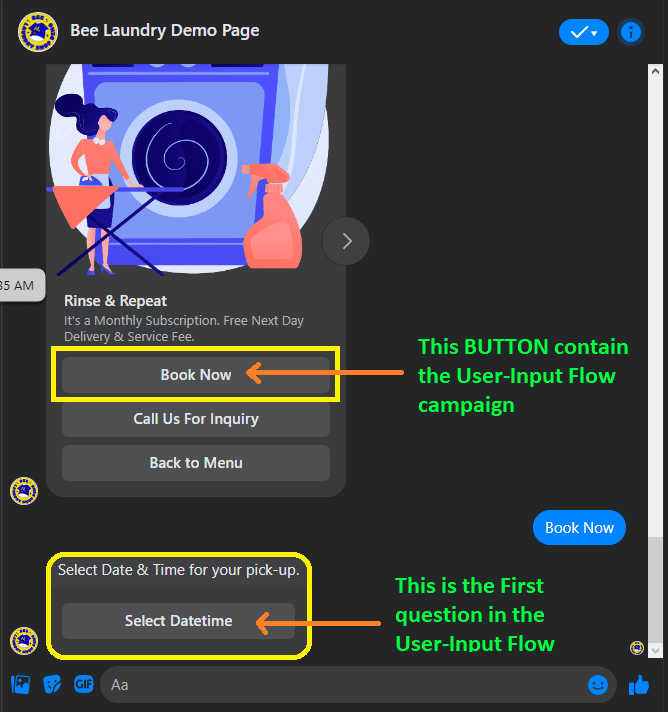
This is how the User Input Flow looks like in your Facebook Page Messenger.
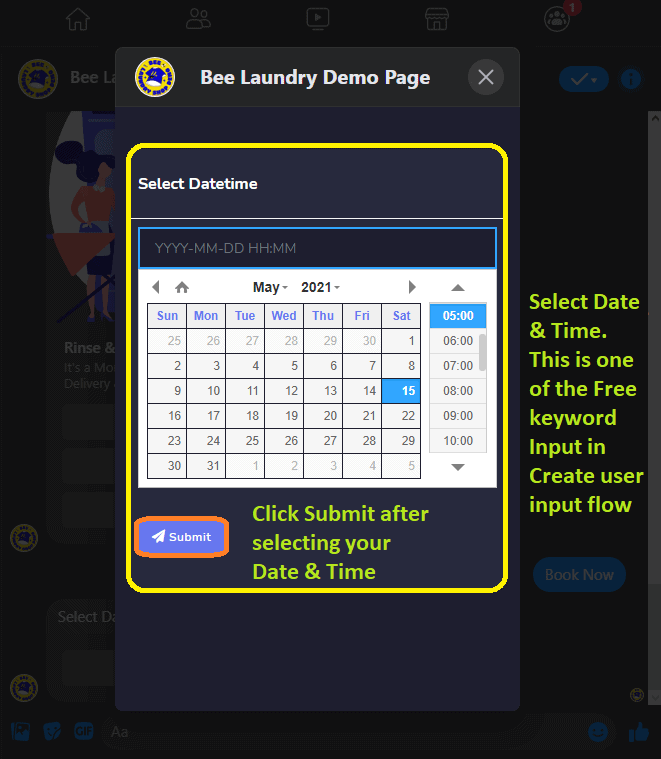
The Select DateTime of Free keyword Input in Create User Input Flow.
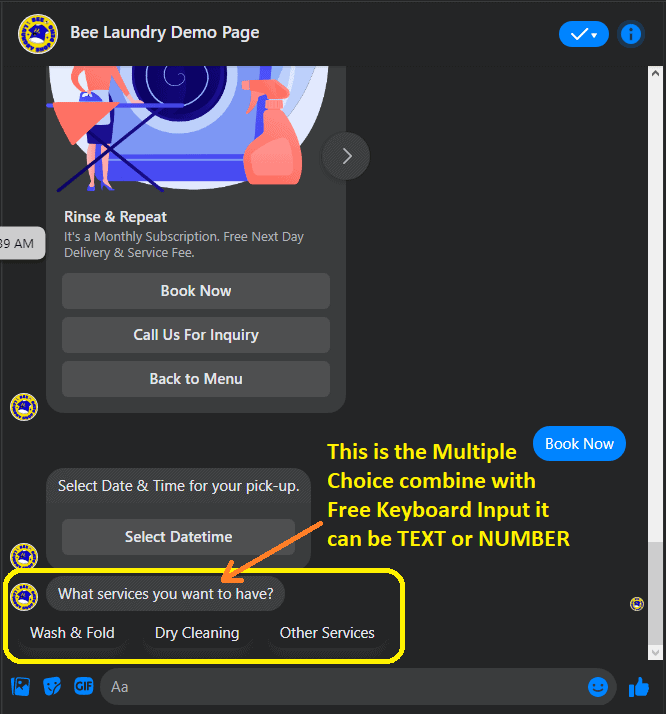
The Multiple Choice of Free Keyboard Input combines with TEXT or NUMBER.
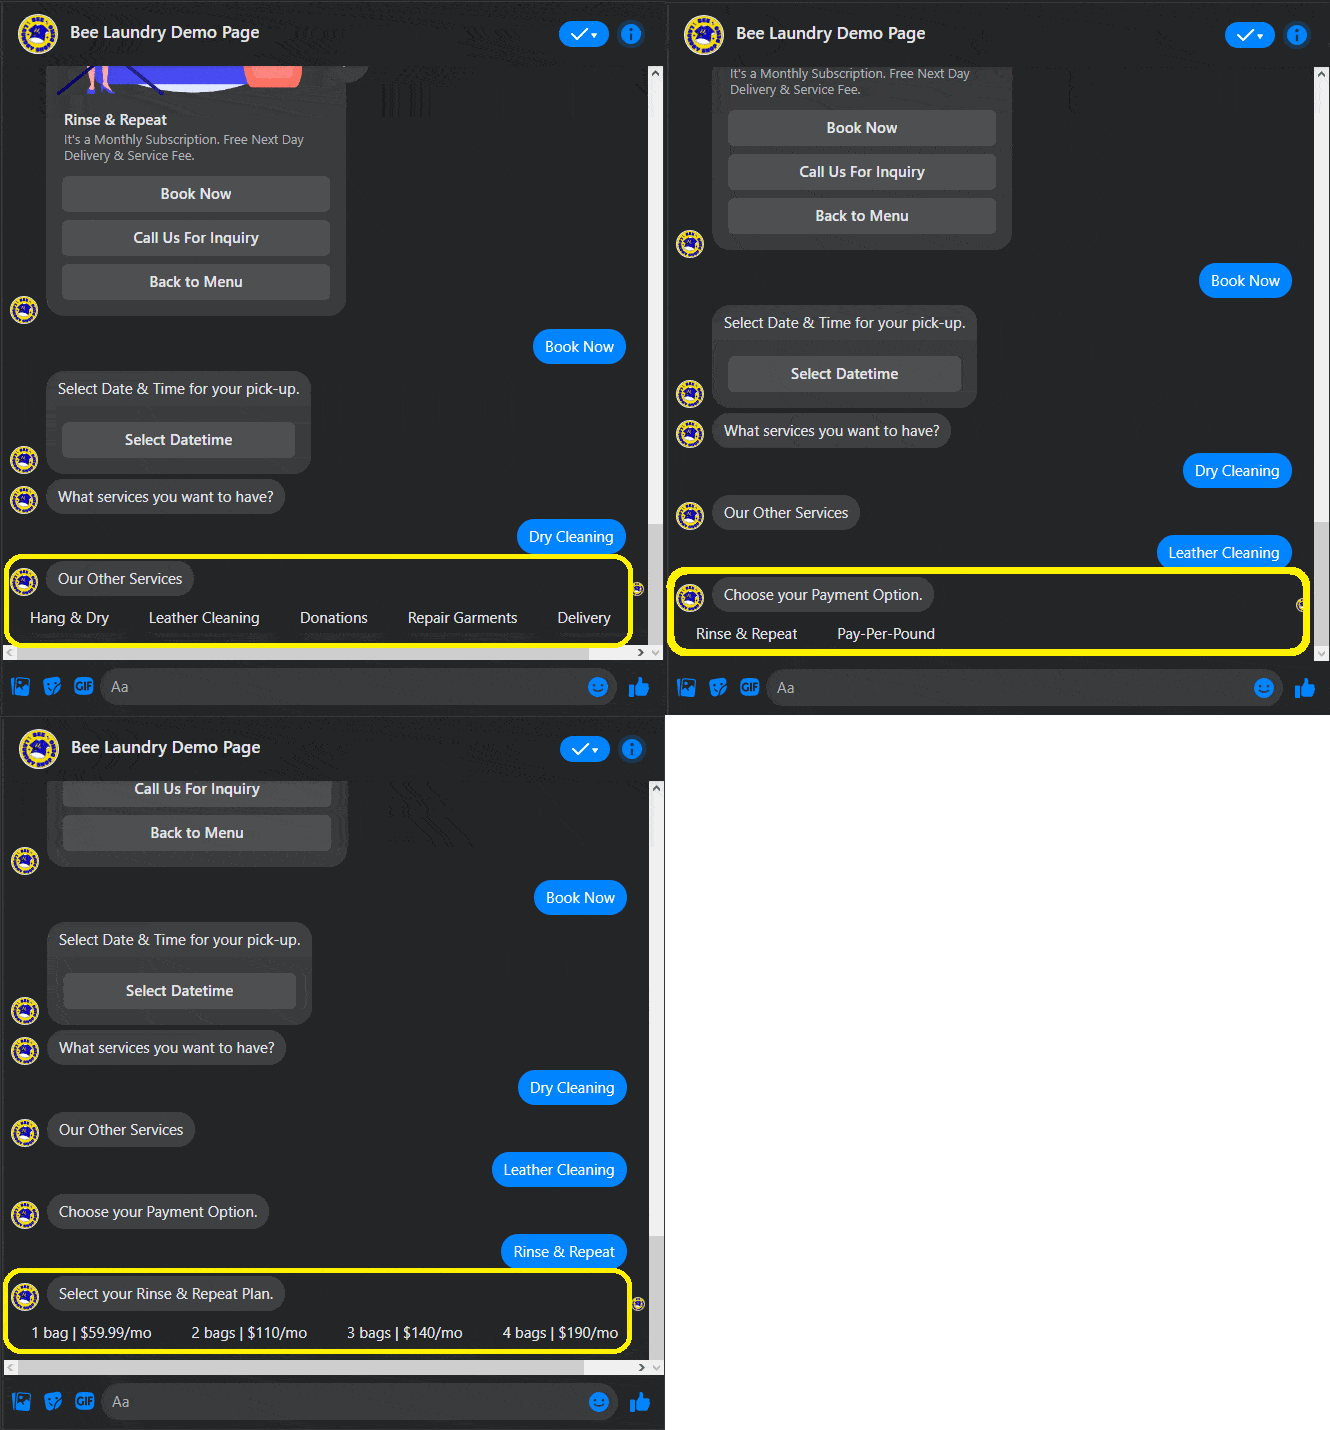
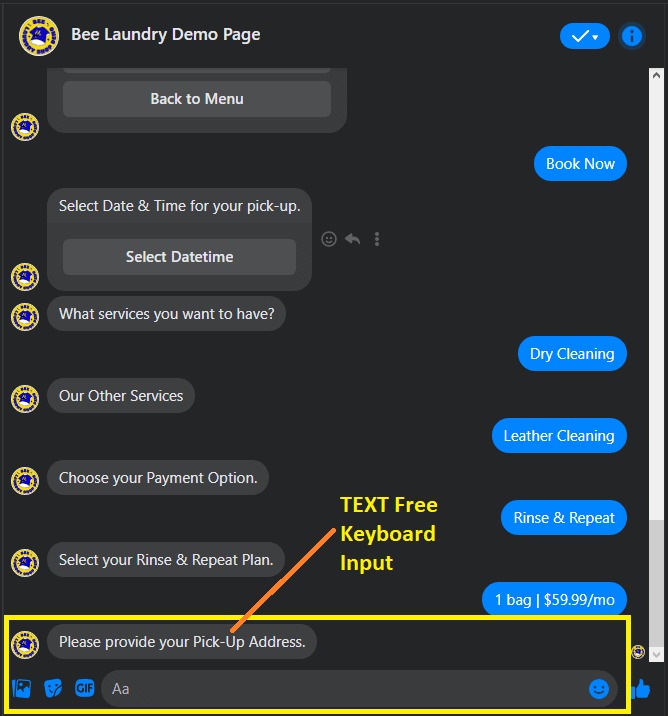
Ito ang TEXT-free keyboard input, just key in the answer.
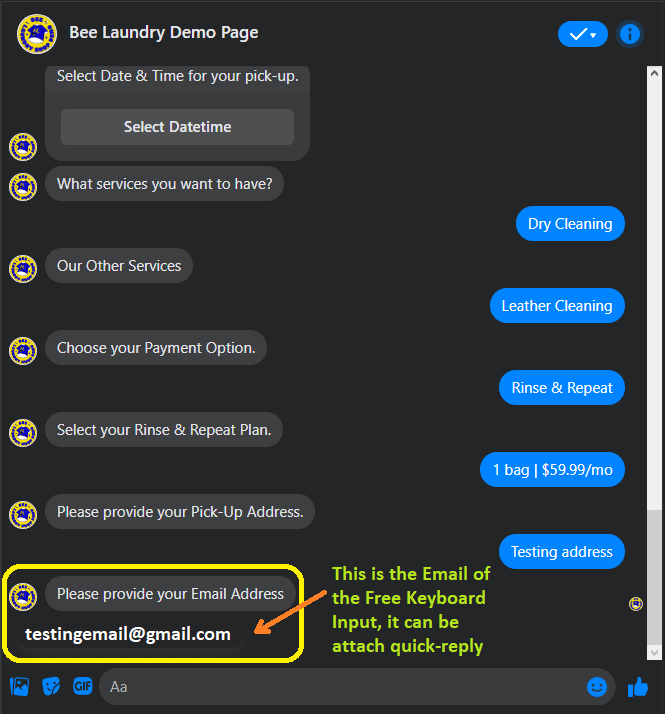
Ito ang Email of free keyboard input, either you will key in or it can be attached as a quick reply.
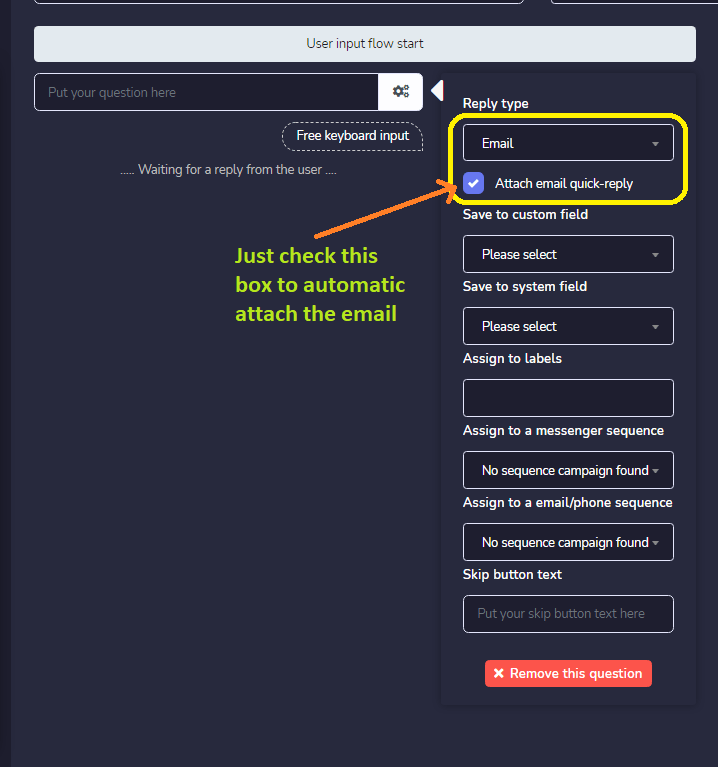
This is how you set up the attached email as a quick reply. Just check the box for automatic attachment.
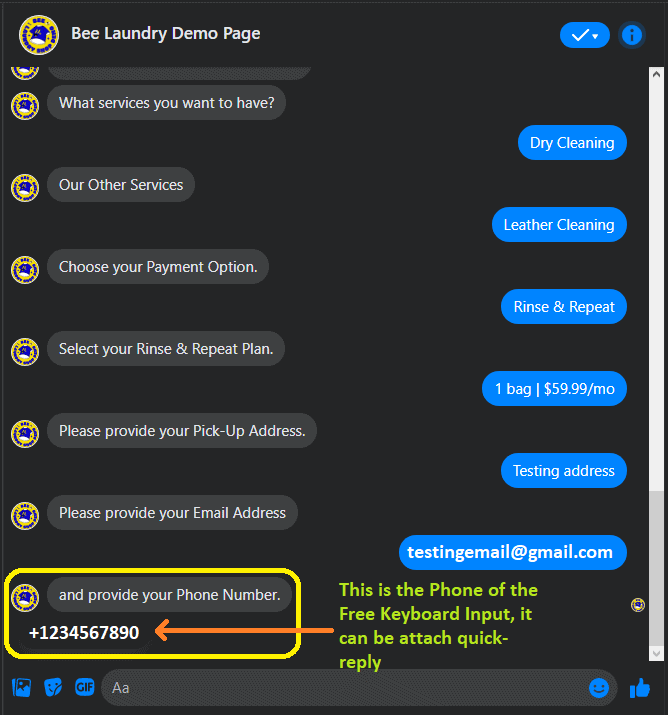
Same as the email-free keyboard input. The Phone with free keyboard input can also be attached as a quick reply.
Another example of TEXT-free keyboard input, you just need to key in your answer.
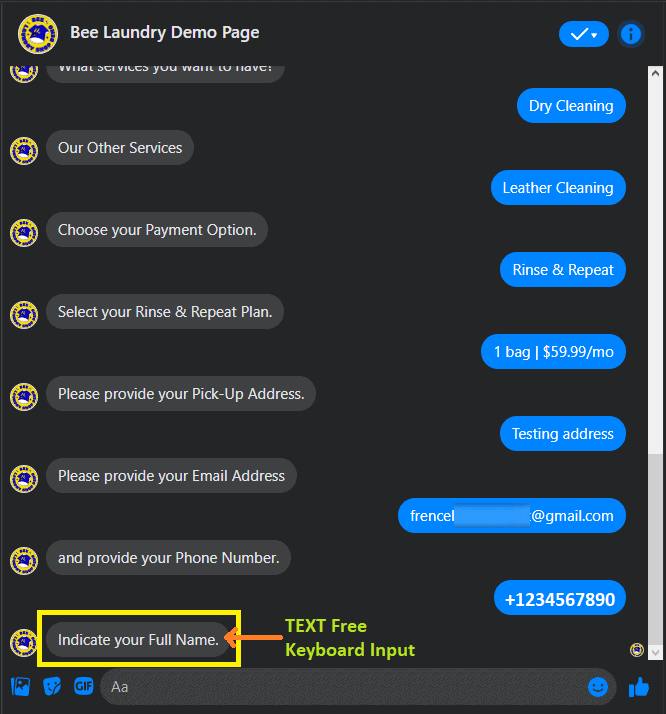
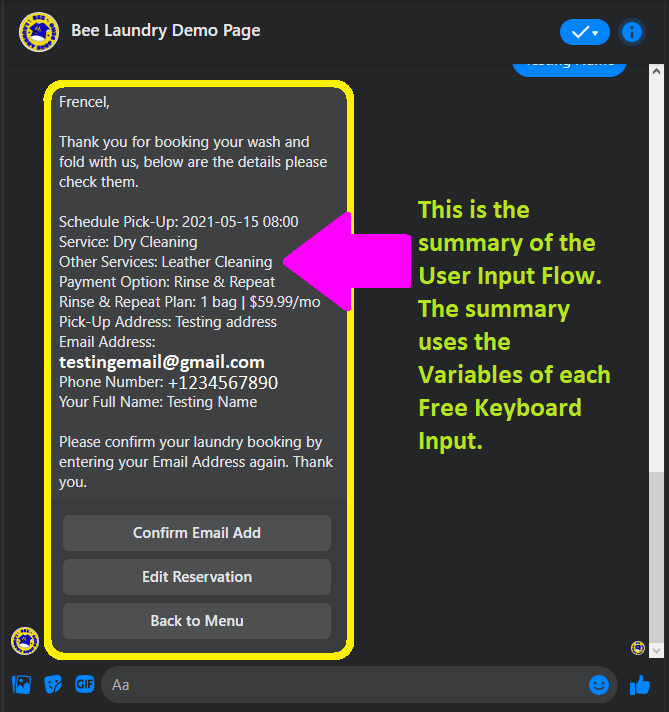
Ito ang summary of the booking system using the User Input Flow, you can use the variables of each FREE Keyboard Input. It also a way of collecting a Lead.
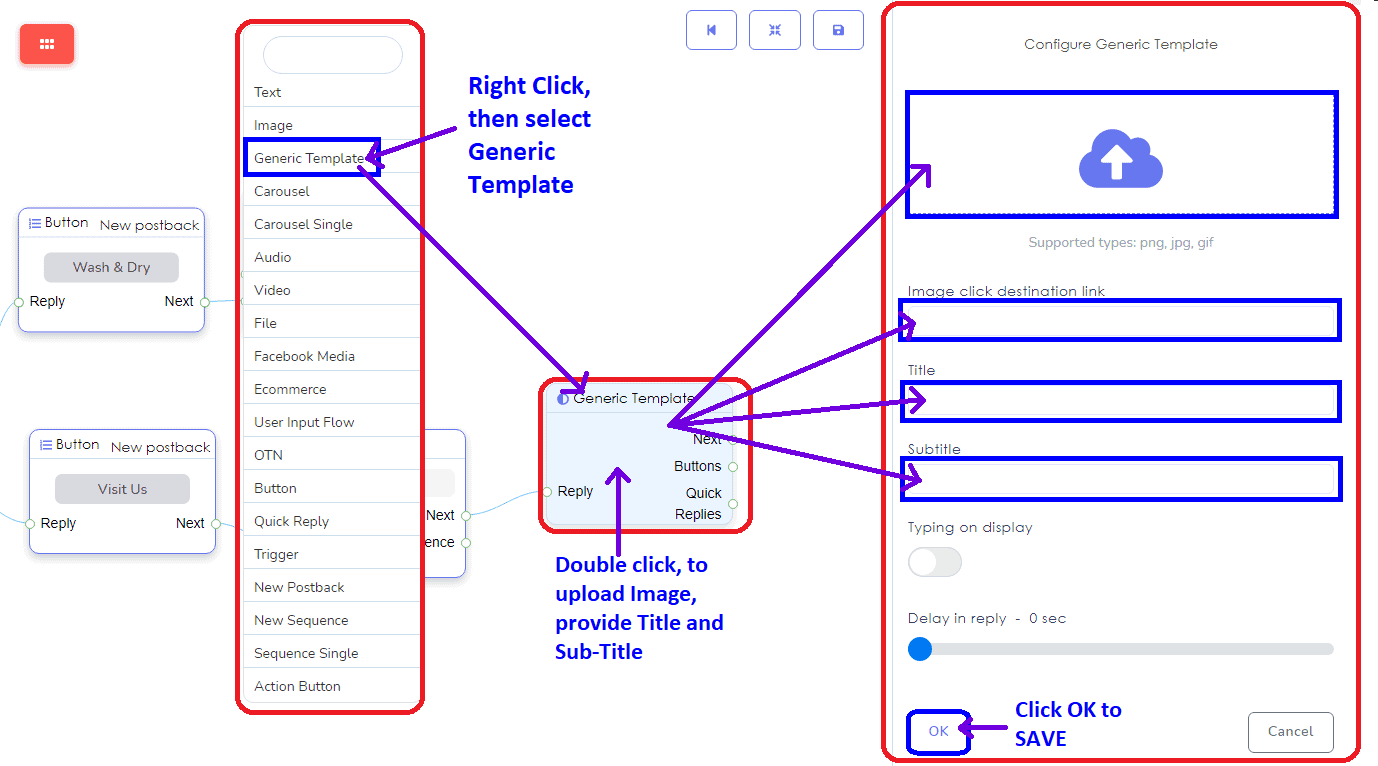
In Generic Template, you upload the image and image link destination, then provide the Title and Sub-Title.
Ang Quick Reply component, is the same as the Button component. You will choose between New Postback, Postback, Phone, or Email, as your Quick reply type.
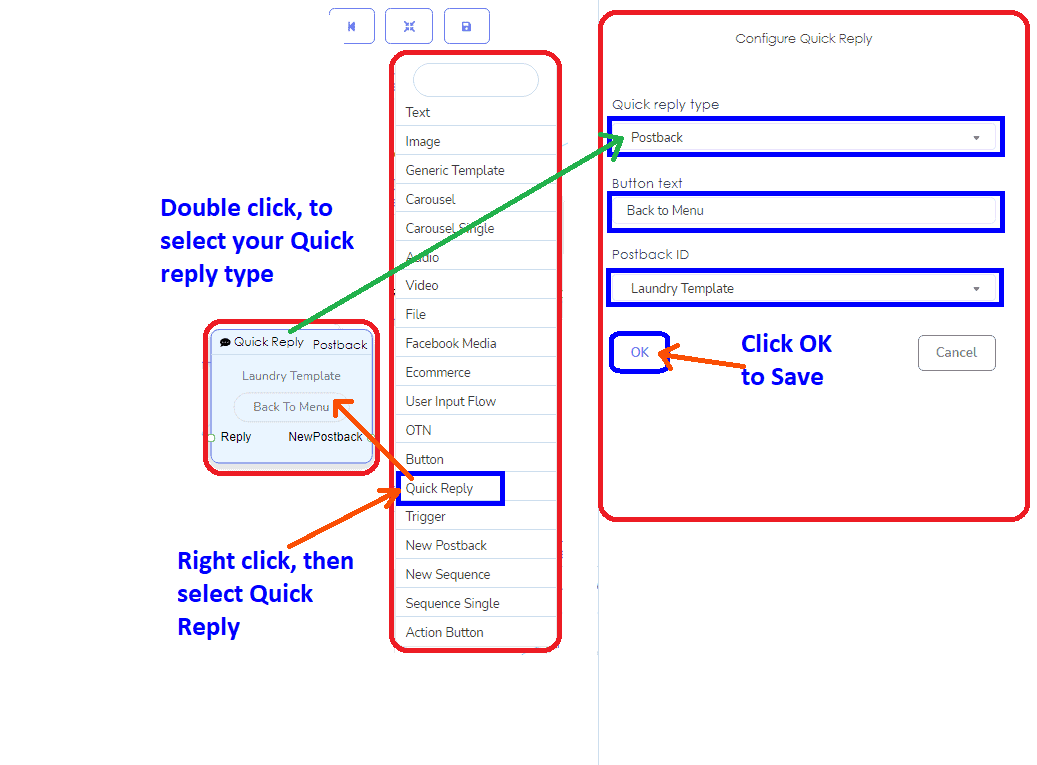
Quick reply using the New Postback.
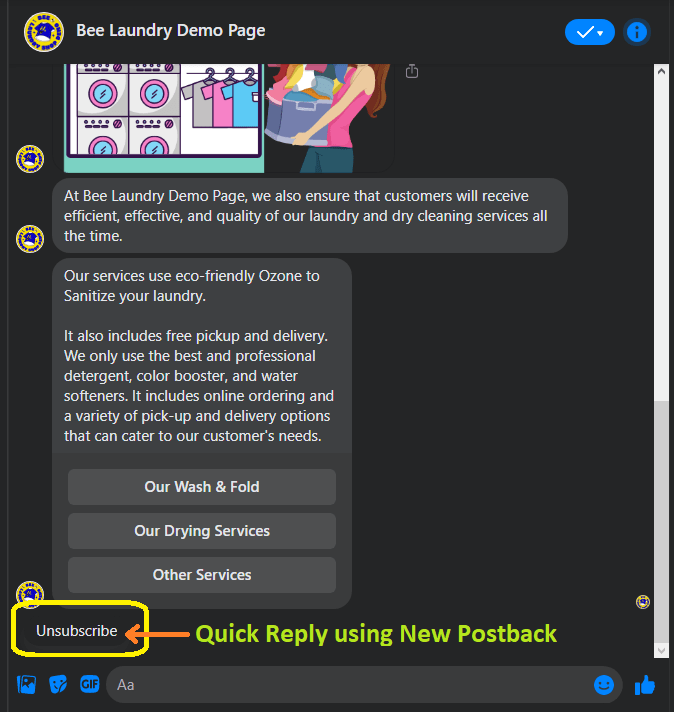
Quick reply using the New Postback.
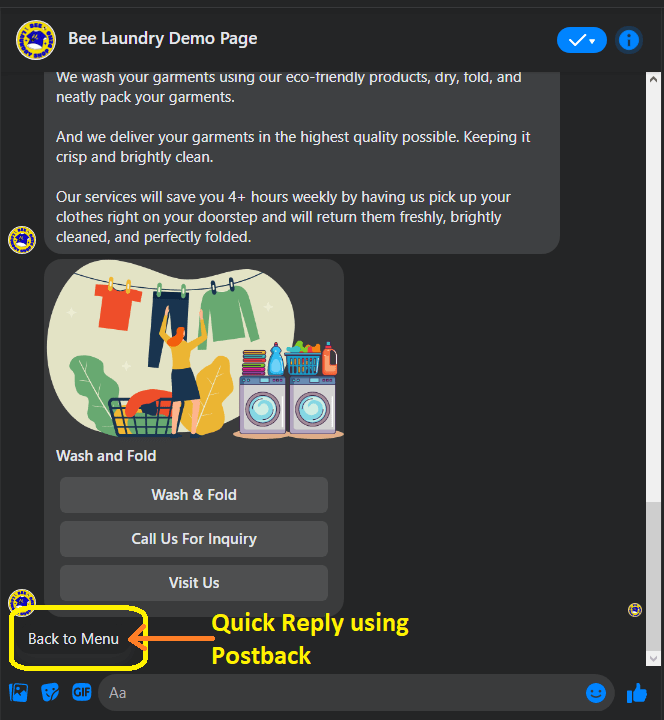
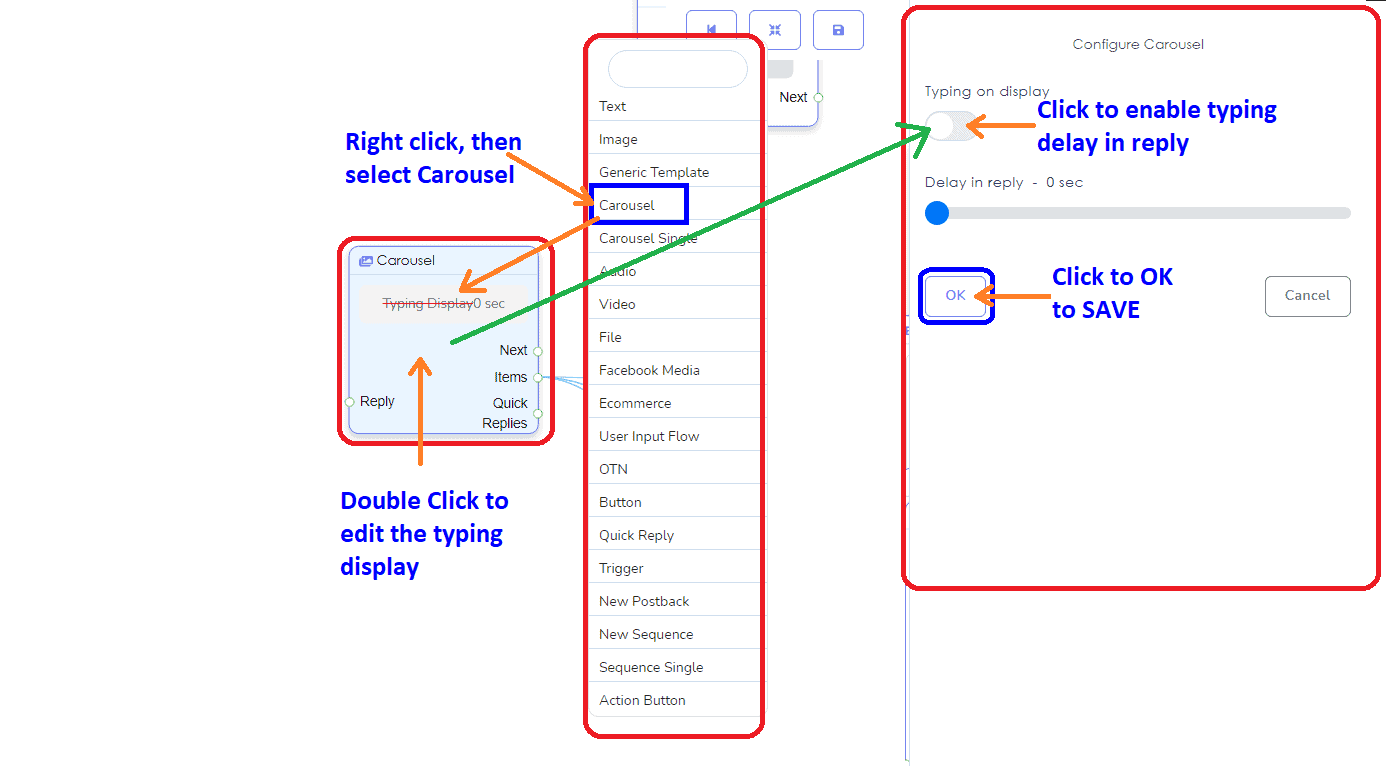
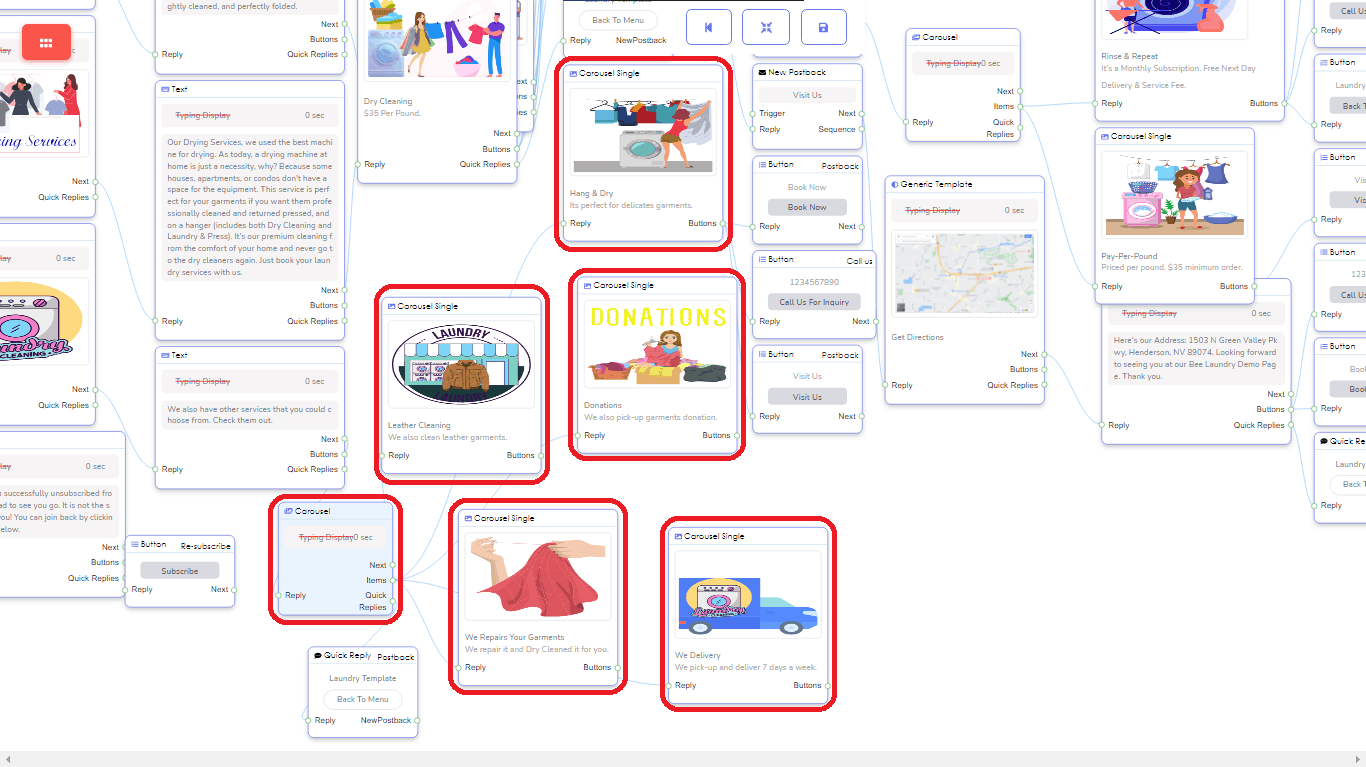
The Carousel component will allow you to reply with a carousel. It will help you attach or connect items with images and information using the Carousel Single. In 1 carousel you can have 10 Carousel Single Item connections.
Ito ang Carousel Single Item, provide the image, image link, Title, and Subtitle.
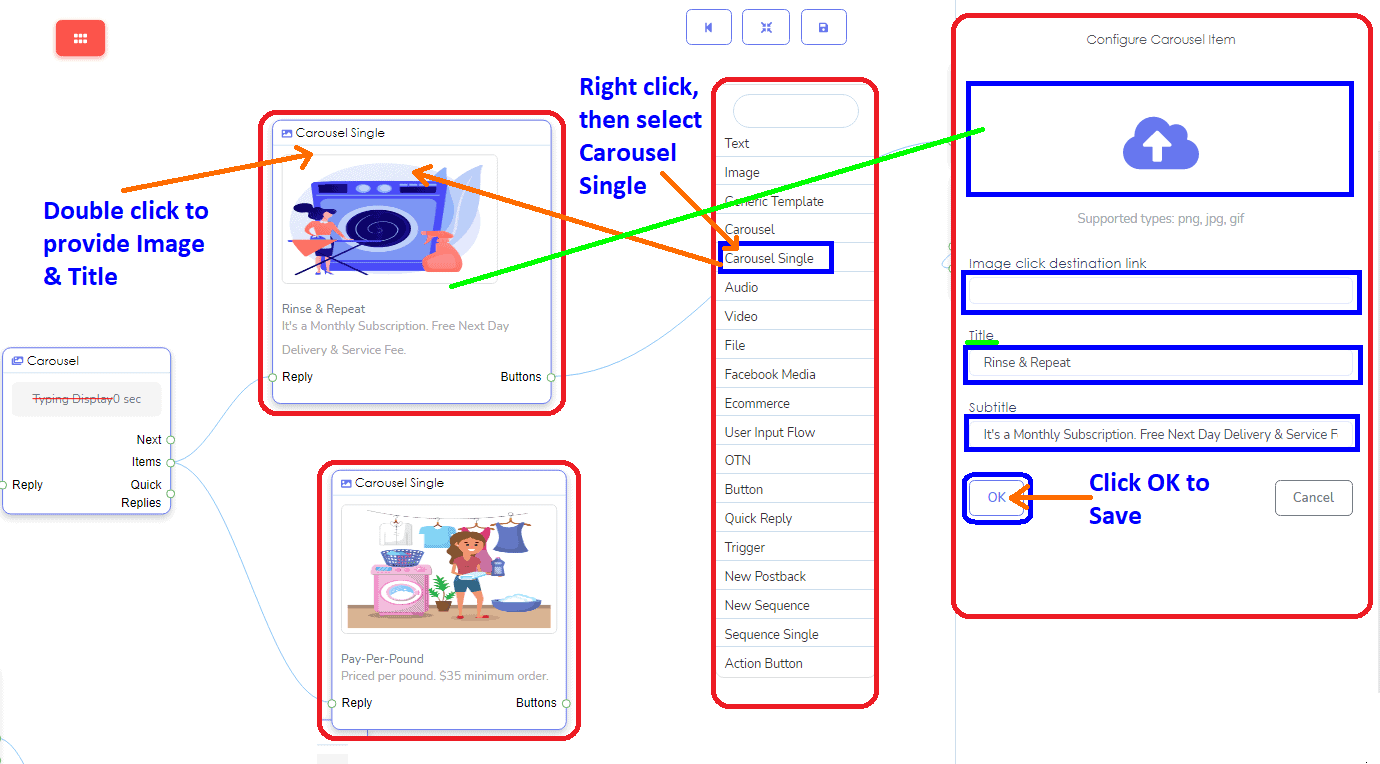
This is the Carousel Single Item. You can make 10 on it in 1 Carousel.
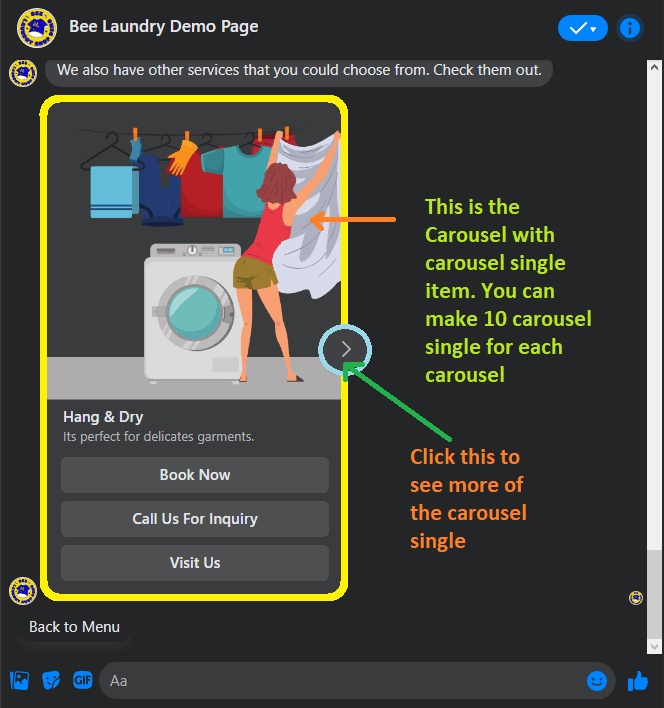
This is the example of the Carousel in your Messenger.
This is the unarranged Visual Flow in Editor Screen.
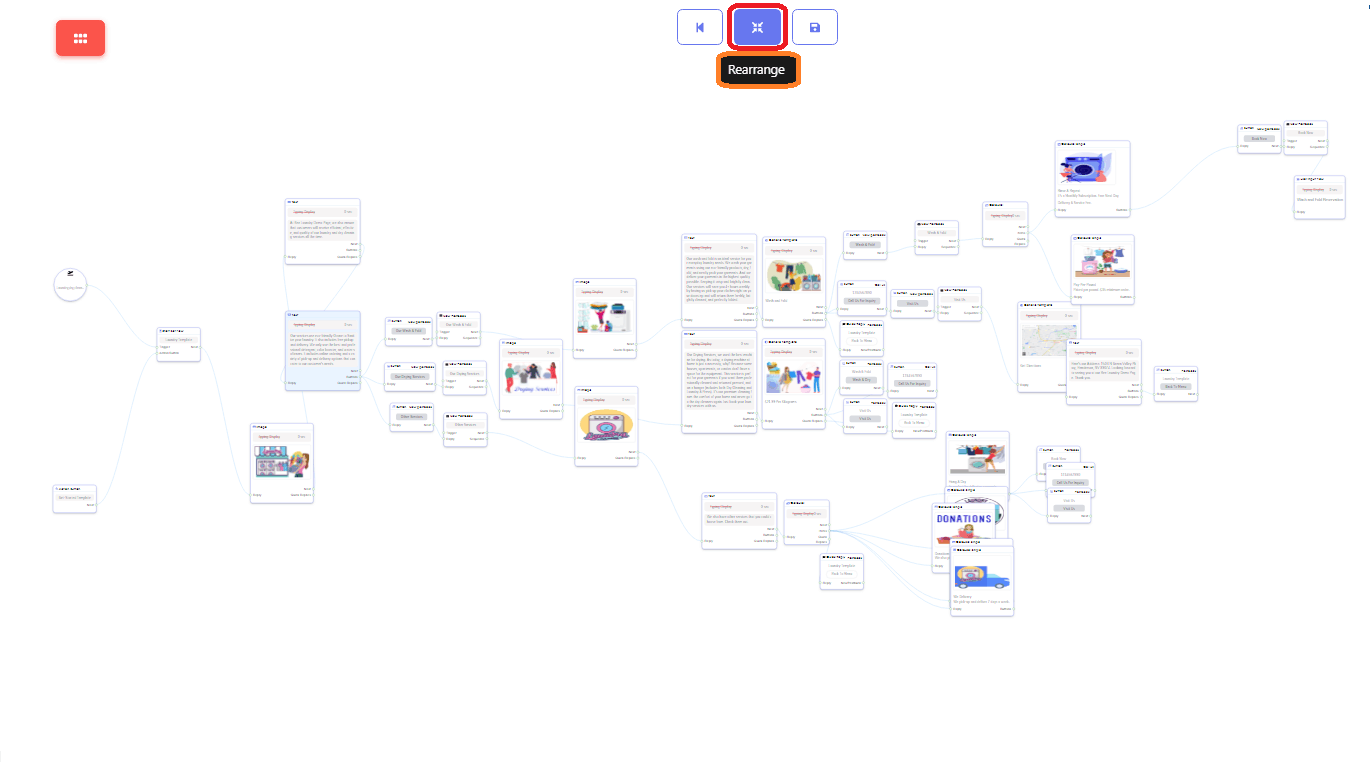
This would be the view of your editor screen after you click the re-arrange button. A nice and organized flow.
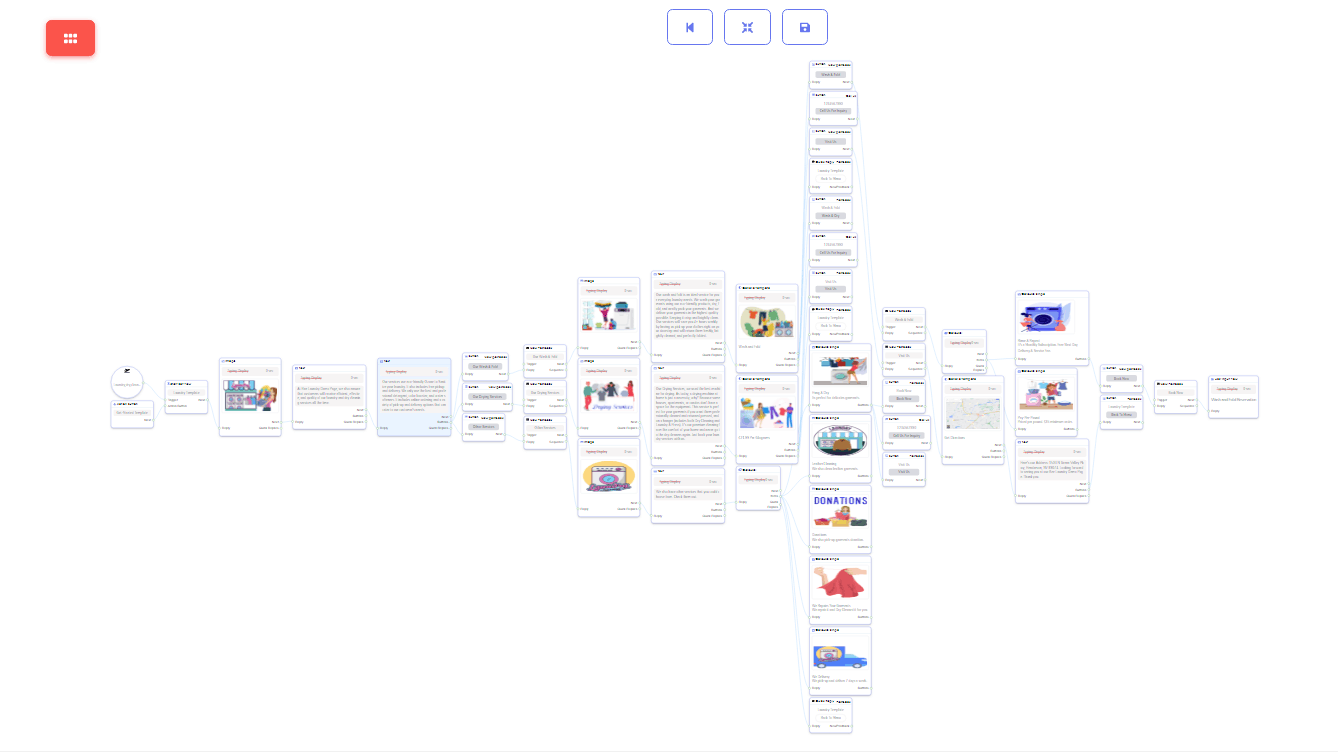
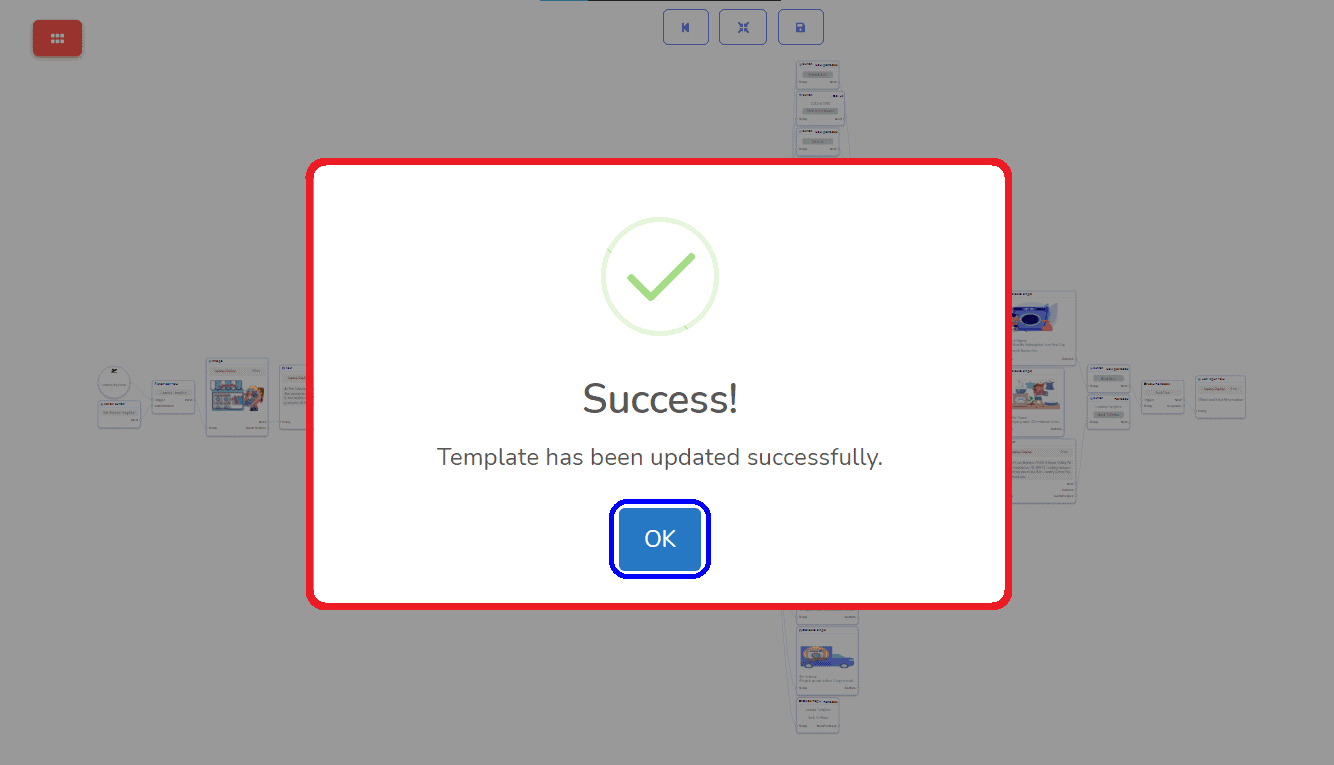
Click Save. To save your Visual Flow template.
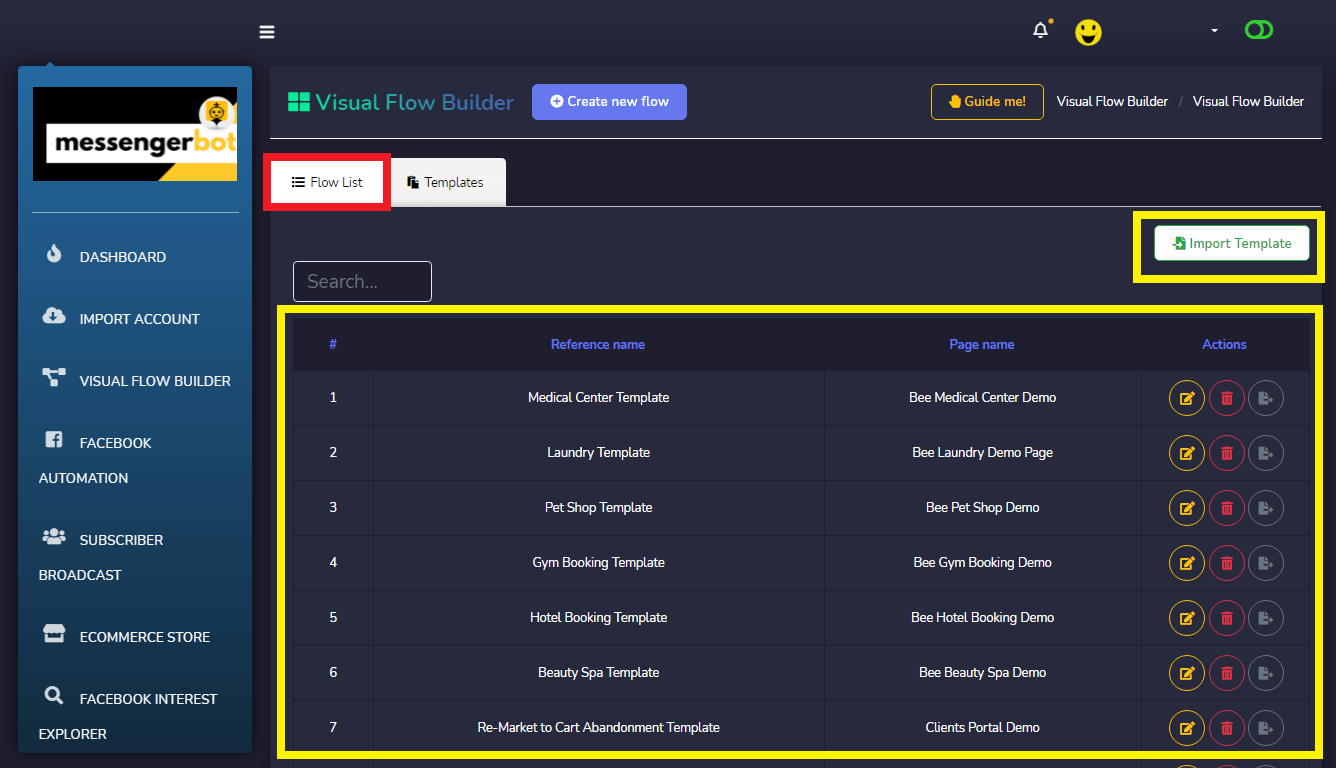
This is your Visual Flow Builder Screen. It contains all your Flow List. You can also Import templates if you want. Just click Import template.
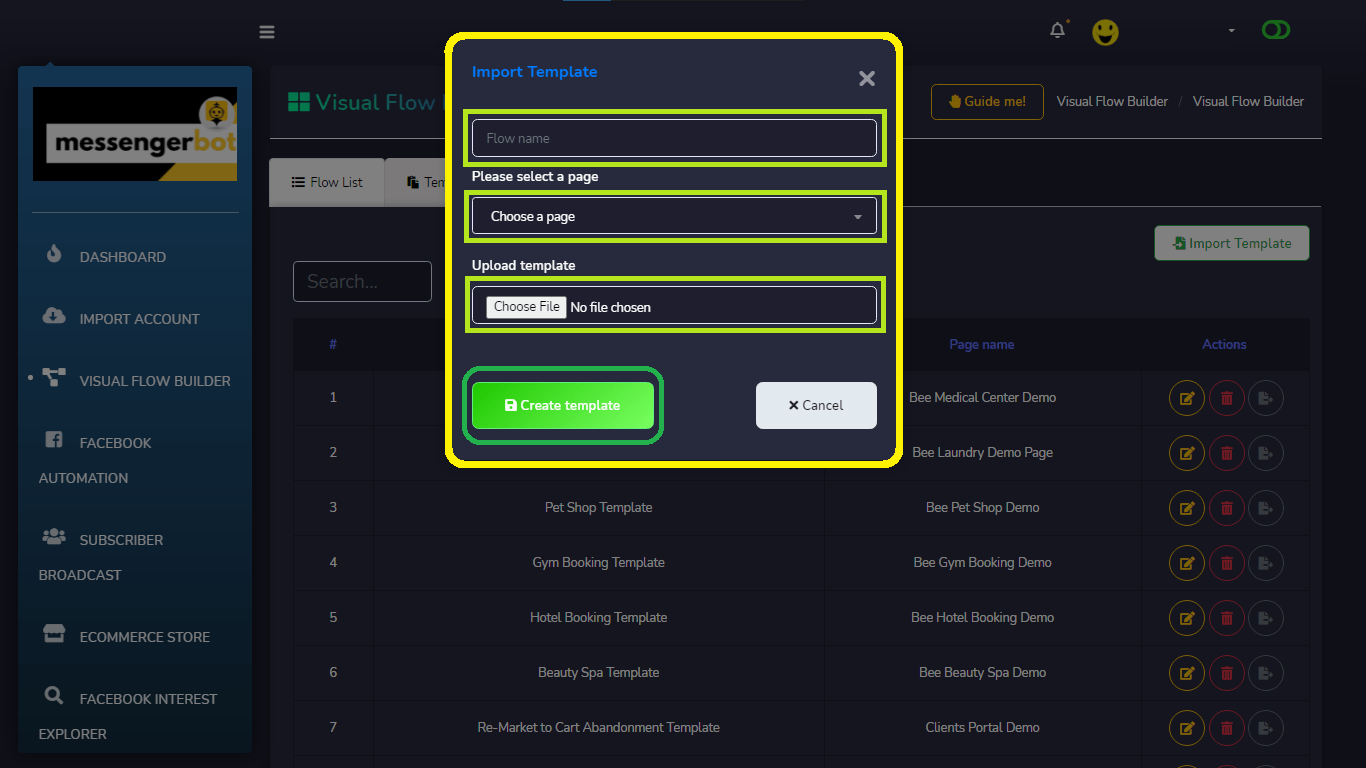
In importing a template you need to give the Flow Name, Select a Facebook Page, and Upload Template. Pagkatapos, i-click ang Create a template.
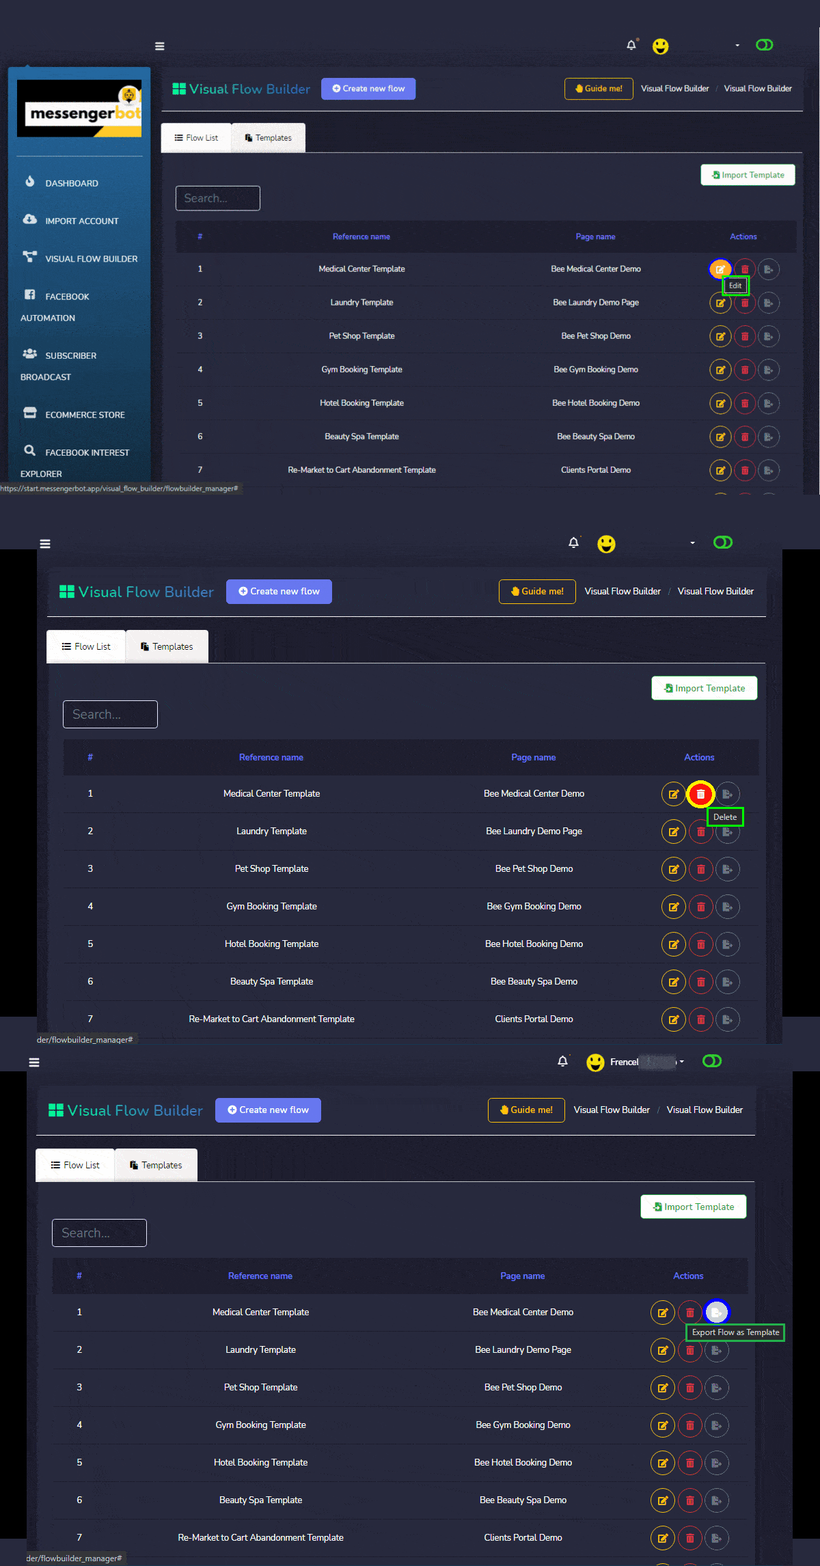
You can Edit your Template if you want to add more flow components. Or you can delete the entire template. Maaari mo ring Export your Flow as a Template and can share it with your connection.
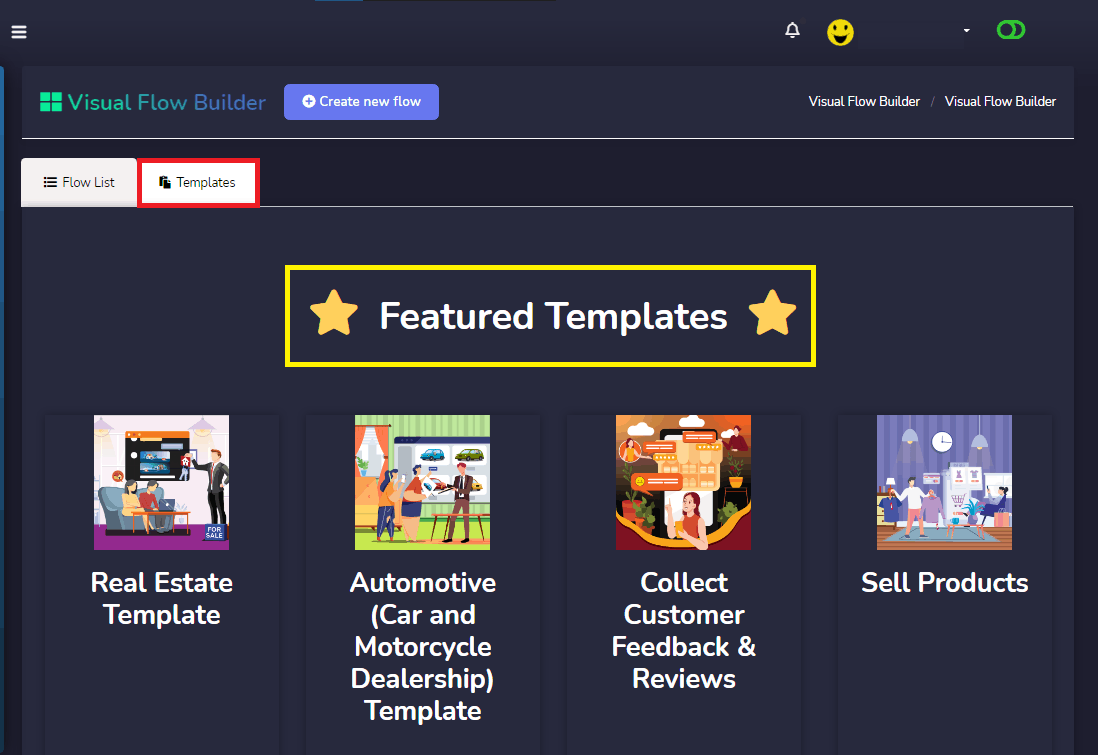
We also have featured templates that you can use. As your reference on building your own Flow. You can enhance the template at add images of your own product.
Visual Flow Builder is a Repeated process when using its components in building your flow. It will serve as your Get-Started flow in your Facebook Page Messenger. Always remember, that Each Component in Virtual Flow Builder needs to be connected to the right component to make your flow working.
Now, you know how to make your Visual Flow Builder. Don’t forget to visit our link to sign up for the Messenger Bot Application.
