Message Could Not Be Sent on Messenger: The 2026 Troubleshooting Guide

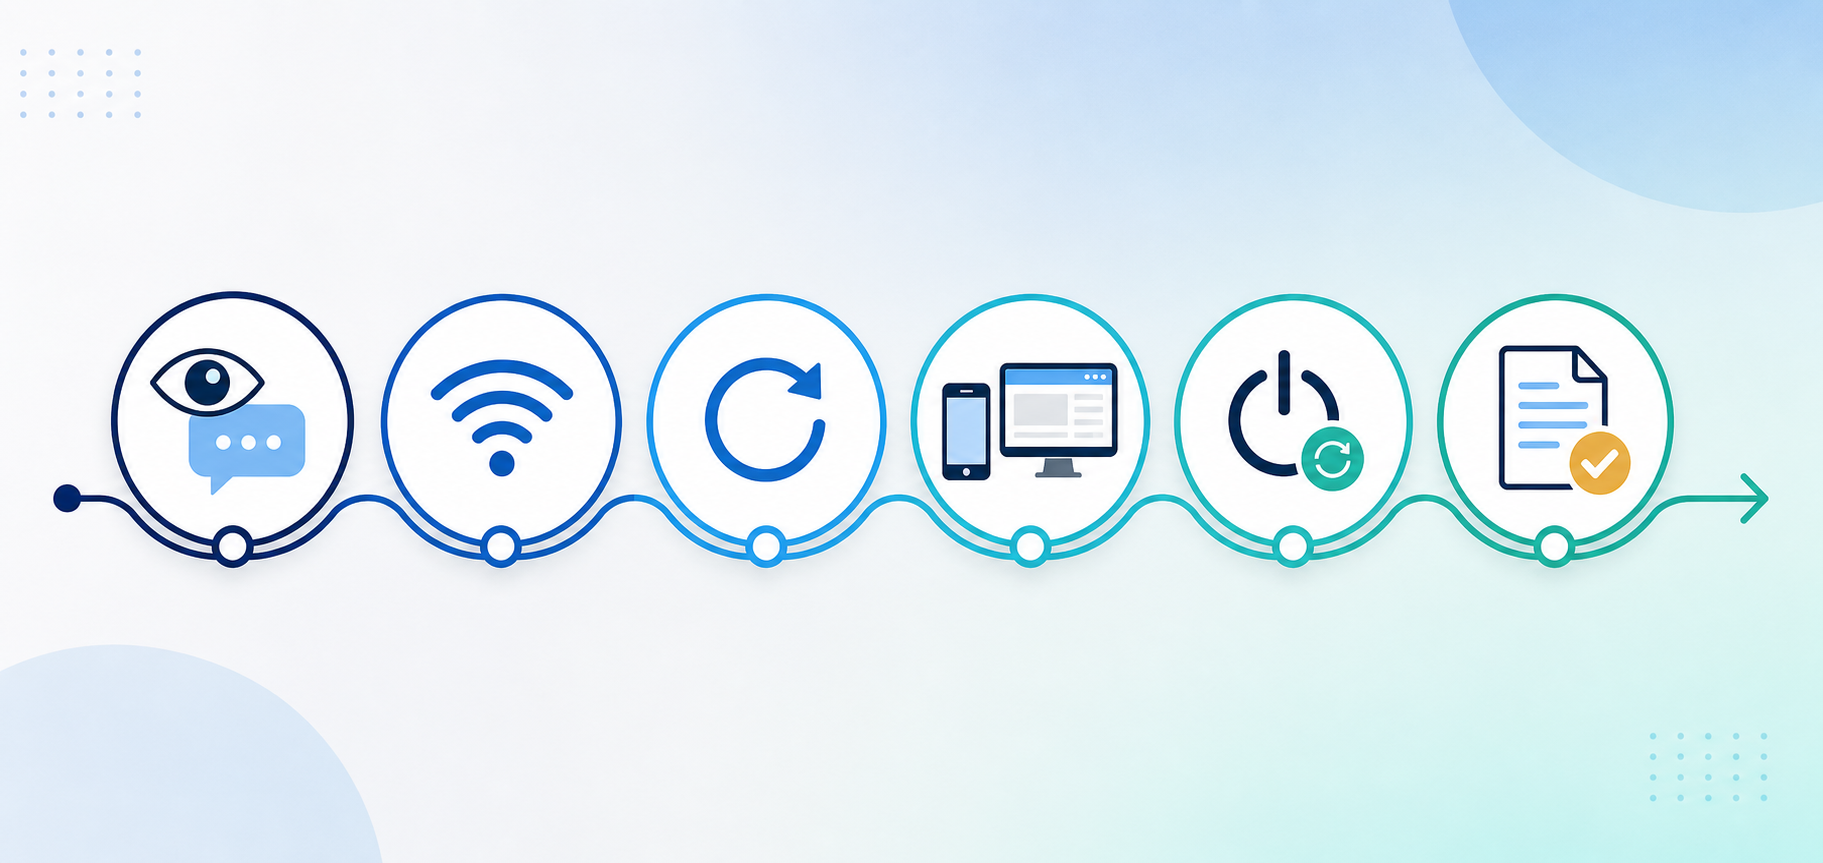
Six-step workflow for troubleshooting a message that could not be sent on Messenger

When a message could not be sent on Messenger, users often seek immediate technical explanations. However, effective troubleshooting relies on systematic observation and structured documentation rather than immediate diagnosis. This methodology focuses on creating a reliable observation log, maintaining reproducible steps, and establishing a support-report template that can be used for sharing with support or personal records. We focus on the six checks: record the visible state, check ordinary connectivity, retry once, compare app and web behavior as an observation only, restart and update through the official app store, and consult the current Meta Help Center. Through these six checks, we build a factual framework that ensures our notes are based on objective observation.

If you encounter a scenario where a message failed to send on Messenger, the app provides observable visual cues. By recording these cues, checking basic connectivity, performing a single retry, comparing interfaces, restarting your device, and checking official documentation, you build a concise troubleshooting log. This process avoids attributing failure to unverified reasons or speculating about why it happened. The objective is simply to observe the current state, follow the six checks, and determine the next observable step without guessing at any underlying cause.

The following sections detail how to document every stage of the process, ensuring that privacy-safe screenshots, accurate timestamps, and clear reproducibility notes form the foundation of your troubleshooting effort. Building this documentation requires careful attention. Every action taken must be recorded accurately, and any action outside the six-step checklist should be avoided. This ensures that the resulting support-report template is an accurate reflection of the application’s observable state.

1. Record the Exact Visible Words and State

The first step requires you to record the exact visible words and state shown on your screen. Do not guess what the error means; simply document its appearance. When a send failure occurs, the Messenger app displays specific visual indicators. Your primary task is to capture this state accurately for your observation log. The observation log must act as a chronological record of the application’s visual behavior, starting from the exact moment the failure was first observed.

To create a robust observation log, start by taking a privacy-safe screenshot. A privacy-safe screenshot captures only the error indicator and the immediate surrounding interface, excluding personal conversations, names, or sensitive data. This practice is crucial for maintaining confidentiality while providing verifiable evidence of the visual state. If the app shows a red circle with an exclamation mark, capture that icon. If the text explicitly reads “Not Sent,” ensure that text is clearly visible in your documentation. For support requests, these screenshots provide verifiable evidence of the application’s visual state at a specific moment. Without these privacy-safe screenshots, sharing with support relies on memory, which degrades the reliability of the support-report template.

In addition to the screenshot, record the precise timestamp of the failure. Note both the local time and the Coordinated Universal Time (UTC). Timestamps are critical for reproducibility notes. When creating a support-report template, a clear timestamp allows a support team to correlate the visual failure with their internal observations. It creates a clear point in time for the troubleshooting log. If the visual state changes—for example, if the red exclamation mark appears immediately or if the app shows an empty circle for a period before transitioning to a failure state—record the duration of this transition in seconds. These precise measurements are the building blocks of accurate reproducibility notes.

This careful recording process ensures your record is based on facts. You are noting what the screen displays, avoiding any assumptions about underlying causes. Keep this log updated as you proceed through the remaining steps. Record the state before every subsequent action, and record the state immediately after. This continuous recording loop ensures that your observation log is comprehensive and ready for sharing with support.

2. Check Ordinary Connectivity

The second step involves observing whether an ordinary page loads. This step requires you to check ordinary connectivity without diagnosing the method of connection. You only need to observe the loading behavior of a standard website; do not investigate or infer anything beyond that visible result. The goal is to document whether the device can complete a standard page load, which serves as a vital data point in the observation log.

To perform this check, open a standard web browser on your device. Navigate to a text-heavy, regularly updated website that you visit frequently. Observe the loading process. If the page loads completely and you can scroll through the text, you have observed that an ordinary page loads. Record this successful observation in your support-report template. Note the exact UTC timestamp of this observation and the specific website used for the check. This adds depth and verifiability to your reproducibility notes.

If the page fails to load, displays an offline warning, or remains blank, you have observed a failure in ordinary connectivity. Document this outcome precisely. State in your reproducibility notes: “Attempted to load an ordinary web page; the page did not load.” Do not attribute this failure to any specific cause. Simply note the observation. This information is vital for sharing with support, as it establishes the baseline connectivity state of the device at the timestamp recorded in the first step. The support-report template must clearly show this observation alongside the initial privacy-safe screenshot.

By keeping the observation limited to whether a page loads, you maintain a clean, factual observation log. This approach ensures that your troubleshooting log remains objective and focused purely on observable phenomena. There is no need to explore the mechanics of the connection; the simple observation of the page loading or failing to load is the only fact required for this step of the support-report template.

3. Retry Once

The third check is to retry once. After recording the initial state and checking ordinary connectivity, you may attempt to send the message a second time. This is a single, deliberate action designed to yield a secondary observation. The importance of limiting this action to a single attempt cannot be overstated. Repeated attempts clutter the observation log without providing new factual data for the record.

Return to the Messenger app and locate the message that failed. Tap the visual indicator—such as the red exclamation mark—and select the option to retry, or simply attempt to send a new message. Do this exactly one time. Once the action is taken, observe the result and immediately log it in your support-report template. Take another privacy-safe screenshot to document this secondary state.

If the message sends successfully, record the exact time and the visual indicator of success (such as a filled circle). If the message fails again, record the new timestamp and note that the failure is reproducible under the current conditions. Your reproducibility notes should state: “Performed a single retry; the visual failure state reappeared.” This concise statement perfectly captures the factual outcome of the action without venturing into speculation.

Do not perform multiple retries. A single retry provides the necessary data for your observation log. Additional attempts do not provide new observable data and do not alter the objective state of the application. Add the result of this single retry to your support-report template, ensuring your support requests include this critical step. The discipline of the single retry is a cornerstone of maintaining an accurate and uncluttered troubleshooting log.

4. Compare App and Web Behavior

The fourth check is to compare app and web behavior as an observation only. This step involves using a different interface to observe if the visual failure state is consistent across platforms. This observation guides the next observable step but does not localize or diagnose a cause. It is a strictly comparative action designed to add a structural observation to the support-report template.

If your initial observation log was based on the mobile app, open a web browser, navigate to the official web interface, and log in. Attempt to send a message from the web interface. Conversely, if your first observation was on the web, use the mobile app for this step. Observe the outcome and record it in your support-report template. Ensure you take a privacy-safe screenshot of the outcome on this secondary platform, noting the UTC timestamp in your reproducibility notes.

App-versus-web comparisons act as observations only. The comparison does not establish anything beyond the two visible outcomes. If the message sends on the web but fails on the app, log this discrepancy. If it fails on both, log the consistent failure. Your concise troubleshooting log should simply state the platform used and the observed visual result.

When preparing support requests, explicitly state that this comparison was performed strictly for observation. This prevents team members from making unverified assumptions. The comparison merely adds another data point to your reproducibility notes, establishing the scope of the observable behavior. It is a powerful observational tool when used strictly within these defined boundaries, enhancing the thoroughness of the observation log.

5. Restart and Update Through the Official App Store

The fifth check involves restarting your device and checking for updates through the official app store. This is a standard procedure to establish a new baseline for observation. By restarting the device and verifying the app version, you ensure that the subsequent observations are made under controlled, baseline conditions. This is essential for reliable reproducibility notes.

Begin by fully powering off your device, waiting a brief period, and powering it back on. Once the device has restarted, navigate to the official app store for your platform. Check if an update for the Messenger app is available. If an update is present, install it. Document both the restart and the update process in your observation log, including the exact version number of the app if an update was installed. Note the UTC timestamp for when the restart was completed and when the update finished.

After completing these steps, return to the app and observe the visual state when you attempt to send a message. Record the outcome. If the “message could not be sent” visual indicator appears again, add a new timestamp and a reproducibility note to your support-report template. Take a fresh privacy-safe screenshot to capture the post-restart visual state.

This action establishes that the device has been restarted and the app is current according to the official store. Completing the restart and store check documents the baseline conditions before the final step. Your troubleshooting log should reflect that these steps were completed before proceeding.

6. Consult the Current Meta Help Center

The sixth and final check is to consult the current Meta Help Center. If you have completed the previous five steps and recorded all observations, you can refer to official documentation for policy information. This step transitions the process from local observation to reviewing documented platform standards, ensuring that any further action is guided by authoritative sources.

Meta says message limitations or Community Standards violations can prevent messages from being sent; readers may consult the current Meta Help Center. This is the official resource for understanding platform policies. Navigate to the Help Center and search for documentation related to message limitations or platform standards. Record the date and time you consulted the documentation in your observation log.

When you consult the Help Center, compare their documented policies with the facts in your observation log. Your support-report template is now complete, containing privacy-safe screenshots, accurate timestamps, reproducibility notes, and a concise troubleshooting log detailing the results of the six checks. This comprehensive log is ready for sharing with support or your own reference, ensuring that your troubleshooting remains grounded in observation. The record provides a complete, factual account of the application’s behavior.

Creating Support-Report Templates and Observation Logs

Maintaining a structured support-report template ensures that all observations are captured uniformly. Whether you are using Messenger Bot for business communications or managing personal messages, a standardized log facilitates clear support requests and reproducibility notes. The template must closely follow the six checks, leaving no room for speculation or unauthorized testing.

A standard template should include fields for the exact UTC timestamp, the initial visual state, the presence of privacy-safe screenshots, the outcome of the ordinary connectivity check, the result of the single retry, the app-versus-web observation, and whether the restart and update steps were completed. By filling out this template for every incident, you build a historical record of application behavior. This record is invaluable for identifying patterns based purely on documented, observable facts.

When executing a support request, provide the completed template alongside the privacy-safe screenshots. Instruct support teams to read the reproducible steps and observe the documented state. This methodology prevents miscommunication and ensures that all parties are operating from the same factual baseline. The process becomes a transfer of verifiable data rather than a transfer of assumptions.

The creation of these logs requires consistency. You must resist the urge to diagnose or speculate. Stick to the six checks. If an action falls outside these steps, do not perform it and do not log it. This focus ensures the integrity of your troubleshooting log. Every entry must be a verifiable observation supported by a privacy-safe screenshot and a precise UTC timestamp.

For additional details on utilizing tools effectively, you can review our overview of messenger app features. This internal resource provides further context on the application’s observable features without deviating from our established documentation methodology.

Advanced Documentation Techniques

While the six checks cover the core methodology, refining how you document these steps can enhance the value of your observation log. When capturing privacy-safe screenshots, consider using standard naming conventions for the files, such as appending the UTC timestamp to the filename. This practice simplifies retrieval during support interactions and ensures that the visual evidence is perfectly aligned with the written reproducibility notes.

Your reproducibility notes should be written in clear, unambiguous language. Avoid using adjectives or adverbs that imply certainty or frequency. Instead of writing that a failure happens “often,” record the exact number of documented failures within a specific timeframe based on your timestamps. This transforms subjective impressions into objective data for your record. The precision of your language directly impacts the quality of the observation log.

When comparing app and web behavior, ensure that the observations are recorded contemporaneously. Do not rely on memory. If you observe a failure on the app, immediately transition to the web interface and log the result. This immediate transition ensures that the baseline conditions are as similar as possible, strengthening the validity of the observation. Document the exact sequence of events in your support-report template.

The support-report template can be adapted to fit your specific workflow, provided it follows the six checks. You might choose to host the template in a shared document for real-time collaboration during team troubleshooting, or keep it in a secure local text file for personal use. The format is less important than the focus on observable facts. The integrity of the record must be maintained regardless of the medium used to store the observation log.

By mastering these advanced documentation techniques, you transform a simple troubleshooting process into a robust system for recording application state. This system provides a solid foundation for any necessary consultations with official documentation or support channels. The consistency required to maintain these records pays off in the clarity and reliability of the resulting support requests.

Building a Culture of Observation

The methodology presented in this guide emphasizes observation over assumption. When managing a messaging platform, especially in a business context using Messenger Bot, the ability to produce a clean, factual observation log is invaluable. It reduces the time spent on unproductive speculation and ensures that all users share a common understanding of the application’s state. This shared understanding is the primary benefit of standardized support requests and rigorous reproducibility notes.

By implementing these support-report templates, you train yourself and your team to focus on reproducible facts. Every incident becomes an opportunity to refine your documentation process. The privacy-safe screenshots act as a visual history, while the timestamps provide a chronological framework for the record. This culture of observation builds resilience and ensures that technical communications are based on solid evidence.

This disciplined approach applies equally to individual users. Keeping a personal observation log when encountering a visual failure state helps you track the frequency of the issue and provides a clear record if you ever need to consult official support channels. The six checks are designed to be universally applicable, providing a safe, reversible framework for documenting application behavior. They empower the user to gather factual data without risking unauthorized or undocumented changes to their device or account.

Remember that the goal is not to force a resolution, but to accurately describe the current reality. By adhering to the ordered troubleshooting checklist and utilizing the comparison table, you maintain the integrity of your observations. This commitment to factual logging forms the bedrock of effective, long-term technical management. A clear troubleshooting log is the ultimate product of this methodology, providing a verifiable account of the application’s observable state.

Furthermore, maintaining this observational consistency ensures that you are always prepared for escalating an issue. Whether you are submitting a report to a specialized support tier or simply passing the observation log to a colleague for review, the support-report template provides all the necessary context. The combination of privacy-safe screenshots, accurate UTC timestamps, and precise reproducibility notes eliminates the need for subjective interpretation.

The six checks provide a comprehensive yet bounded framework. By restricting actions to recording the exact visible words and state, checking ordinary connectivity, retrying once, comparing app and web behavior as an observation only, restarting and updating through the official app store, and consulting the current Meta Help Center, we ensure that every step is safe, reversible, and purely observational. This framework protects the integrity of the observation log and ensures the reliability of the resulting record. Through consistent application of this methodology, the process of documenting a visual failure state becomes systematic, predictable, and highly effective.

This systematic approach is essential for any long-term management strategy. By prioritizing observation and adhering to the six checks, we create a sustainable model for technical documentation. The resulting observation logs, support-report templates, and troubleshooting records form a robust foundation for understanding and responding to application behavior, ensuring that every support request is based on verifiable facts rather than unverified assumptions.

Troubleshooting Comparison Table

This concise table tracks the observable state based purely on the six checks. It serves as a quick reference for the observation log and the troubleshooting record.

Action Observable Step Documentation Method Next Step in Record
Record visible state Note the exact visual indicator on screen Privacy-safe screenshots, UTC timestamps Check connectivity
Check ordinary connectivity Observe if an ordinary page loads Add result to observation log Retry once
Retry once Perform a single retry action Log the visual outcome and timestamp Compare app and web
Compare app and web Observe behavior across interfaces Note discrepancy or consistency in support-report template Restart and update
Restart and update Restart device, update via official app store Record app version and restart timestamp Consult Meta Help Center
Consult Meta Help Center Review current Meta Help Center documentation Finalize support-report template for support requests Maintain observation log

Ordered Troubleshooting Checklist

Follow this strictly ordered checklist to build your concise troubleshooting log. Every step must be documented in the support-report template.

  1. Record the exact visible words and state using privacy-safe screenshots and precise UTC timestamps.
  2. Check ordinary connectivity by observing whether an ordinary page loads in a standard browser.
  3. Retry once and log the immediate visual outcome in your reproducibility notes.
  4. Compare app and web behavior as an observation only, noting the results for your support requests.
  5. Restart the device and update through the official app store, documenting the version.
  6. Consult the current Meta Help Center for policy documentation and finalize the log.

Frequently Asked Questions

What is the first step to take?

The first step is to record the exact visible words and state shown on the screen. Capture privacy-safe screenshots and note the exact UTC timestamp in your observation log to create a factual baseline.

How should I verify my connection?

You should check ordinary connectivity by observing whether an ordinary page loads in a standard web browser. Record this observation in your support-report template.

How many times should I attempt to resend?

You should retry once. A single retry provides the necessary observable data for your log without altering the objective state of the application.

Why do I check the web interface?

You compare app and web behavior as an observation only. This observation guides the next observable step in your reproducibility notes but does not localize or diagnose a cause.

Where can I find policy information?

Meta says message limitations or Community Standards violations can prevent messages from being sent; readers may consult the current Meta Help Center for official documentation.

Related Articles

Automotive Chatbots: A Dealership Evaluation Guide

Automotive Chatbots: A Dealership Evaluation Guide

Automotive Chatbots: A Dealership Evaluation Guide Route each vehicle question to the right team while keeping a person responsible for the follow-up. Evaluating conversational interfaces requires a pragmatic approach focused on boundaries, clear routing, and...

read more
HR Chatbots: A Risk-Aware Evaluation Guide for 2026

HR Chatbots: A Risk-Aware Evaluation Guide for 2026

HR Chatbots: A Risk-Aware Evaluation Guide for People Operations in 2026 Keep HR chatbot use narrow: protect private information, review risk, and preserve a human decision point. For modern People Operations teams, the volume of inquiries—ranging from basic policy...

read more
en_USEnglish