Table of Contents:
Messenger Bot is mainly a messenger bot building platform, though it has multiple features that can do online marketing. Messenger Bot’s messenger bot is a robust and powerful tool to talk to people smoothly and automatically. Messenger Bot has a classic bot builder to build a bot. With the classic bot builder, you can build a bot, though the process is a bit complex.
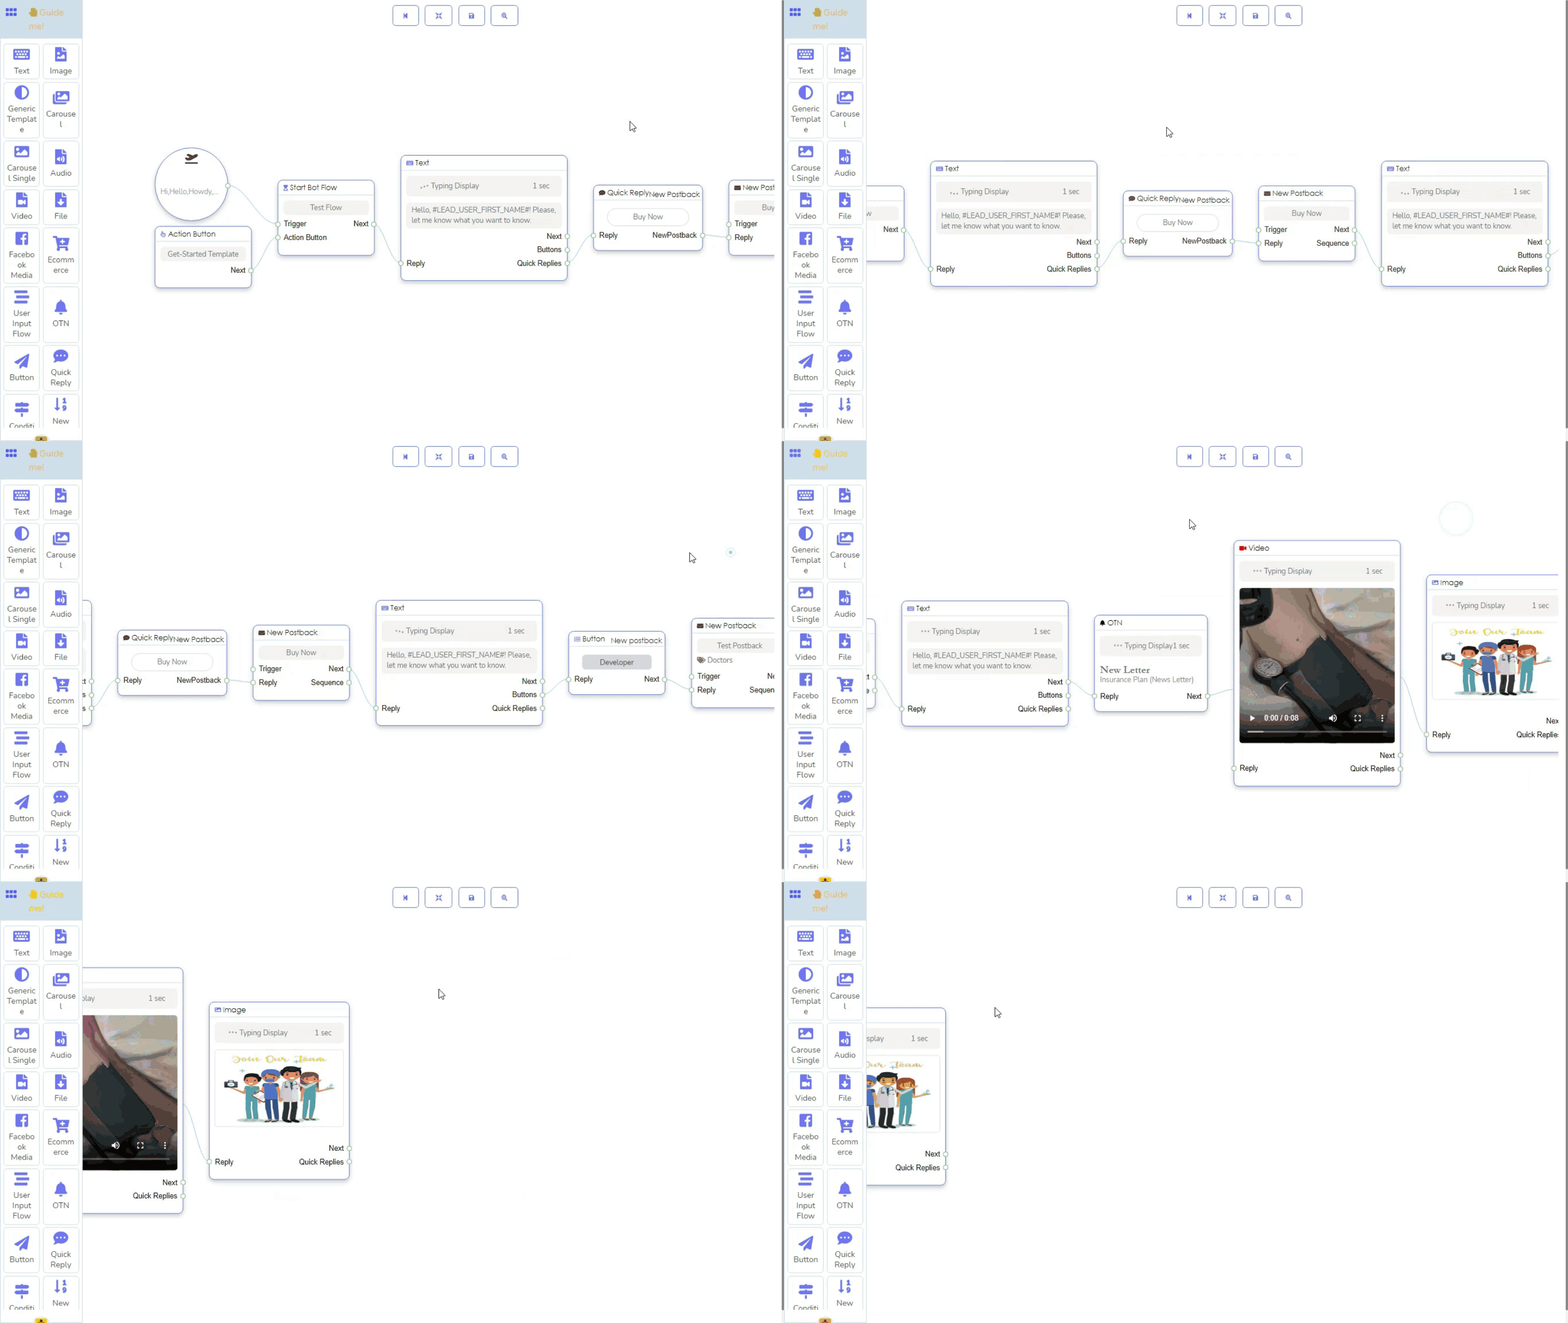
Therefore, to make bot-building easy, straightforward, and fast, Messenger Bot has presented Flow Builder, a Messenger Bot add-on. After you have added the add-on, the Flow Builder will be available on Messenger Bot. It is a graphical drag and drops Messenger bot builder. With the graphical editor, you can easily build a bot by dragging elements from the dock menu and dropping them on the editor, adding data to the elements, and connecting them to each other. On the Flow Builder, you can control all of the messages in the same place without moving to and fro. Moreover, you can envision all of the messages. Therefore, you can make a highly interactive and remarkably responsive bot easily in a short time.
Now let’s be familiar with the process of building a bot with the flow builder. In fact, in the article, I will discuss the elements or components of the Flow builder and how to build a bot on it. After you have read the article, you will be familiar with the elements and how to work with them. Therefore, you will able to build a messenger bot easily as you like.
Go to the flow builder:
To build a bot with the Flow Builder, first, go to the dashboard of the Messenger Bot. Then click on the Flow Builder menu on the left side of the Dashboard.
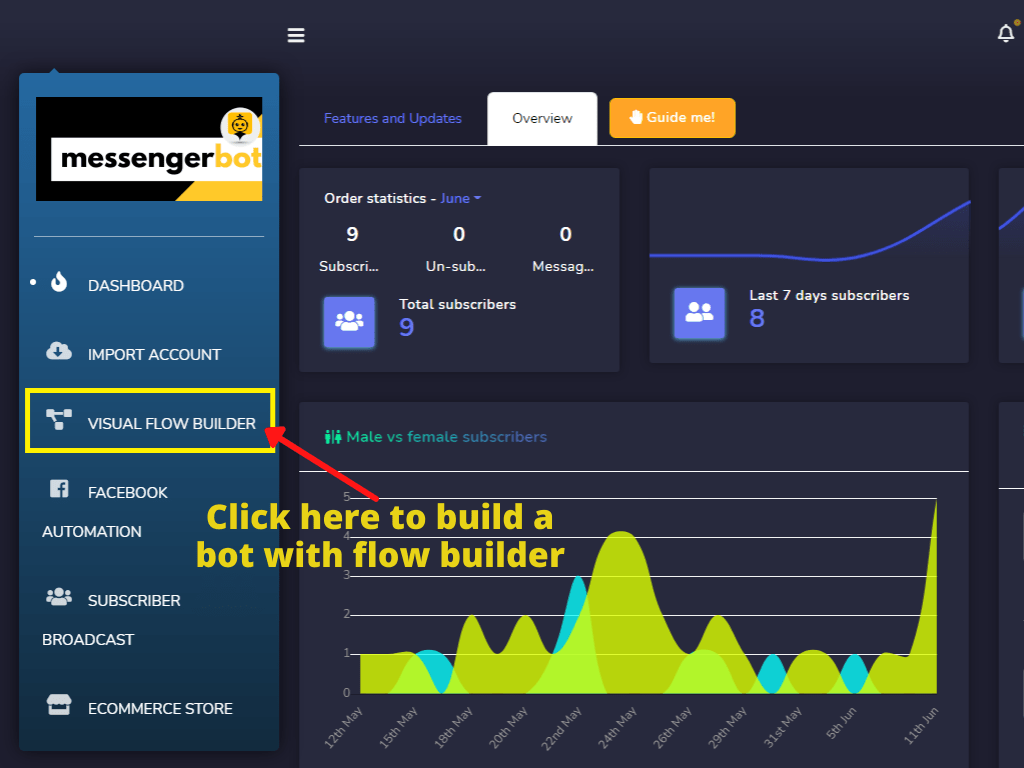
Instantly, the Visual Flow Builder page will appear with a button called to create a new flow.
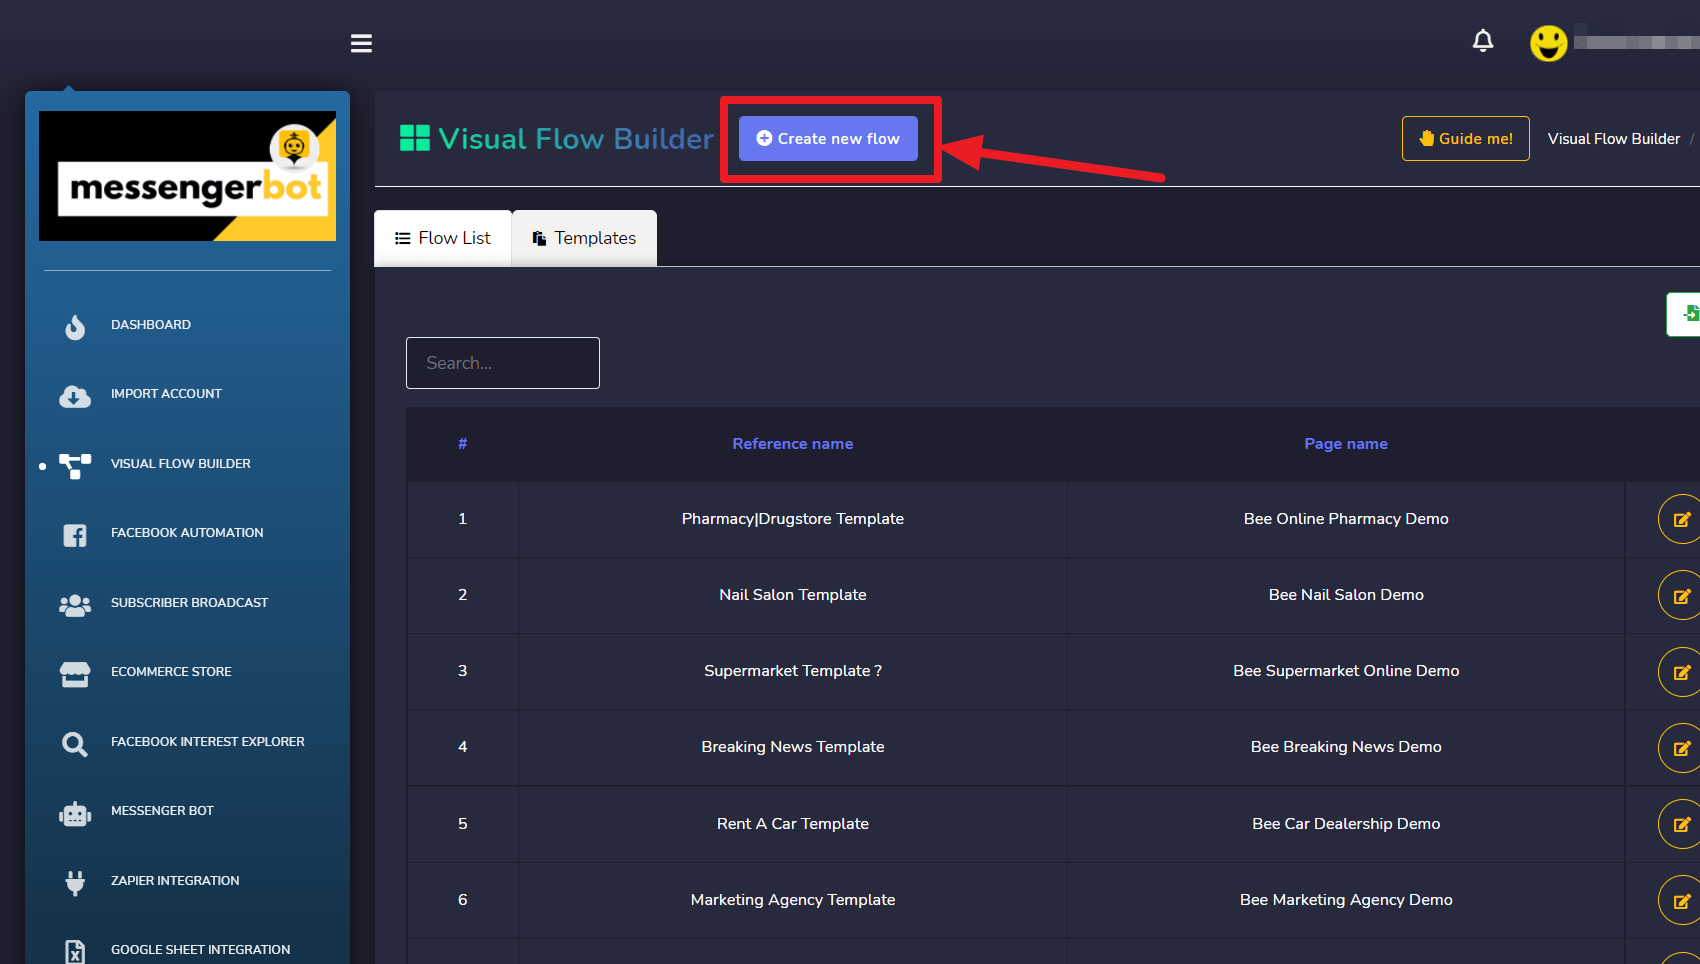
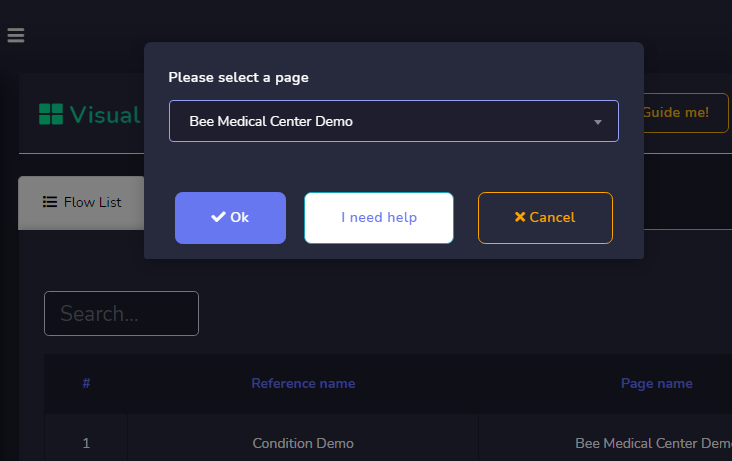
Now click on the create new flow button and a dialog box will appear. Now click on the select a page field and a drop-down menu of your page will appear. Now select a page on which you want to build a messenger bot. Now click on the ok button and instantly the editor of the flow builder will appear where you will build your bot.
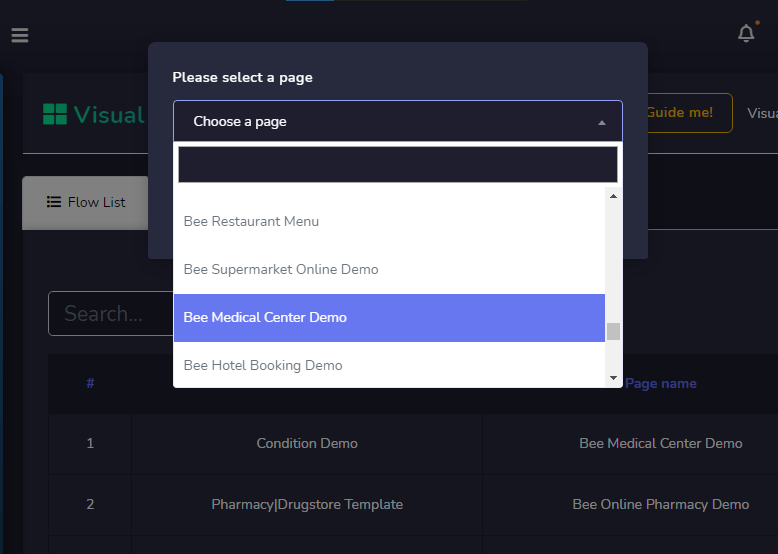
Now click on the ok button and instantly the editor of the flow builder will appear where you will build your bot.
Let’s see the Editor:
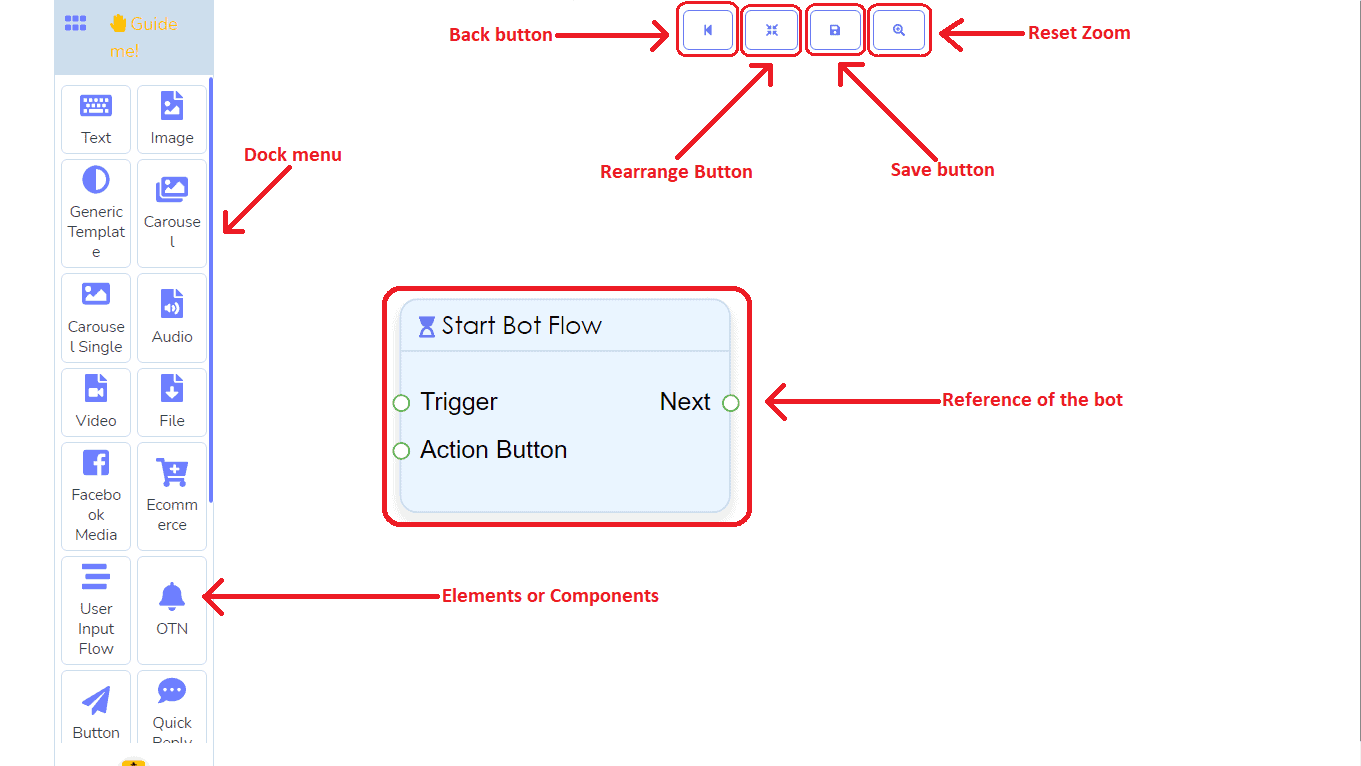
The Flow builder is divided into two parts– dock menu and editor. On the dock menu, all the elements are gathered together. And the editor is the place where you will build your messenger bot. There are 20 types of elements for the Messenger Bot Flow Builder if you have added some special add-ons, such as user input flow and message bot enhancers. Anyway, all the elements are on the Dock menu except one– the start bot flow that is already placed on the editor. The Start bot Flow is the reference of the bot that you are going to make. You will give the name of the messenger bot on the Start bot Flow element.
Drag element from the dock menu and place on the Editor:
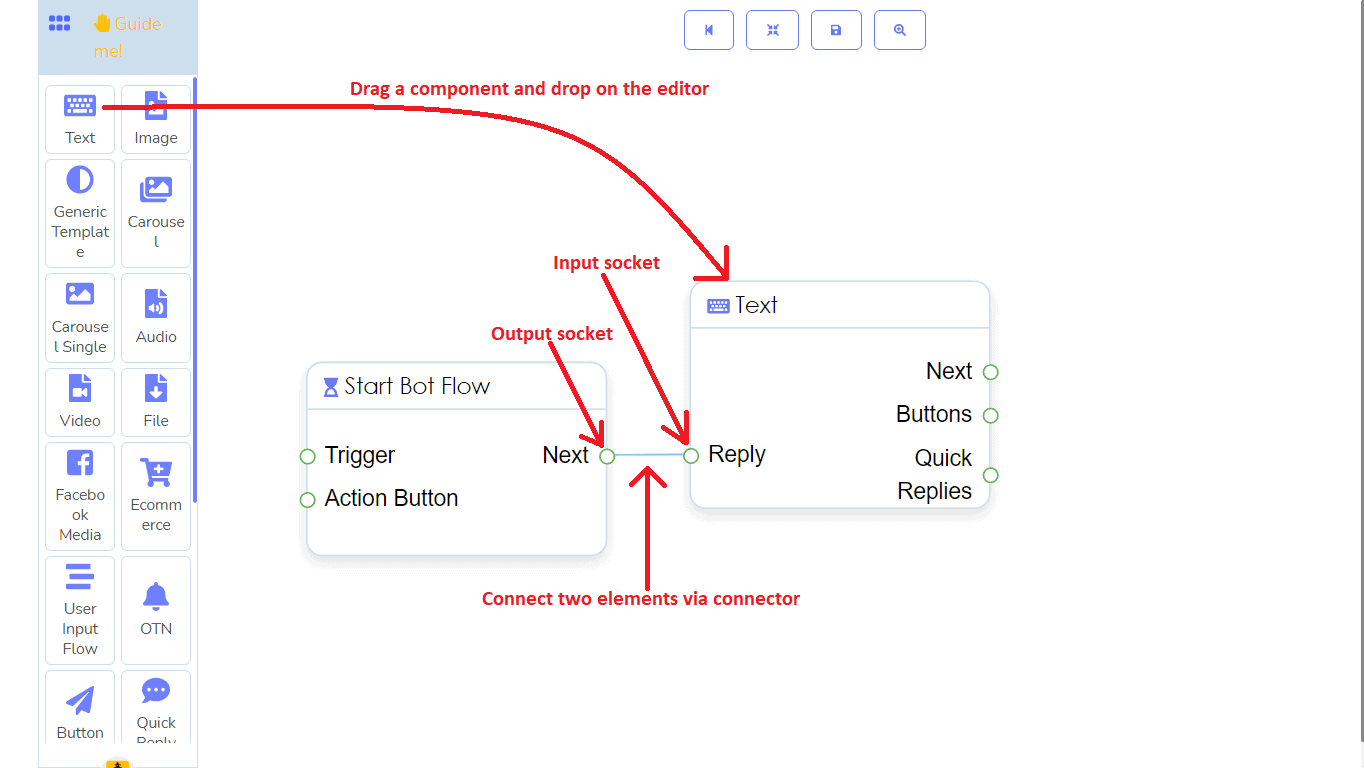
You have to drag elements that you need to build your desired bot from the dock menu and drop them on the editor.
Connecting elements with each other:
Then you have to connect the element with each other. The elements have two types of sockets— input socket and output socket. You have to link the input socket of one element to the output socket of another element.
Adding data to the elements:
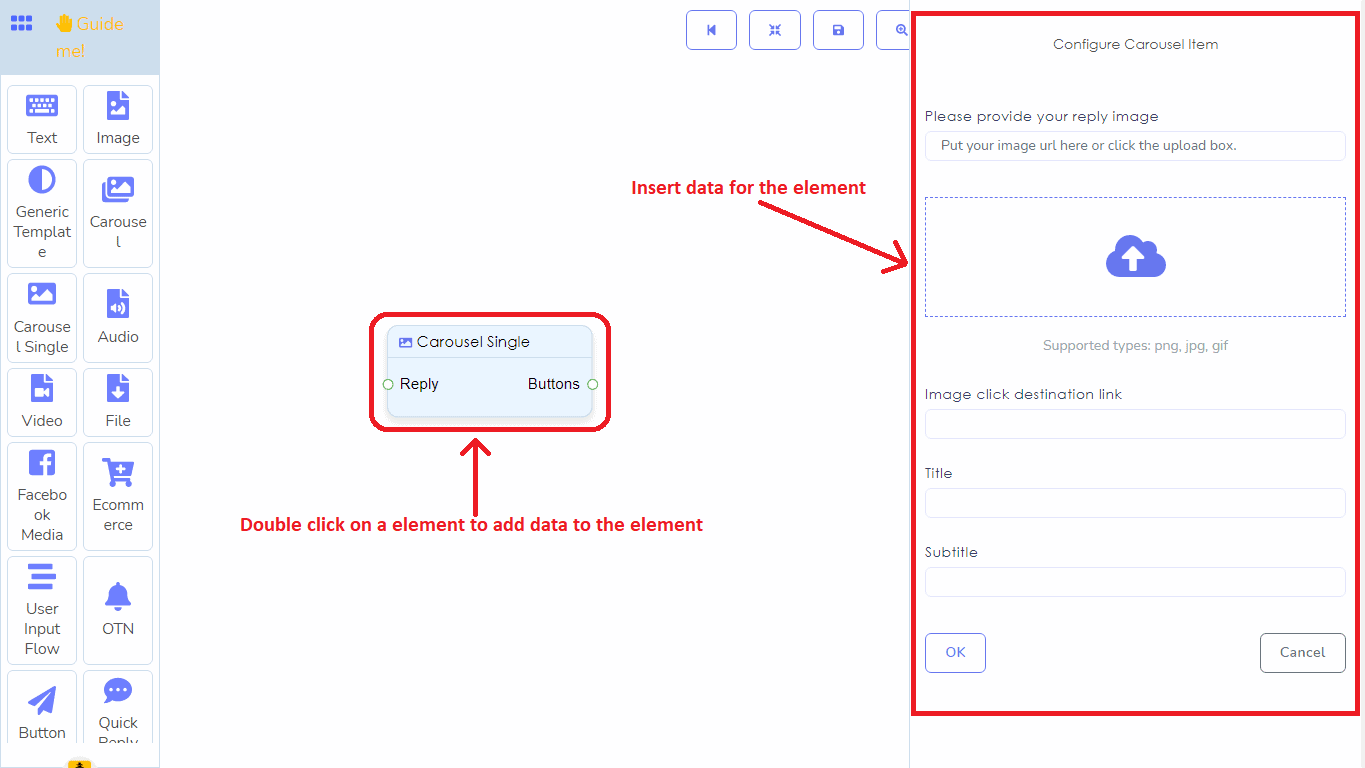
Now you have to add data to the elements. To add data, you have to double-click on the element. Just as you double-click on an element, a form will appear on the left side of the editor. Thereupon, you have to fill out the form with the necessary data. Each element takes a different type of data and the process of inserting data is a bit different.
Now let’s skim through the elements one by one.
Trigger element:
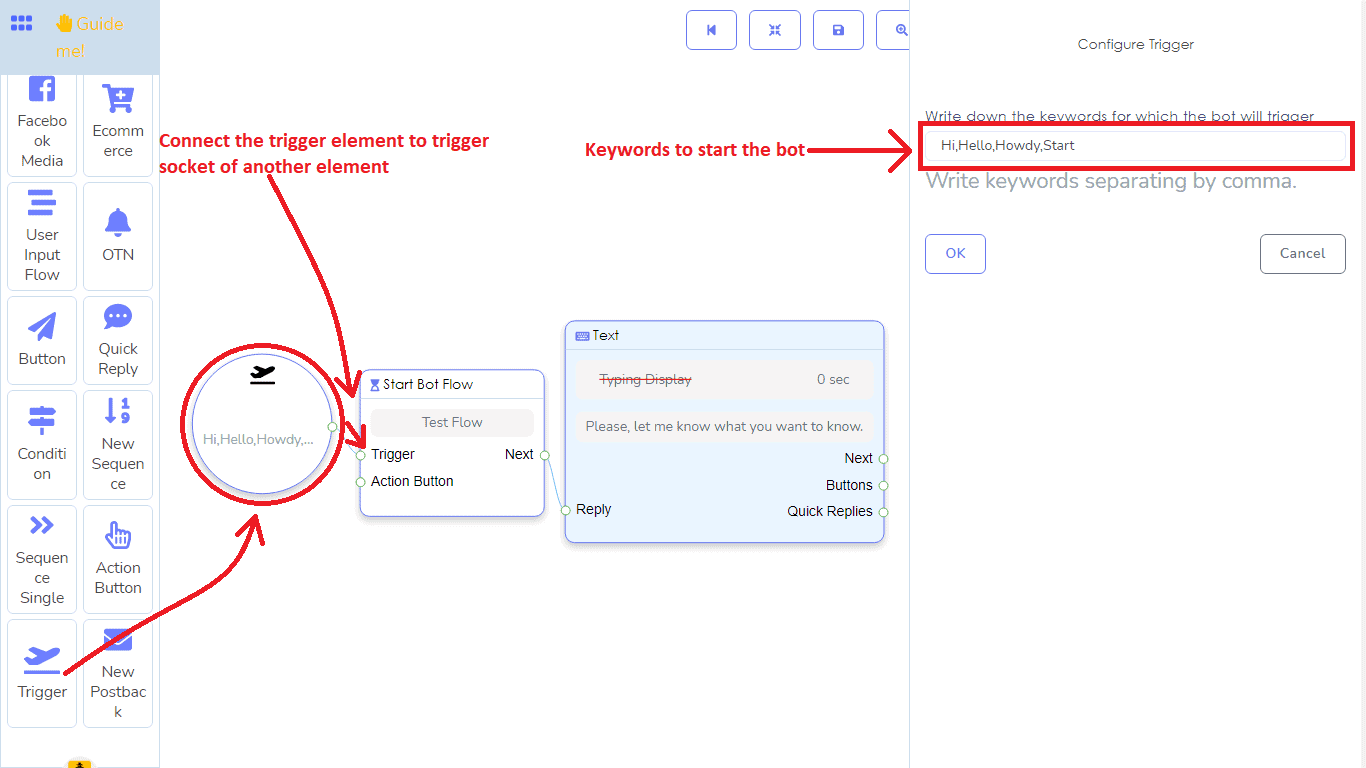
Trigger element takes text data as keywords— you can add multiple keywords in the trigger element. This element is required to build a messenger bot, placing at the beginning of the bot and it is responsible to start the bot. If the words a user types in the messenger match with the keywords in the trigger element, the messenger bot will start.
Text element:
Text element takes text data. This element is used to give text messages or text reply to the users. Of course, you can insert the first name or the last name of the user into the text data.
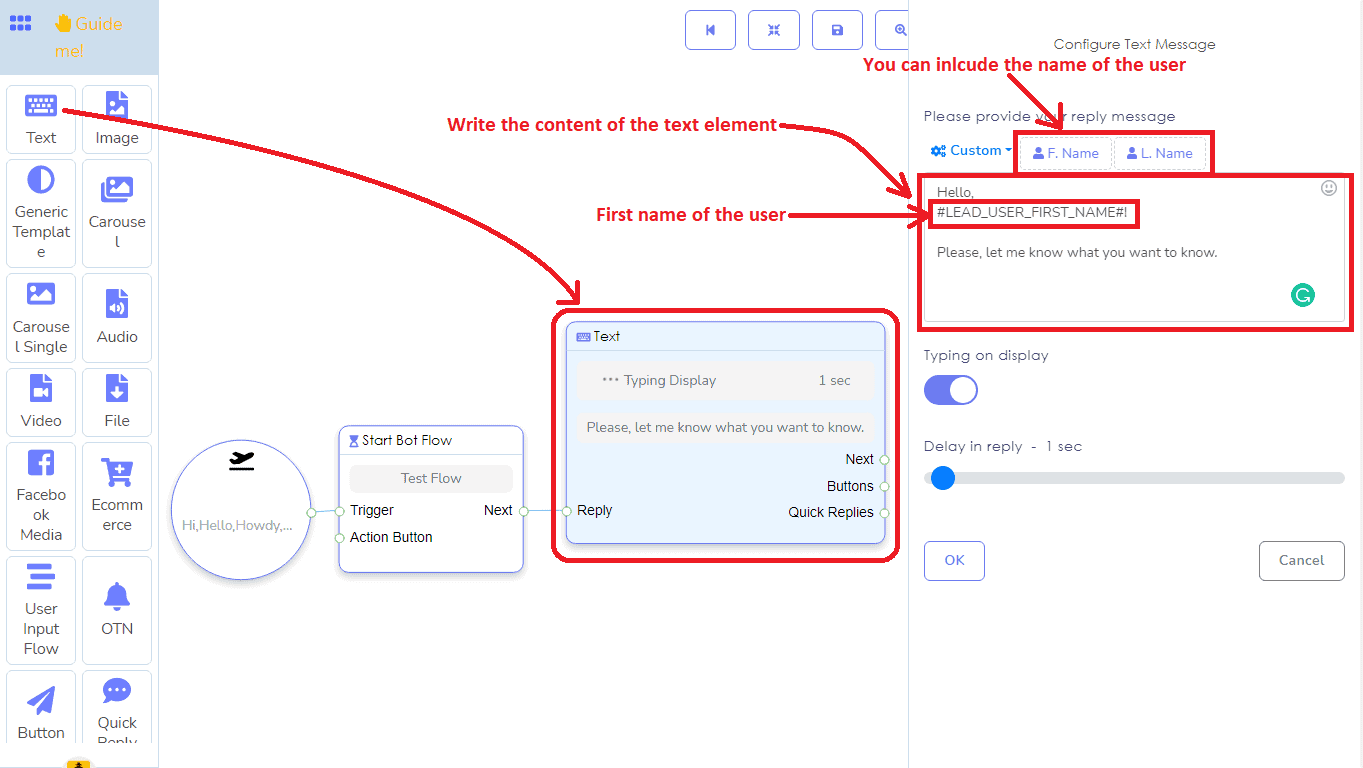
Image element:
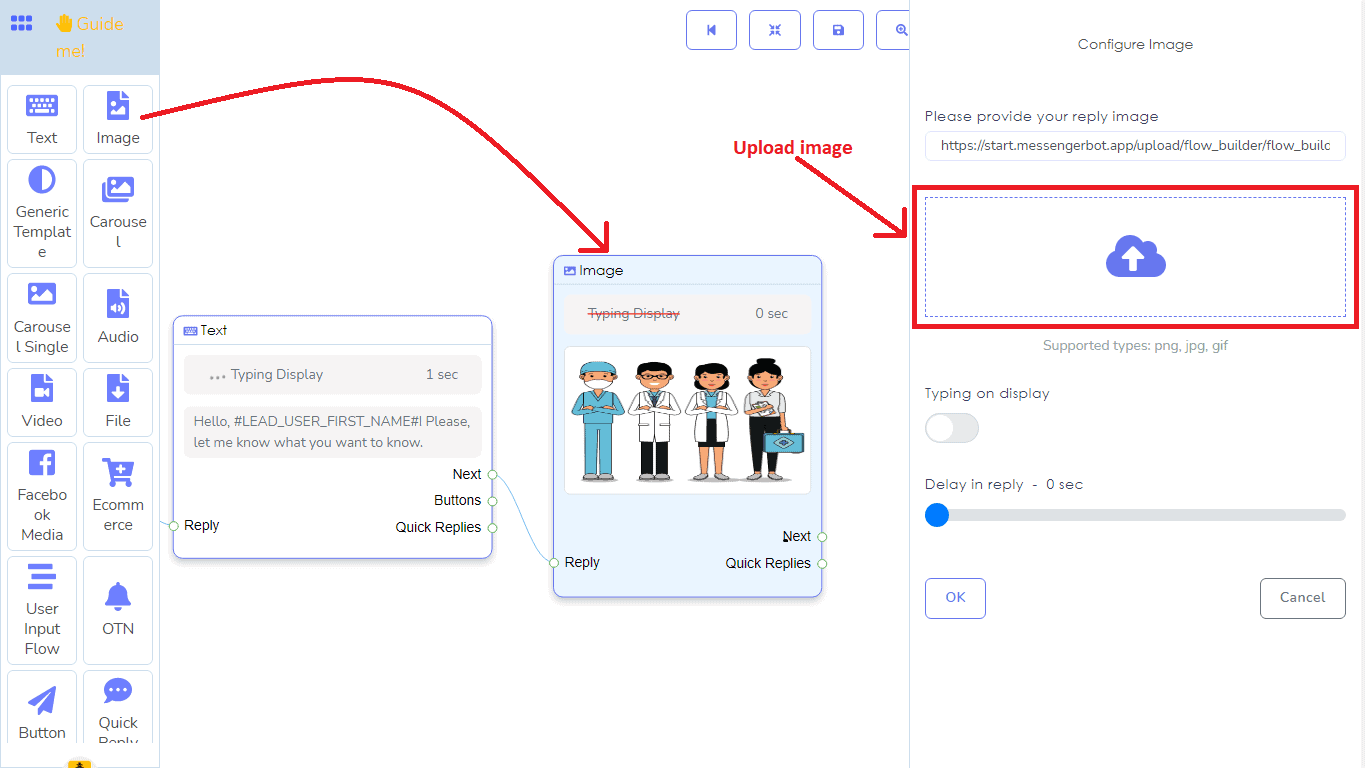
The image element take images. For the image element, you have to upload an image from your local computer. The image element supports multiple image formats– jpg, png, and gif.
Audio element:
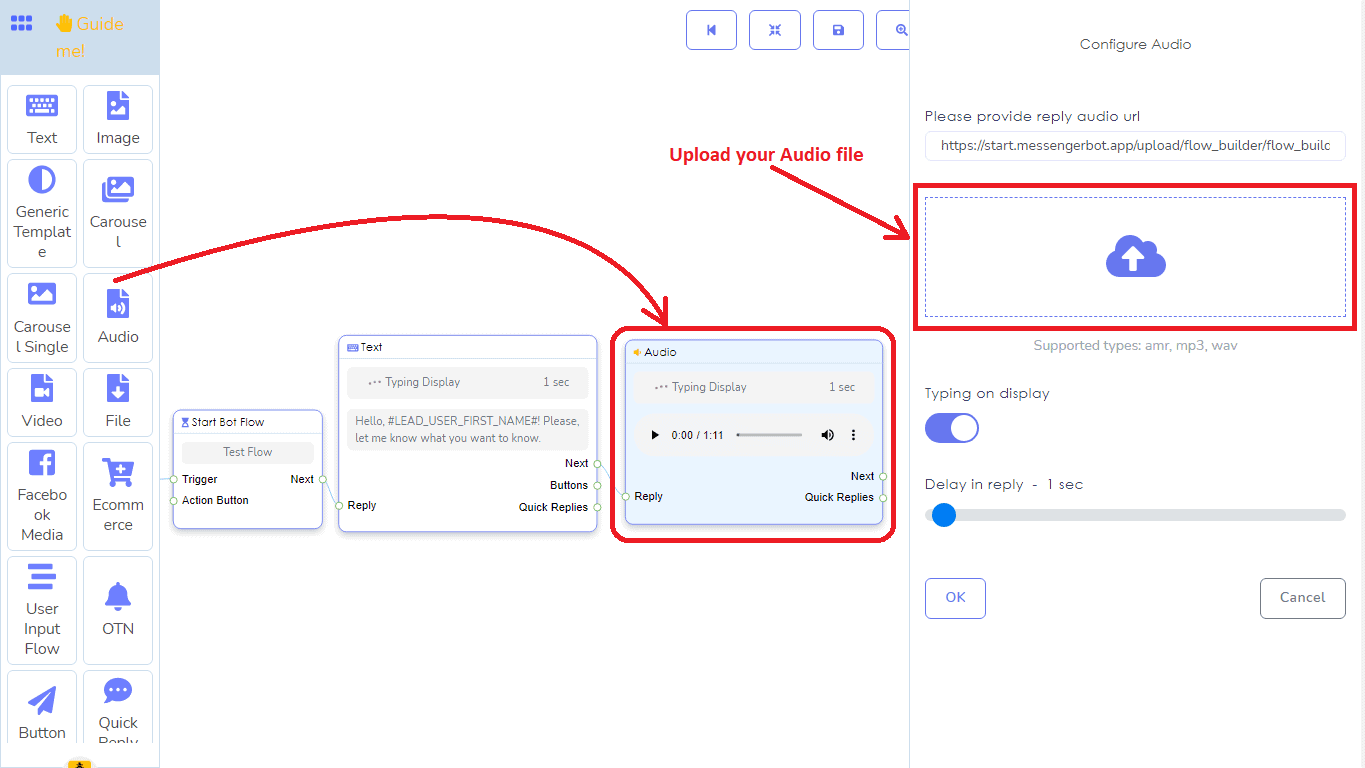
The audio element takes an audio file. And you have to upload an audio file from the local computer. It supports multiple audio file formats– amr, mp3, and wave.
Video element:
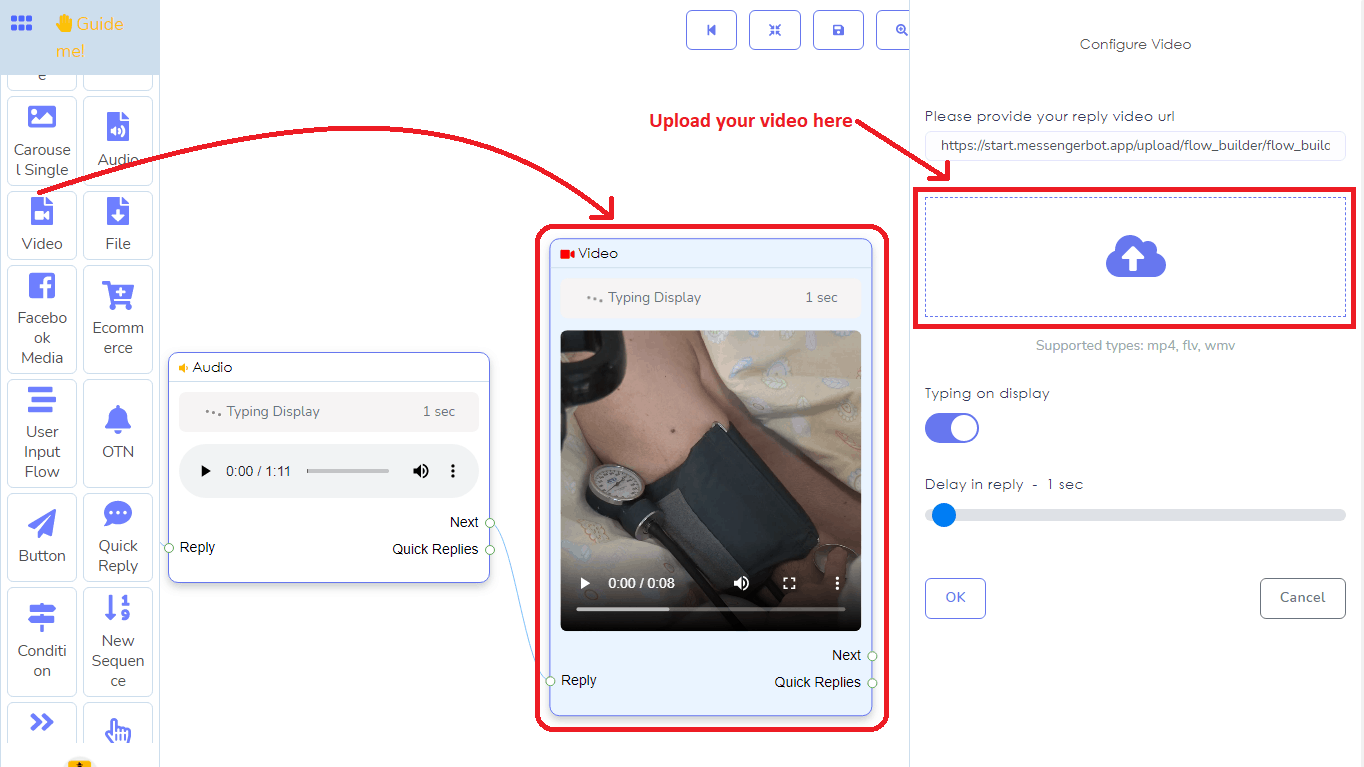
Video element takes video file. And you have to upload a video file from the local computer. It supports multiple video file formats– mp4, Flv, and wmv.
File element:
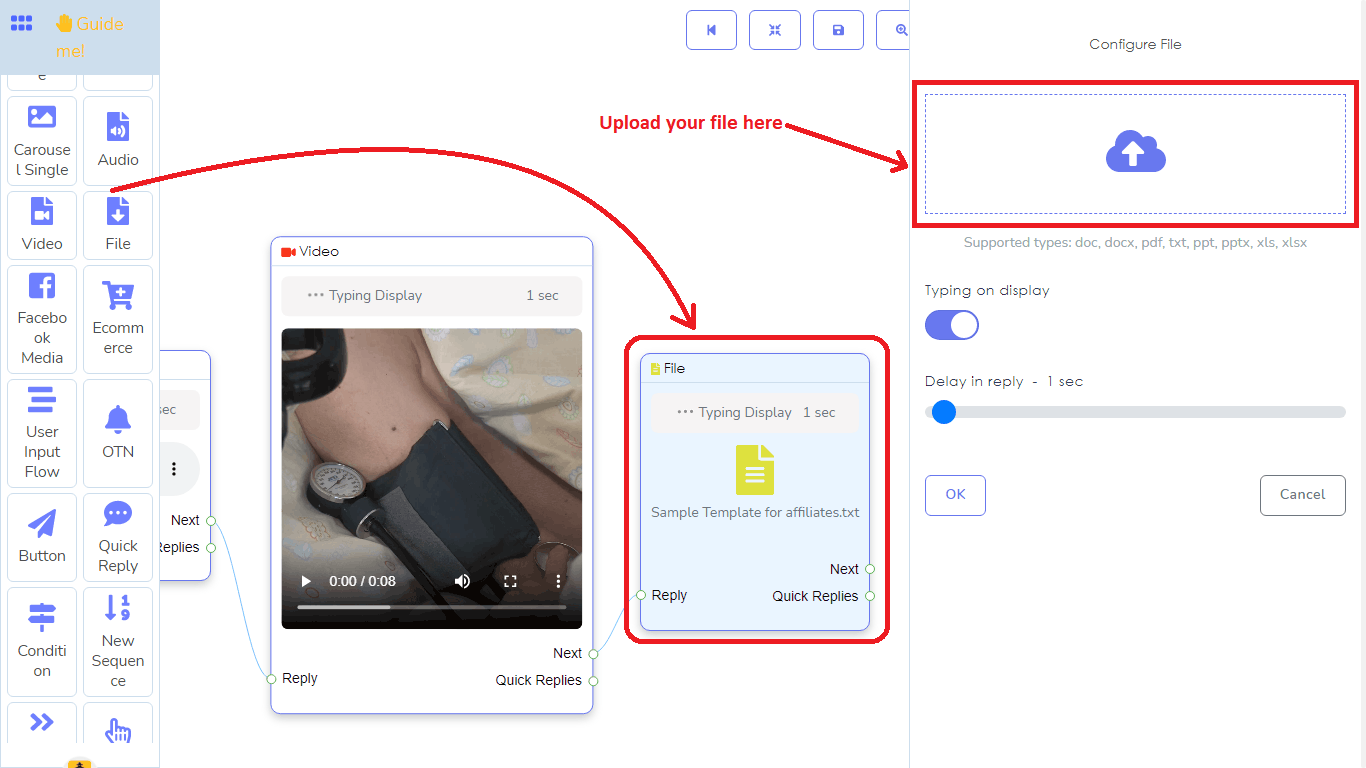
The file element takes different kinds of files. And you have to upload the files from the local computer. It supports multiple file formats–doc, Docx, pdf, txt, ppt, pptx, xls, and xlsx.
Button element:
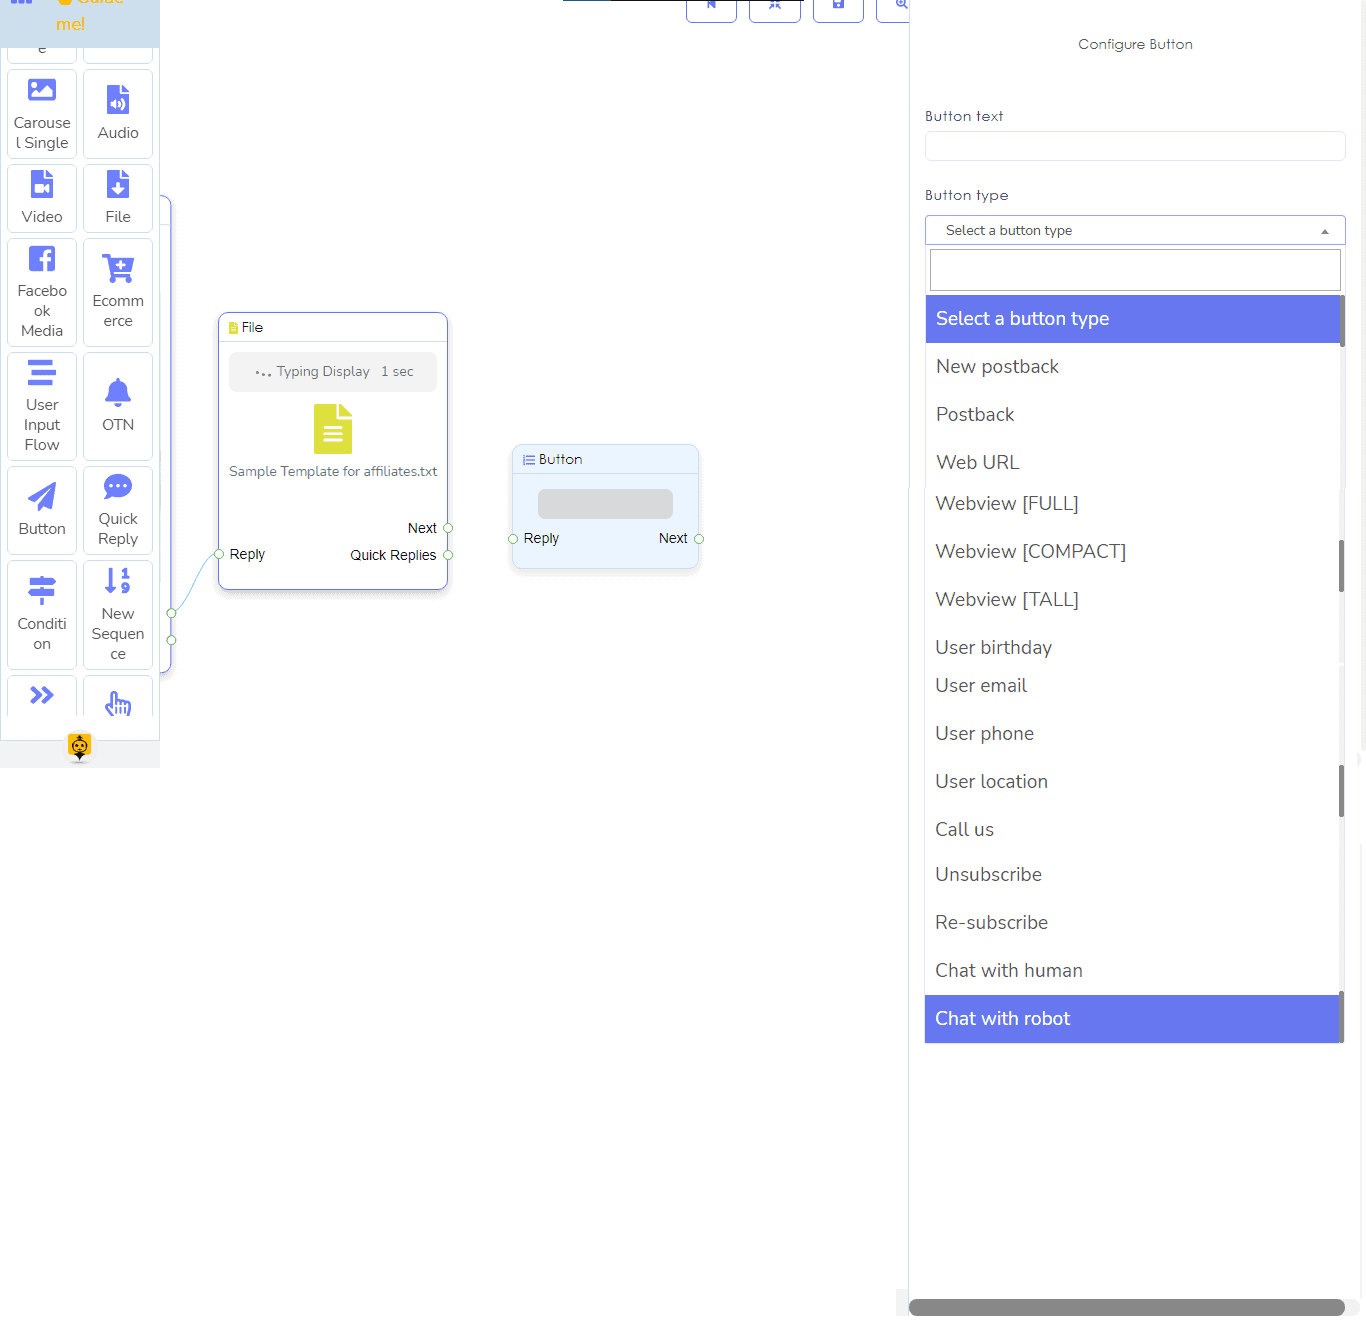
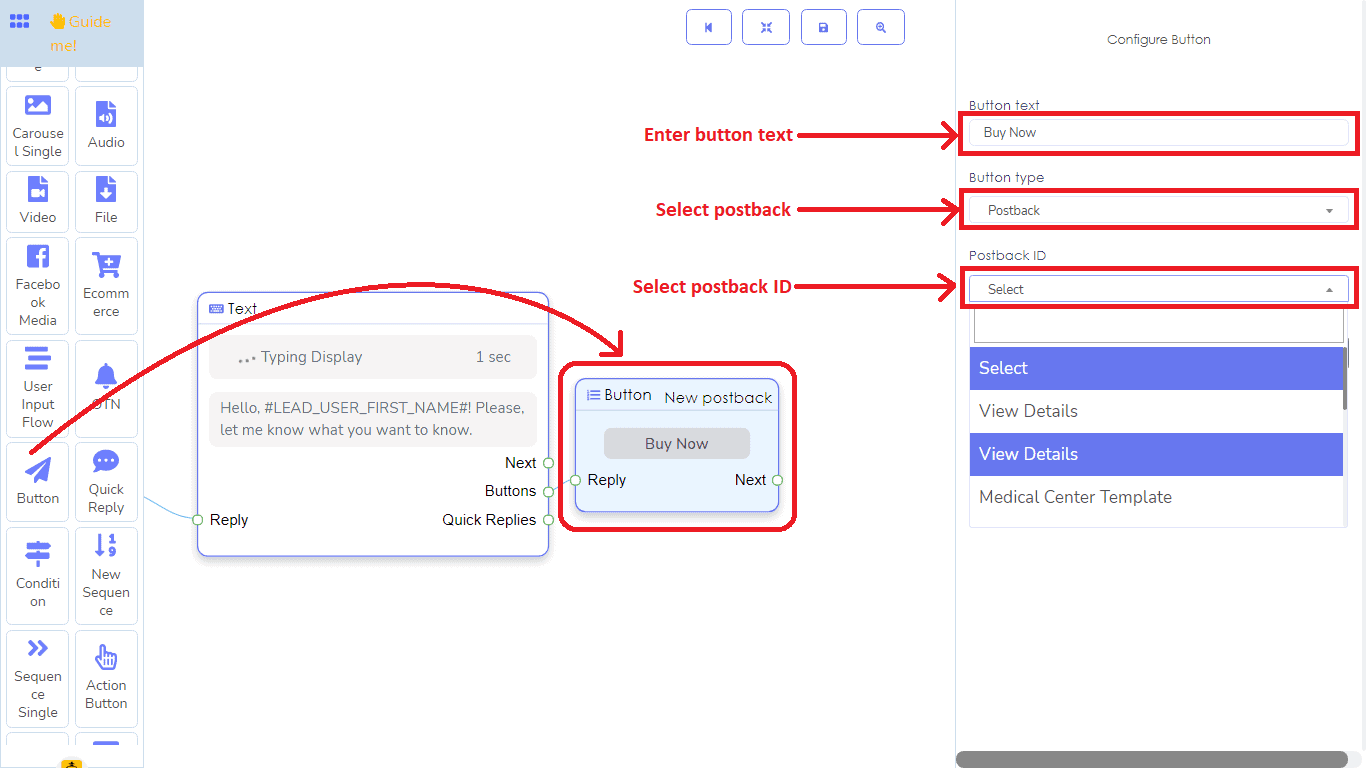
The button element will work as a button in the messenger bot. When you double click on the button element, a form with two from fields– button text and button type– will appear at the right side of the editor. In the first field, button text, you have to give a name for the button. And in the second field, you have to select a button type from a drop-down menu of different types of buttons, such as:
- New postback
- Postback
- Web URL
- Webview[Full]
- Webview[Compact]
- User birthday
- User email
- User Phone
- User Location
- Call us
- Unsubscribe
- Resubscribe
- Chat with human
- Chat with Robot
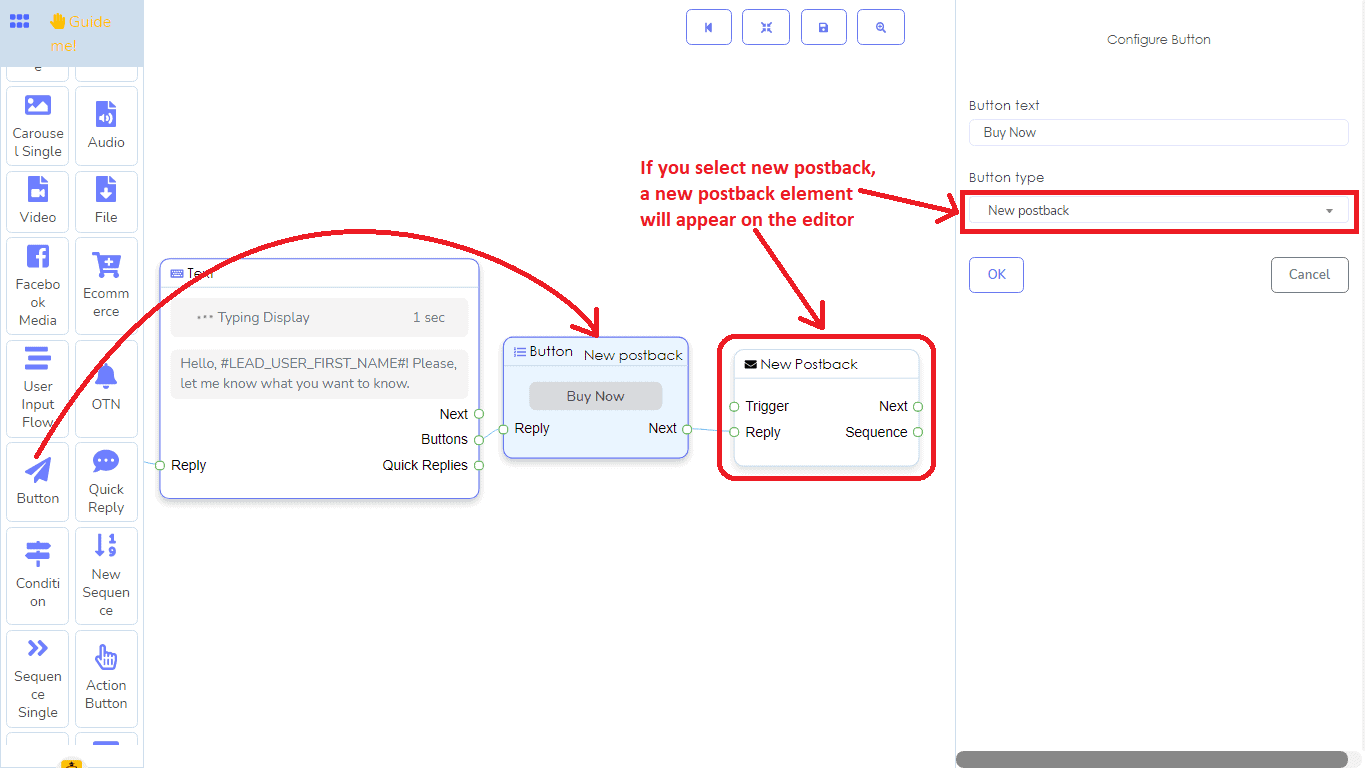
IF you select the new postback button, a new postback element connected with a button element will appear on the editor. Thereupon, you have to configure the new postback element. In the New postback section of the article, I will show you how to configure the new postback element.
On the other hand, if you select web URL or web view, an additional form field will appear where you have to provide the URL. In this case, when a user clicks on the button, the user will redirect to the page of the URL.
if you select postback, a field called postback id will appear. Click on the postback id field and the drop-down menu of predefined postback will appear and select a postback id from them.
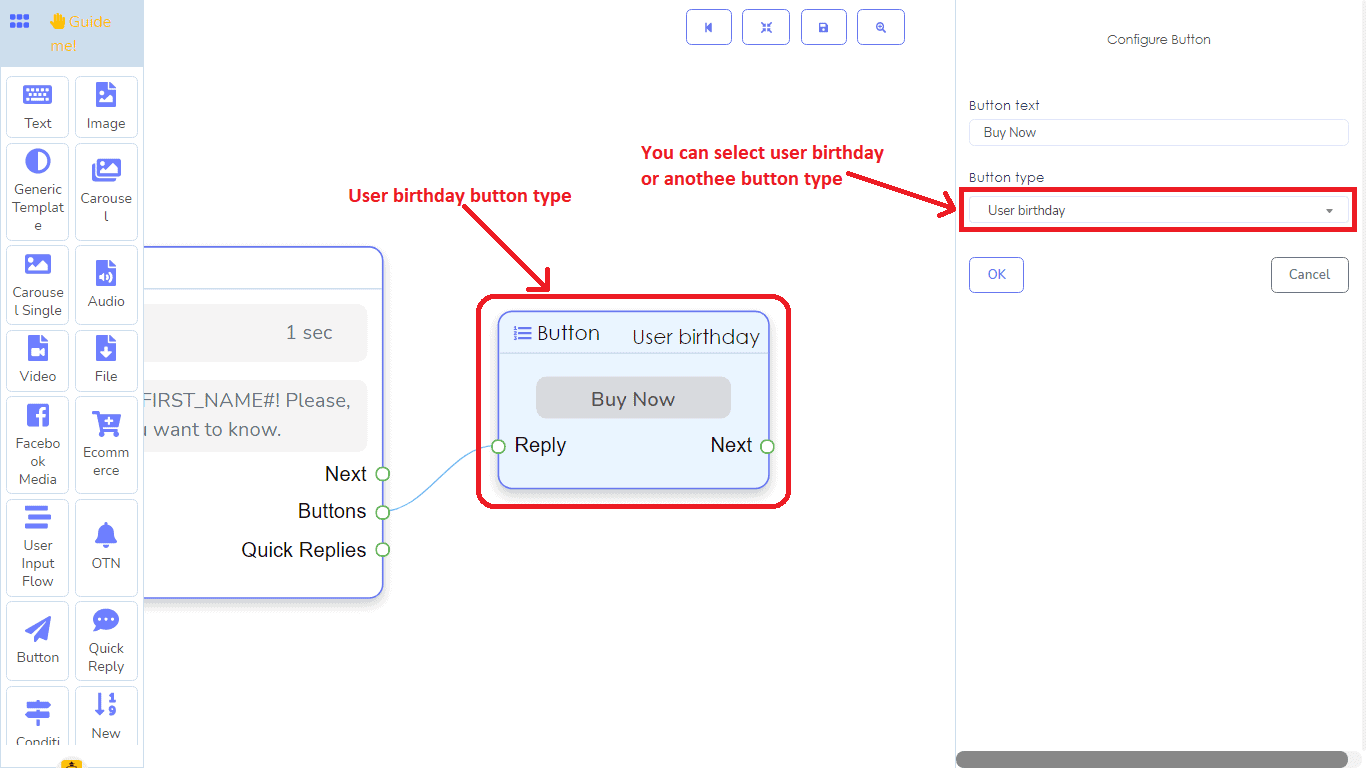
Also, to collect user birthday, user phone number, user mail, user location, you have to select the respective button type. Also, you can give the option to unsubscribe and resubscribe by selecting the unsubscribe and resubscribe buttons. By selecting chat with a human, you can give the option to the user to talk with a human. Likewise, if you select the chat with bot option, the users can start to talk with the bot again. Similarly, if you select the call us button, the user can call you directly by pressing the button.
Generic template element:
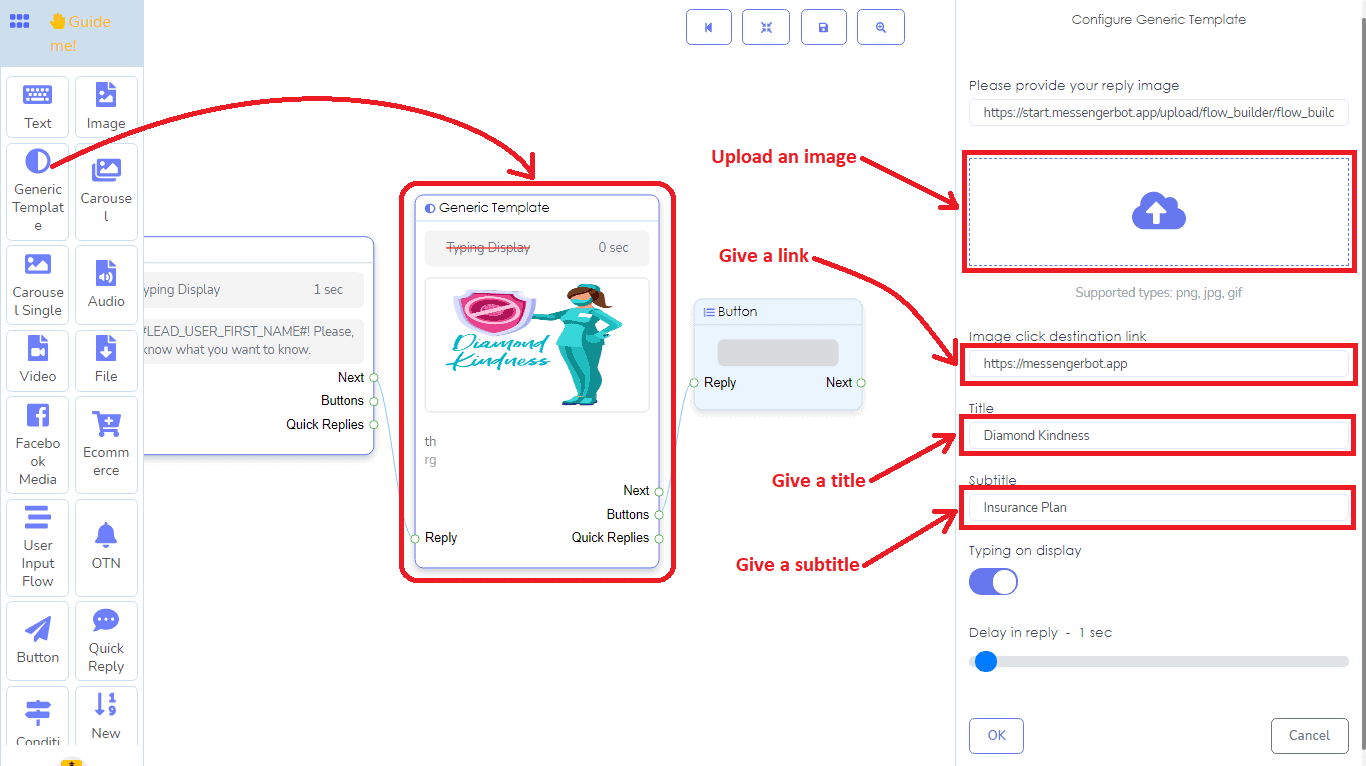
You can create a generic template with a generic template element. In the generic template element, you have to add an image, an URL, a title, and a subtitle. When you drag a generic template element from the dock menu and drop it on the editor, the template comes with a button. And in the button element, you have to add data. From the button element section, you may already know how to work with the button element. Besides buttons, you can add quick reply elements to the output socket called Quick replies.
Carousel element:
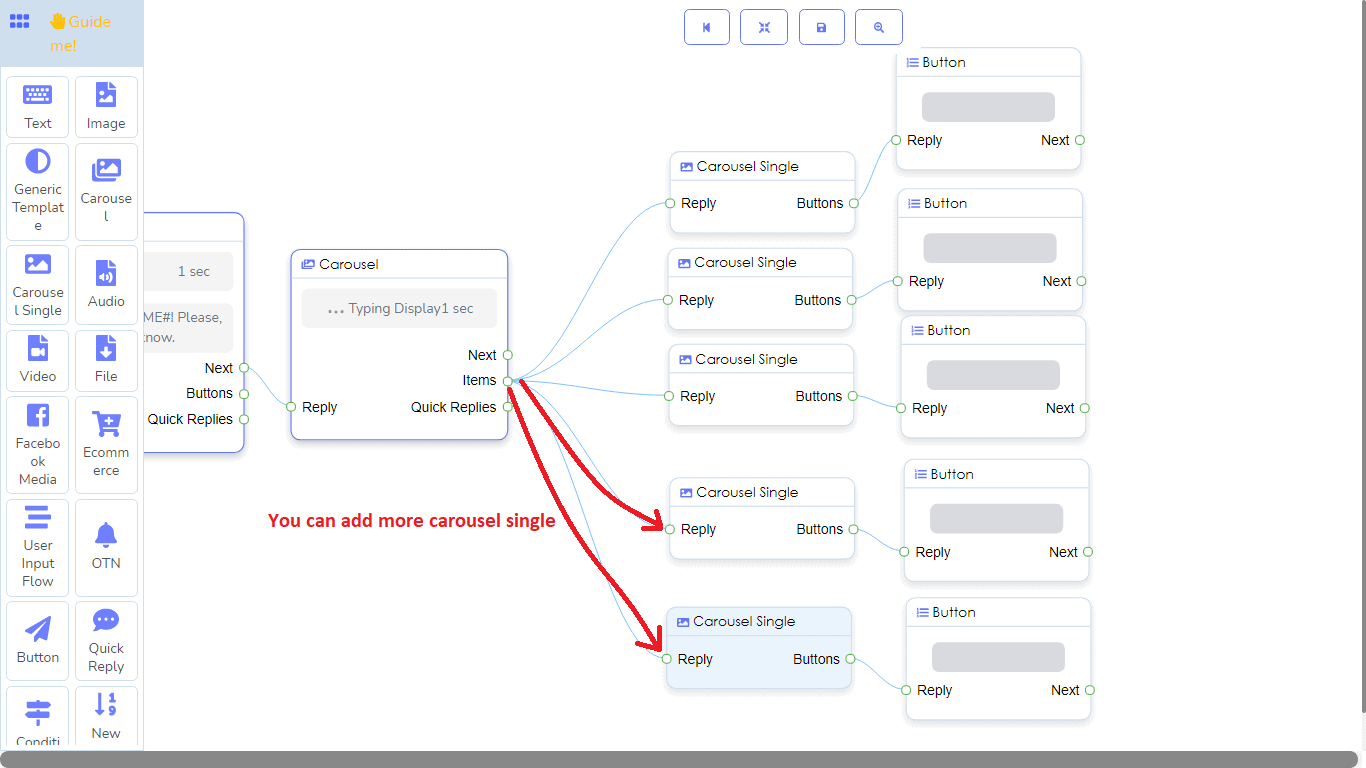
Carousel element only works as the parent of carousel single element. And it itself receives no data. When you drag and drop the carousel element, it comes with three carousel single elements with three-button elements connecting with the carousel single. You have to add data to the carousel single and to the button elements.
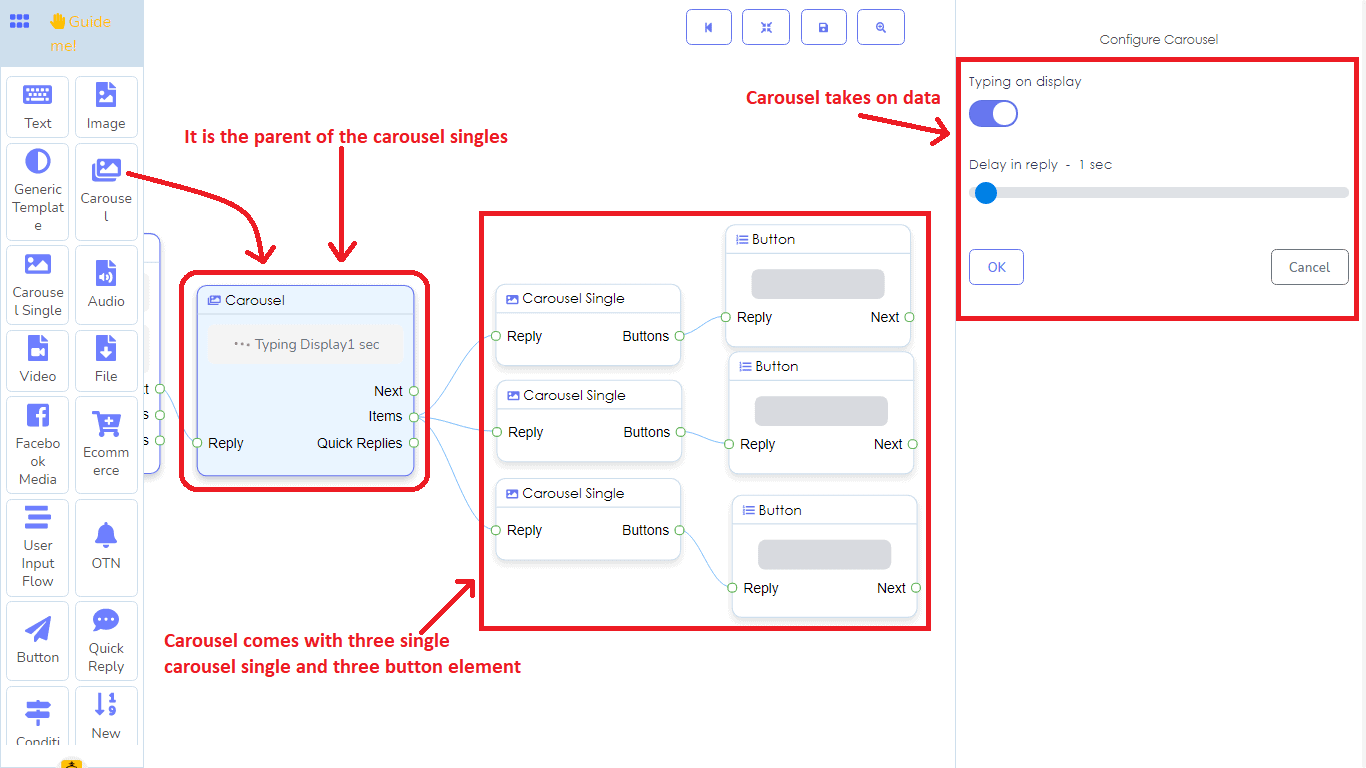
Of course, you can add more carousel single elements to the carousel element.
Carousel single element:
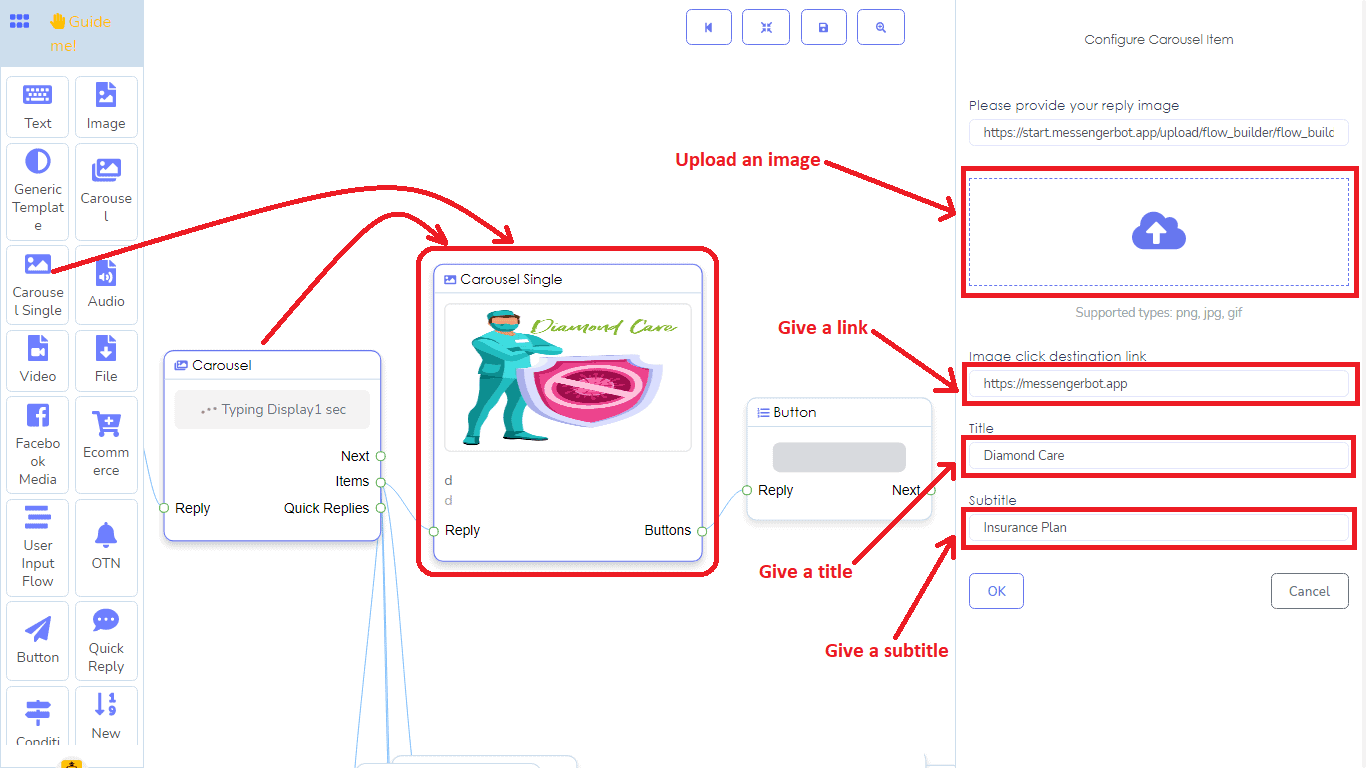
In the carousel single element, like a generic template, you have to add an image, link, title, and subtitle. The carousel single element is ultimately the child of the carousel element. That is, it could only be connected to the carousel element.
Facebook Media:
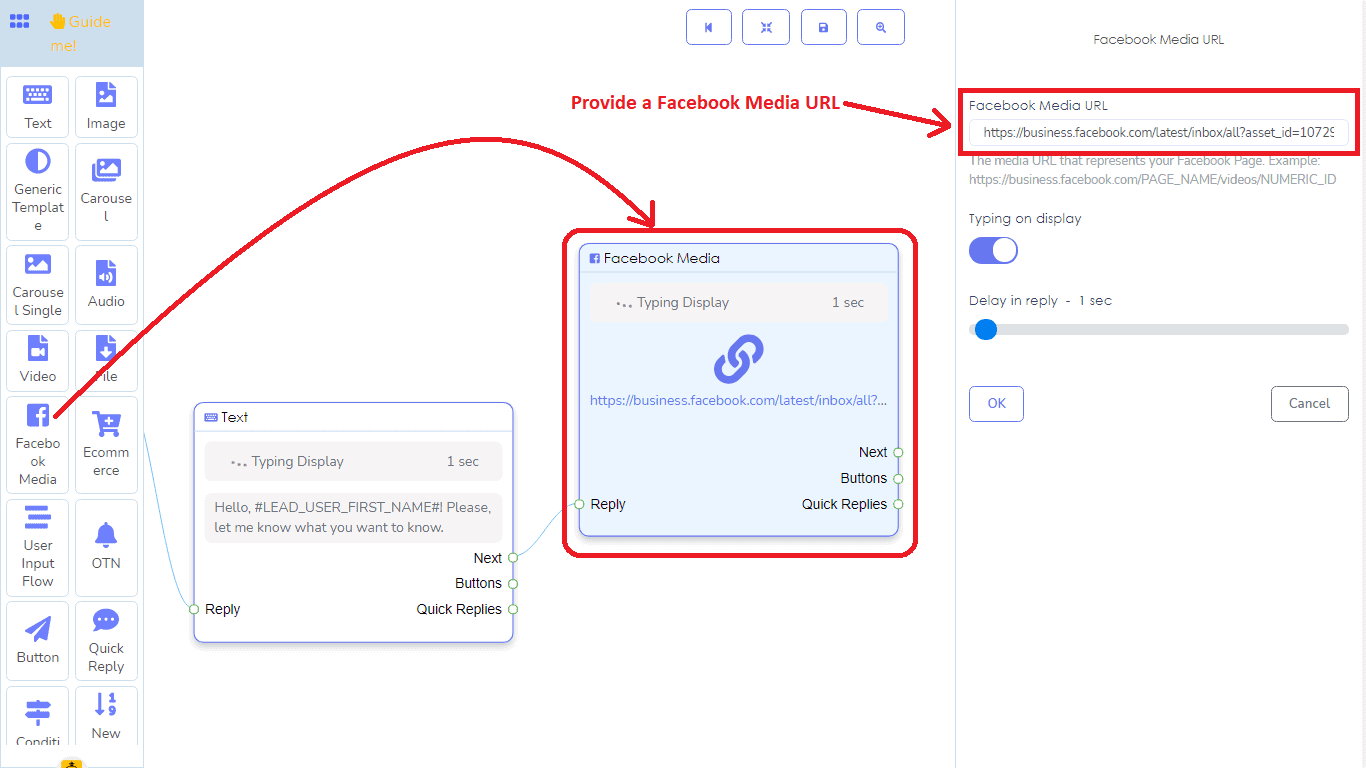
The Facebook media element shows a media– images and video— posted on your Facebook page. In Facebook media, you have to add the link to any image or video post of your page. If so, the user can see the image or video post of your page in the messenger.
Ecommerce element:
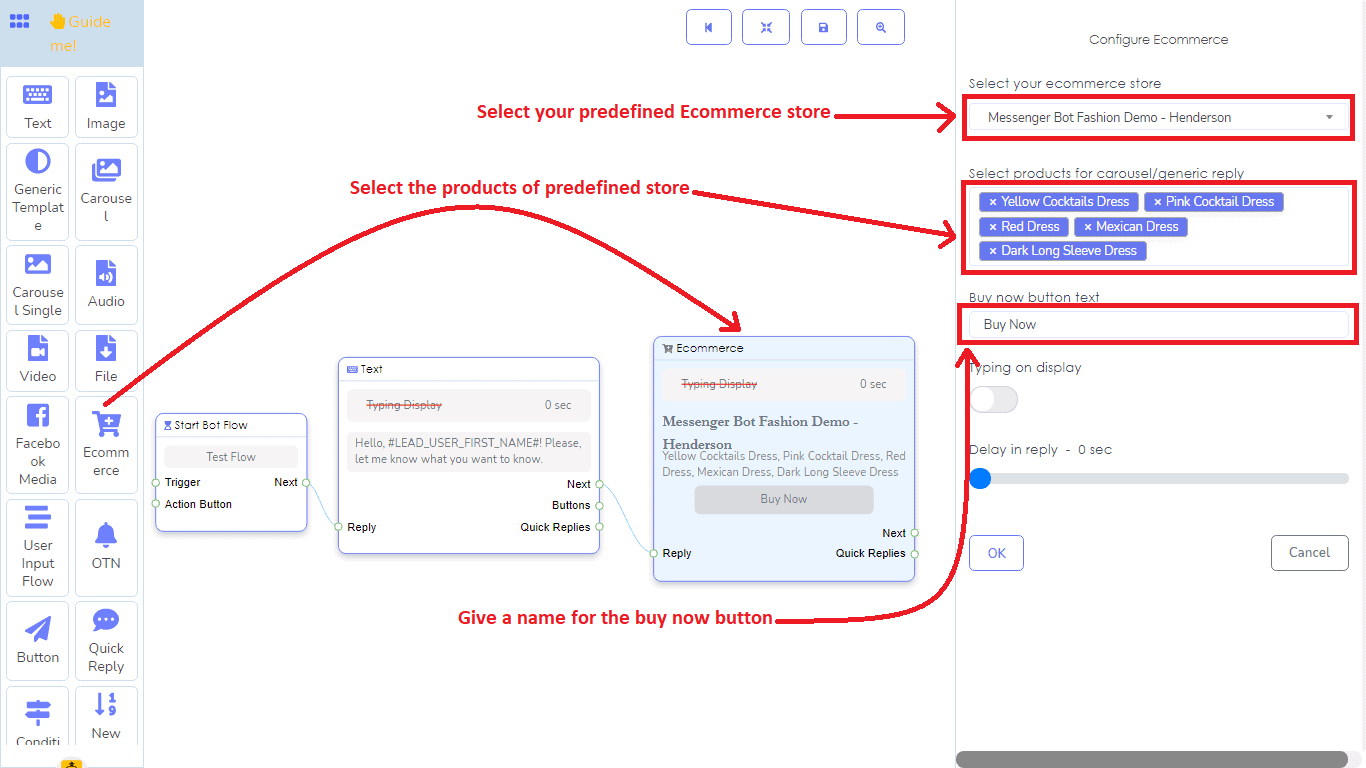
With the ECommerce element, you can make a carousel generic reply to the products of your e-commerce store. In the Ecommerce element, first, you have to select an ECommerce store you have created before from a dropdown menu, then you have to select products to make a carousel or generic replies of these products. Thereupon, you have to add text for the buy now button. And that’s all. It will create a nice carousel or generic reply of the products of your eCommerce store you have selected.
User Input Flow element:
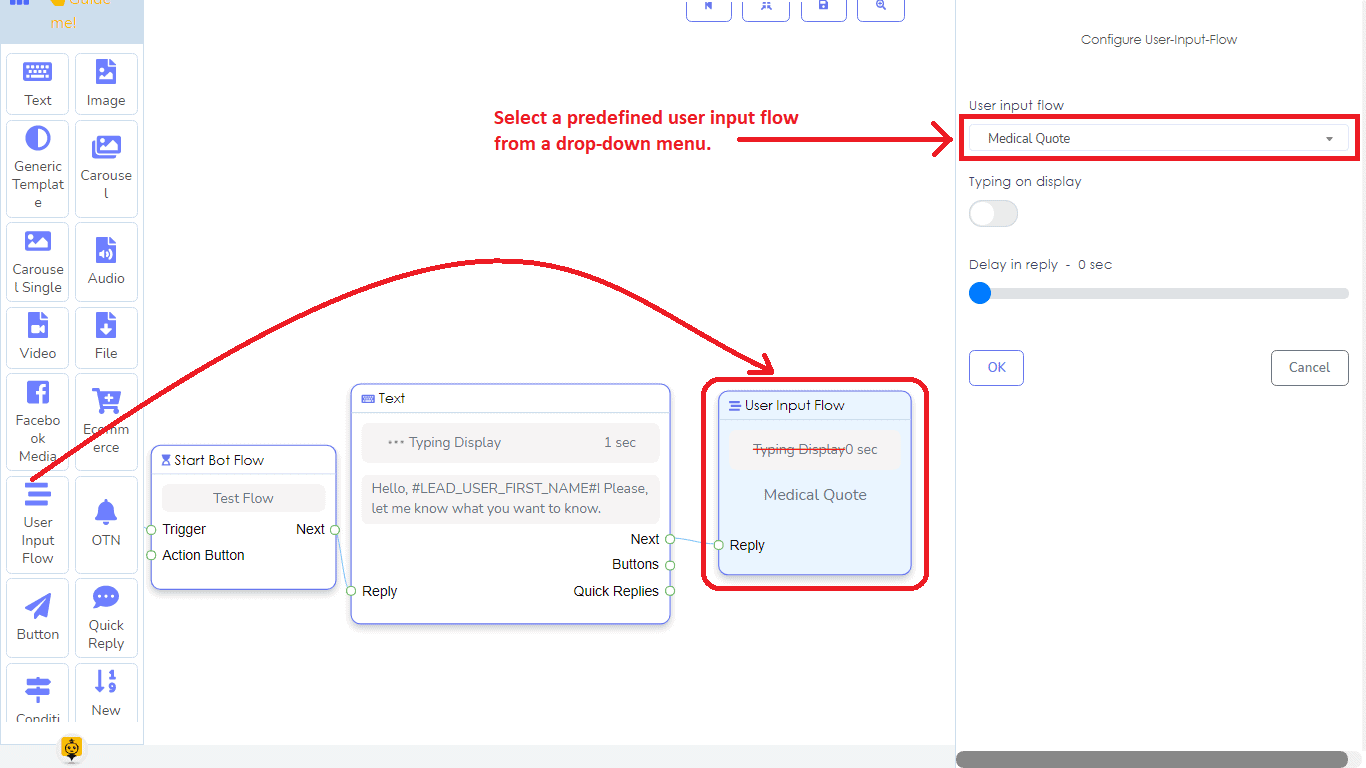
With the element, you can add your user input flow to your bot easily. From a drop-down menu, you just have to select a predefined campaign for User Input Flow. If you don’t have any campaign, first you have to create one. Please, read the article to know how to create a campaign for User Input Flow.
Quick Reply element:
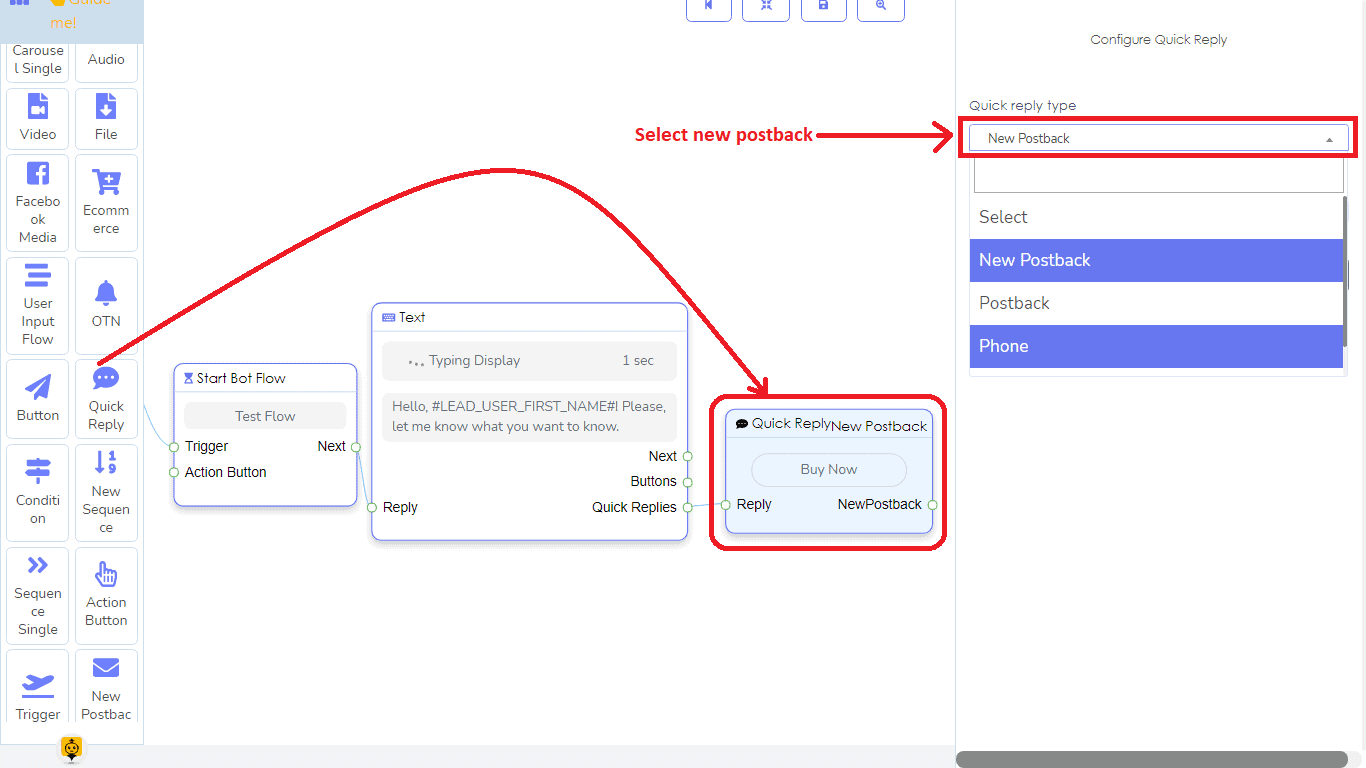
You can only connect the quick reply element with elements that have an output socket called Quick replies. For the quick reply type, you can select New postback, postback, phone, and email from a dropdown menu.
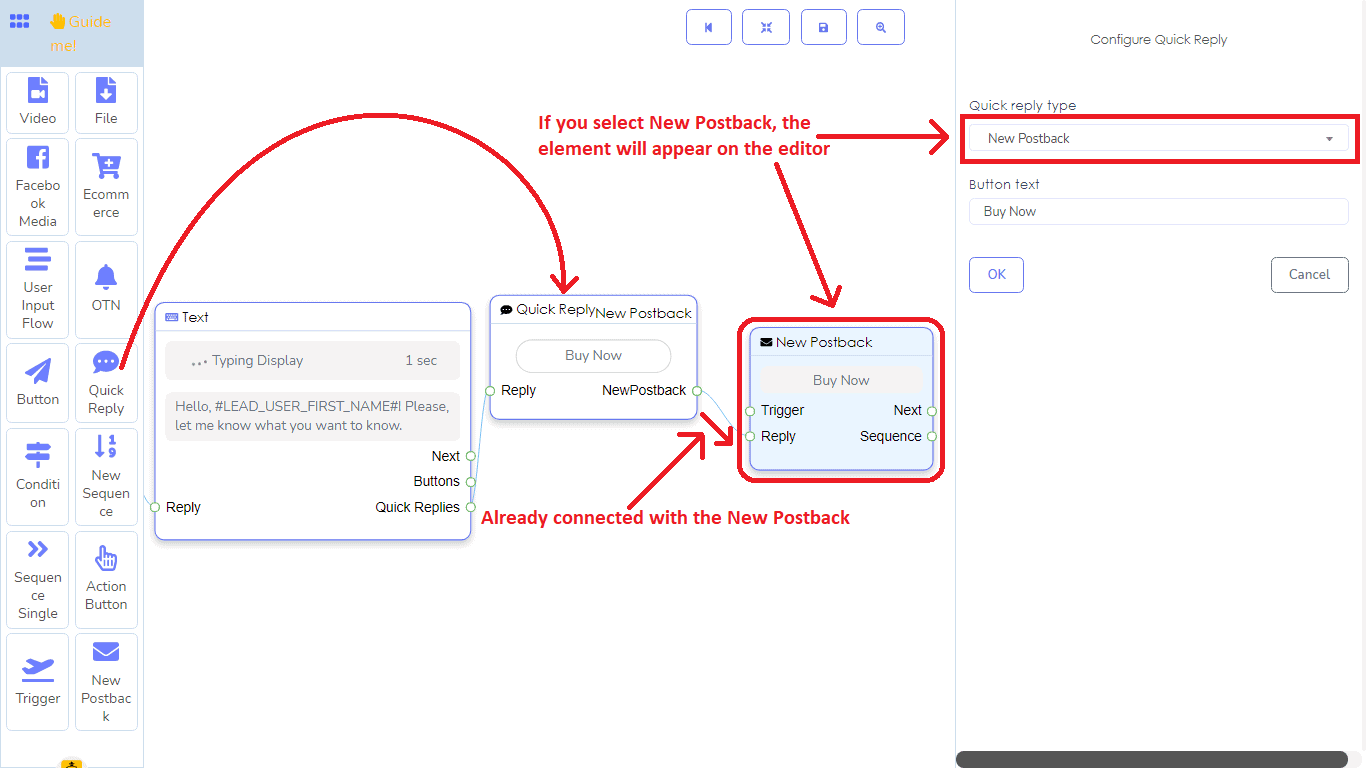
If you select a new postback, a button text field will appear. You just have to fill out the field and click the okay button. Instantly, a new postback element connected to the Quick reply element will appear on the editor. In the new postback, you have to give a title. Also, you can choose a label. Then you have to choose a sequence from a drop-down menu. In the drop-down menu, you will see a list of New sequences and other sequences that you have created earlier. If you select a new sequence, a new sequence element with other elements, three sequences single and three new postback elements will appear. Now you have to create the sequence. Follow the below section to know how to create sequence messages.
New sequence element:
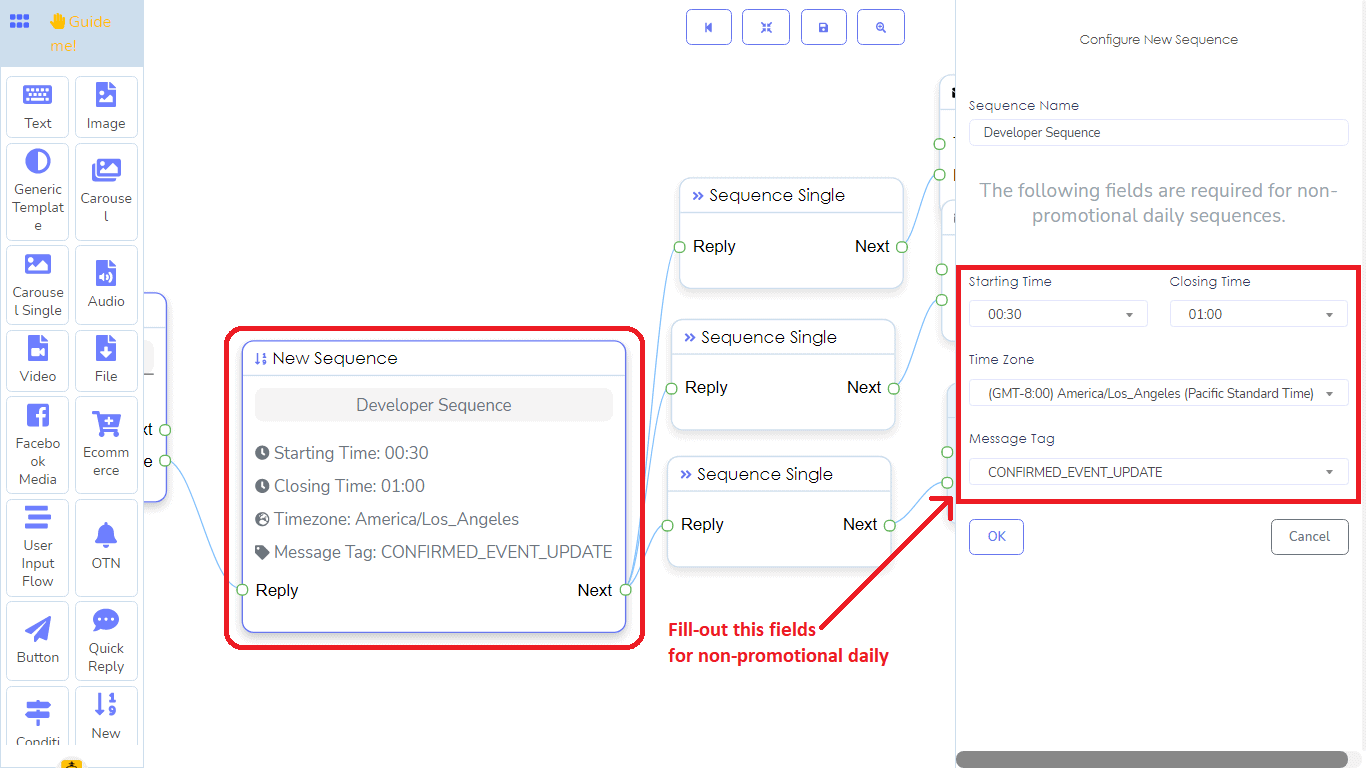
If you want to create sequence messages, you have to use a new sequence element. With the sequence messages, you can create a conditional flow of the messages. That is, the same bot can flow in different ways for different types of people.
New postback:
To configure New postback, you have to give it a title. You can choose a label. Then you have to select a predefined sequence from a drop-down menu.
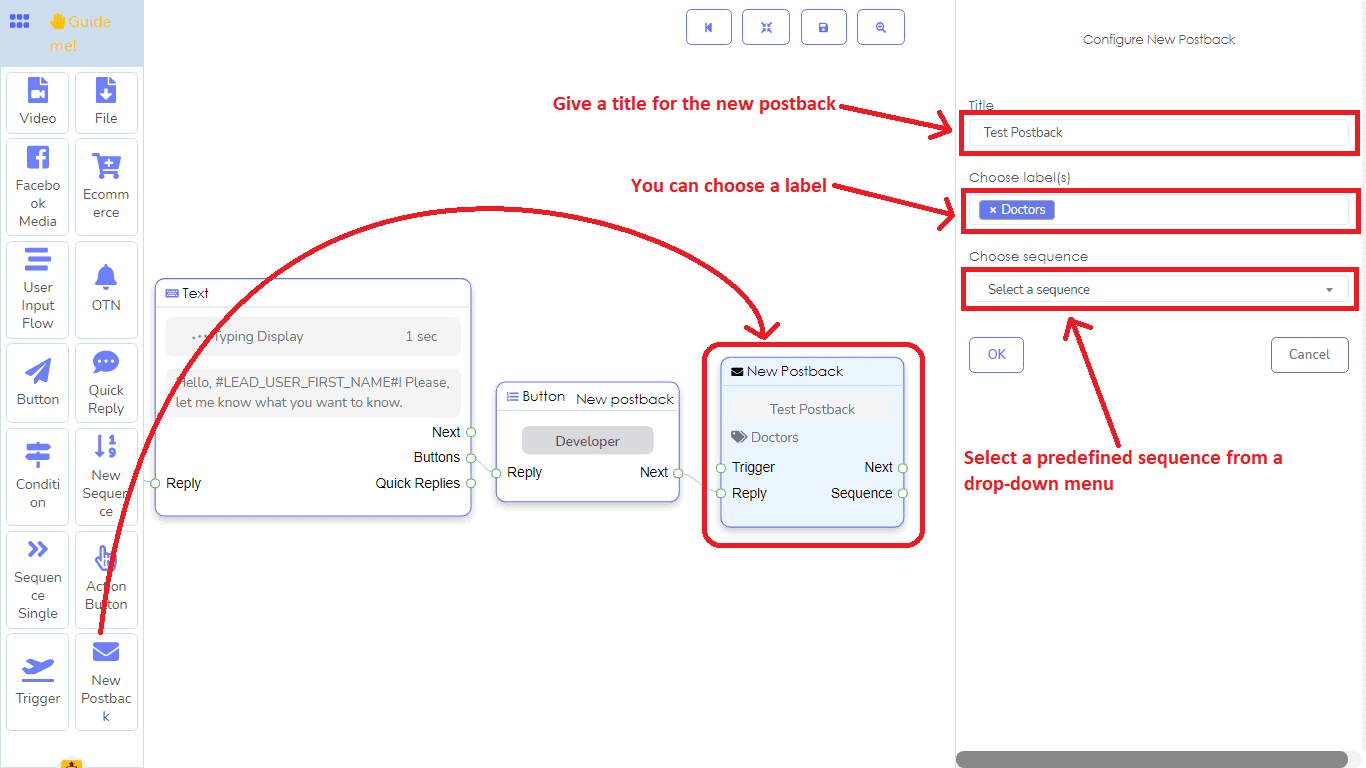
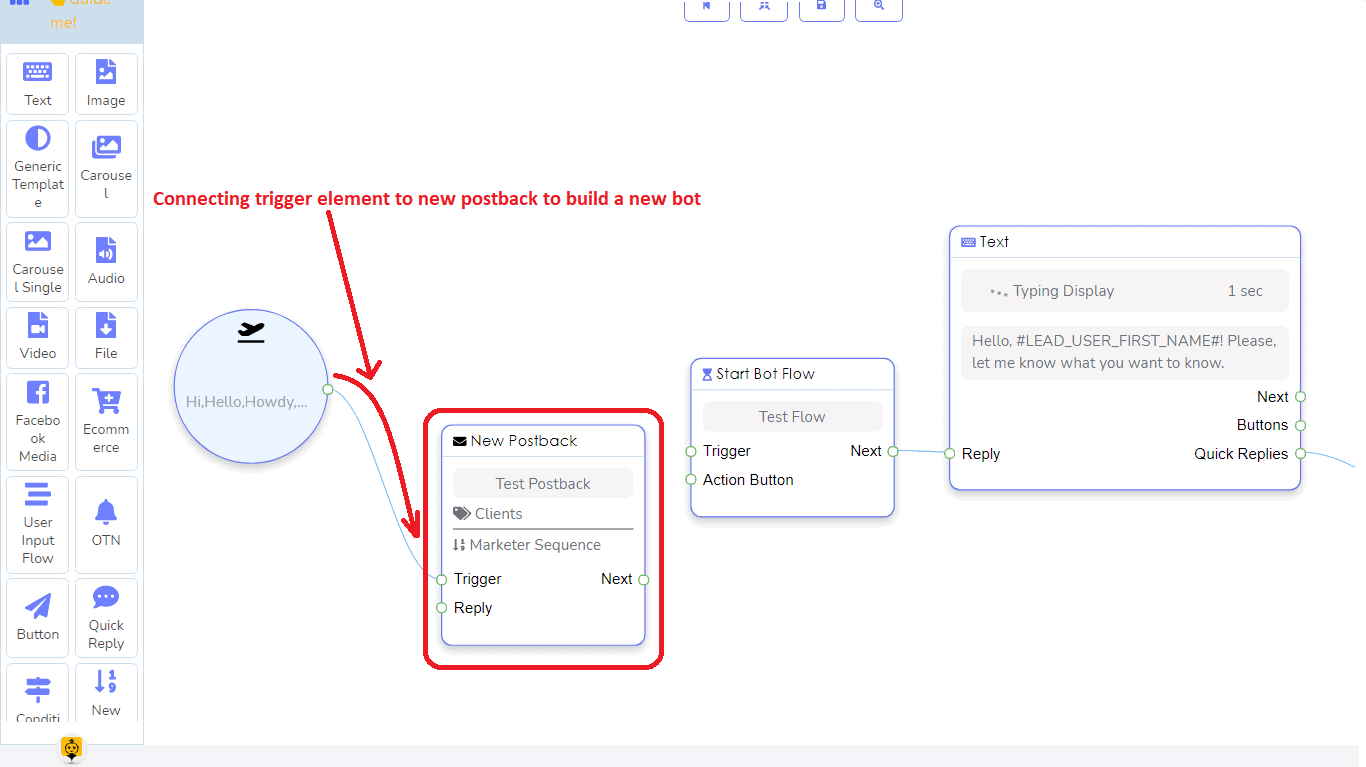
New postback is mainly used to create campaigns for sequence messages. The element usually is placed before the new sequence and is connected to it. Besides, you can start a bot with a new postback. In this case, you have to connect the trigger element with the new postback. You can use the new postback as the reference of a bot. That is, you can connect the trigger element to a new postback element.
OTN element:
In the OTN element, you have to give a title and select a predefined OTN postback ID from a dropdown list.

Action Button element:
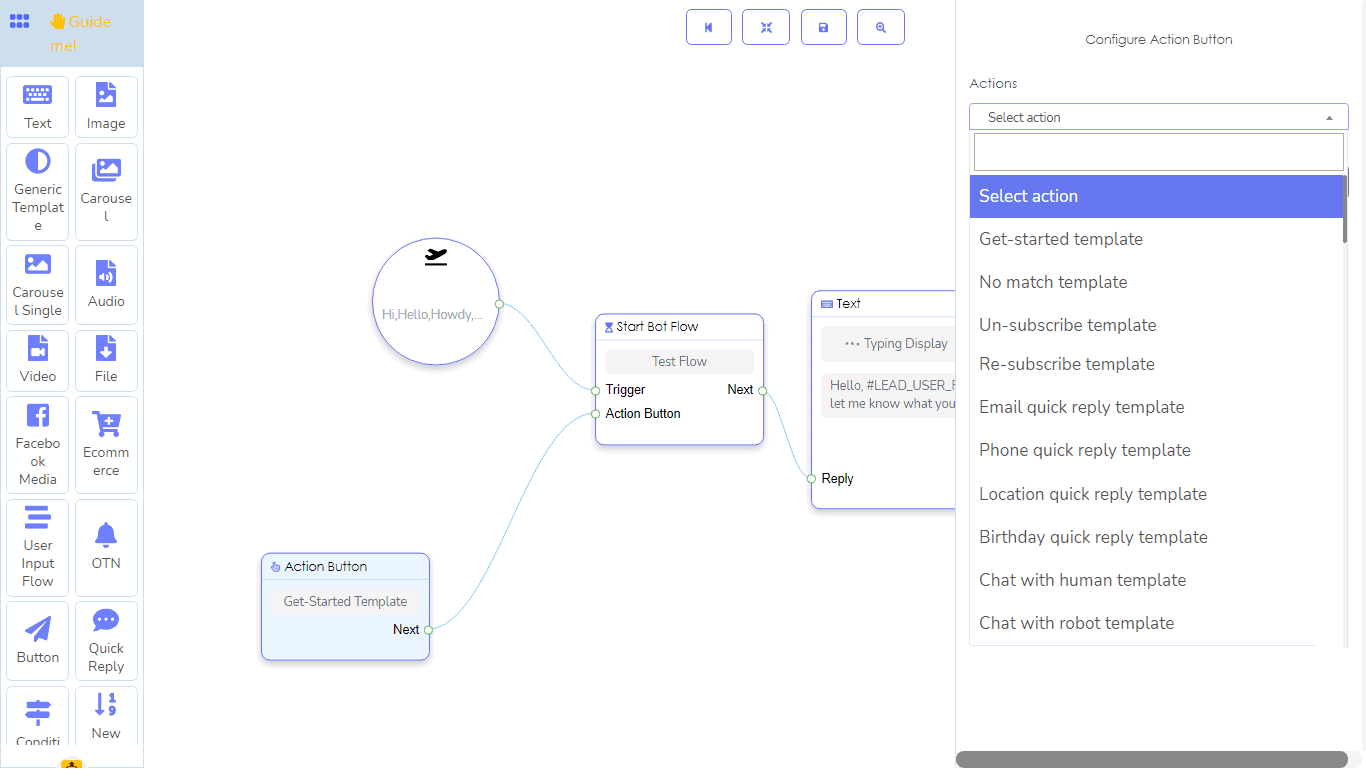
Besides, trigger element, you can also start a bot flow with the action button. In this case, you have to connect the action button element to the action button socket of the start bot flow element. Besides the action button, you can, of course, connect the trigger element with the Start bot flow element.
Well, as for the action button element, you can select any from the different actions as follows:
- Get started template
- no-match template
- Un-subscribe template
- Re-subscribe template
- Email quick reply template
- Phone Quick reply template
- Location Quick reply template
- Birthday Quick reply template
- Chat with human template
- Chat with Robot template
User friendly
The Messenger Bot Flow builder is very user-friendly. By double click, you can collapse the dock menu to increase the place of the editor. Of course, by double click, you get back the dock menu when you need it.
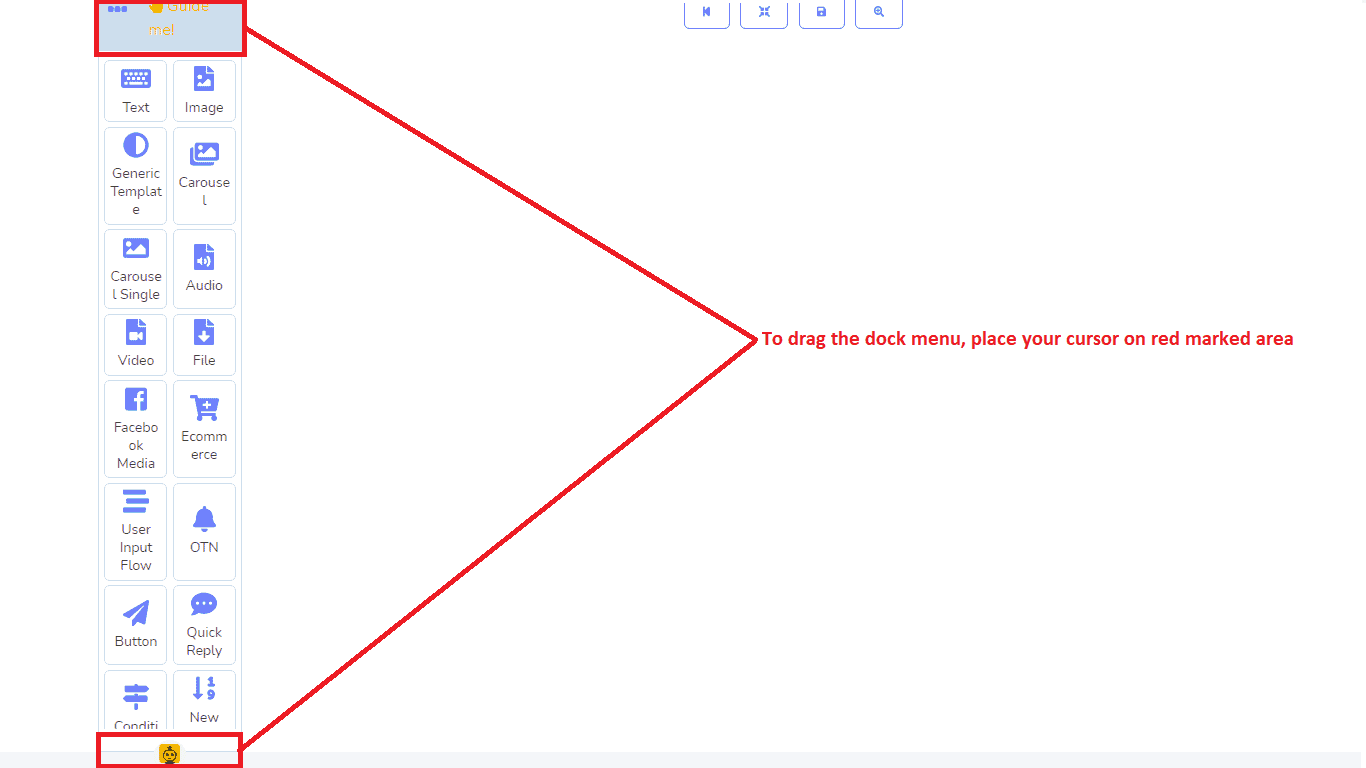
Besides, you can move the dock menu and place it anywhere on the editor.
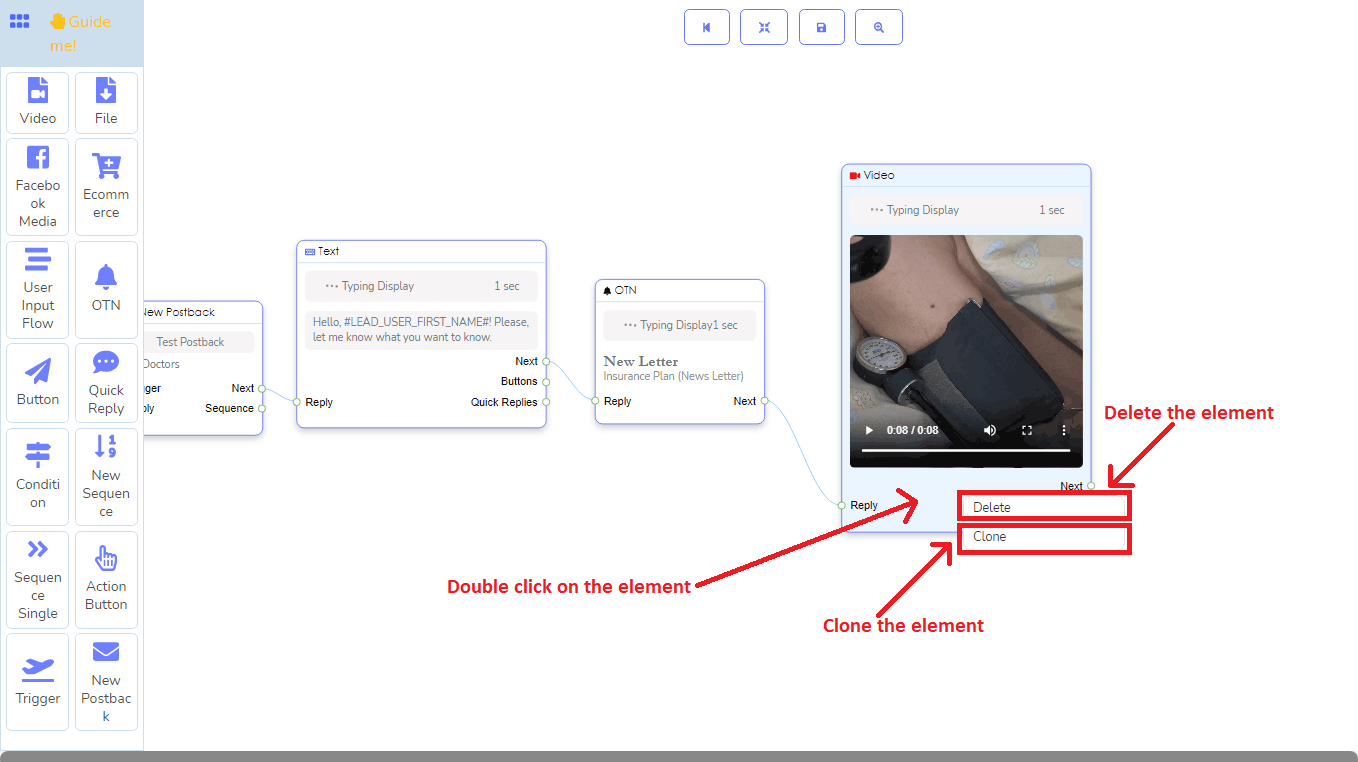
After you have drag and drop an element, you can clone it and delete it easily.
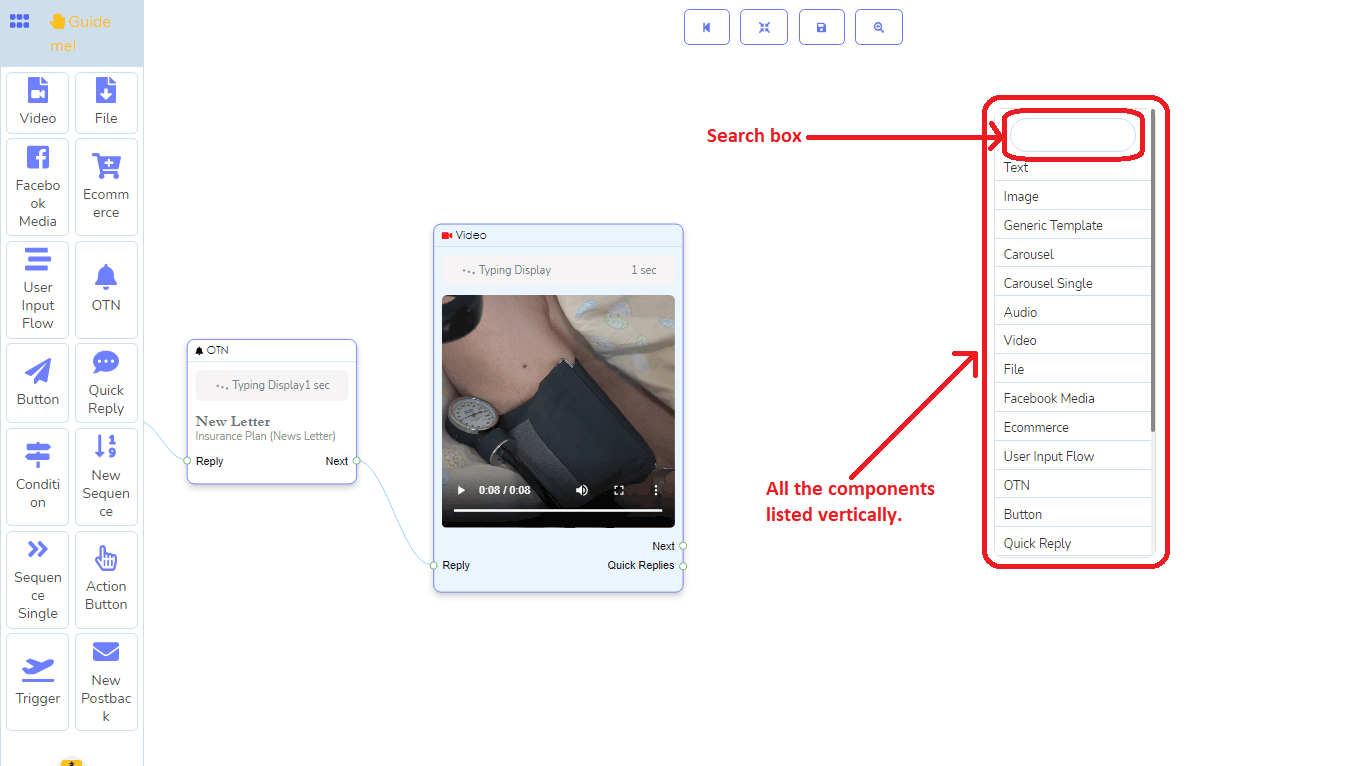
And if you right-click on the editor, all of the elements listed will appear in a vertical bar on the editor. And from the vertical bar, you can pick any specific element by clicking on it.
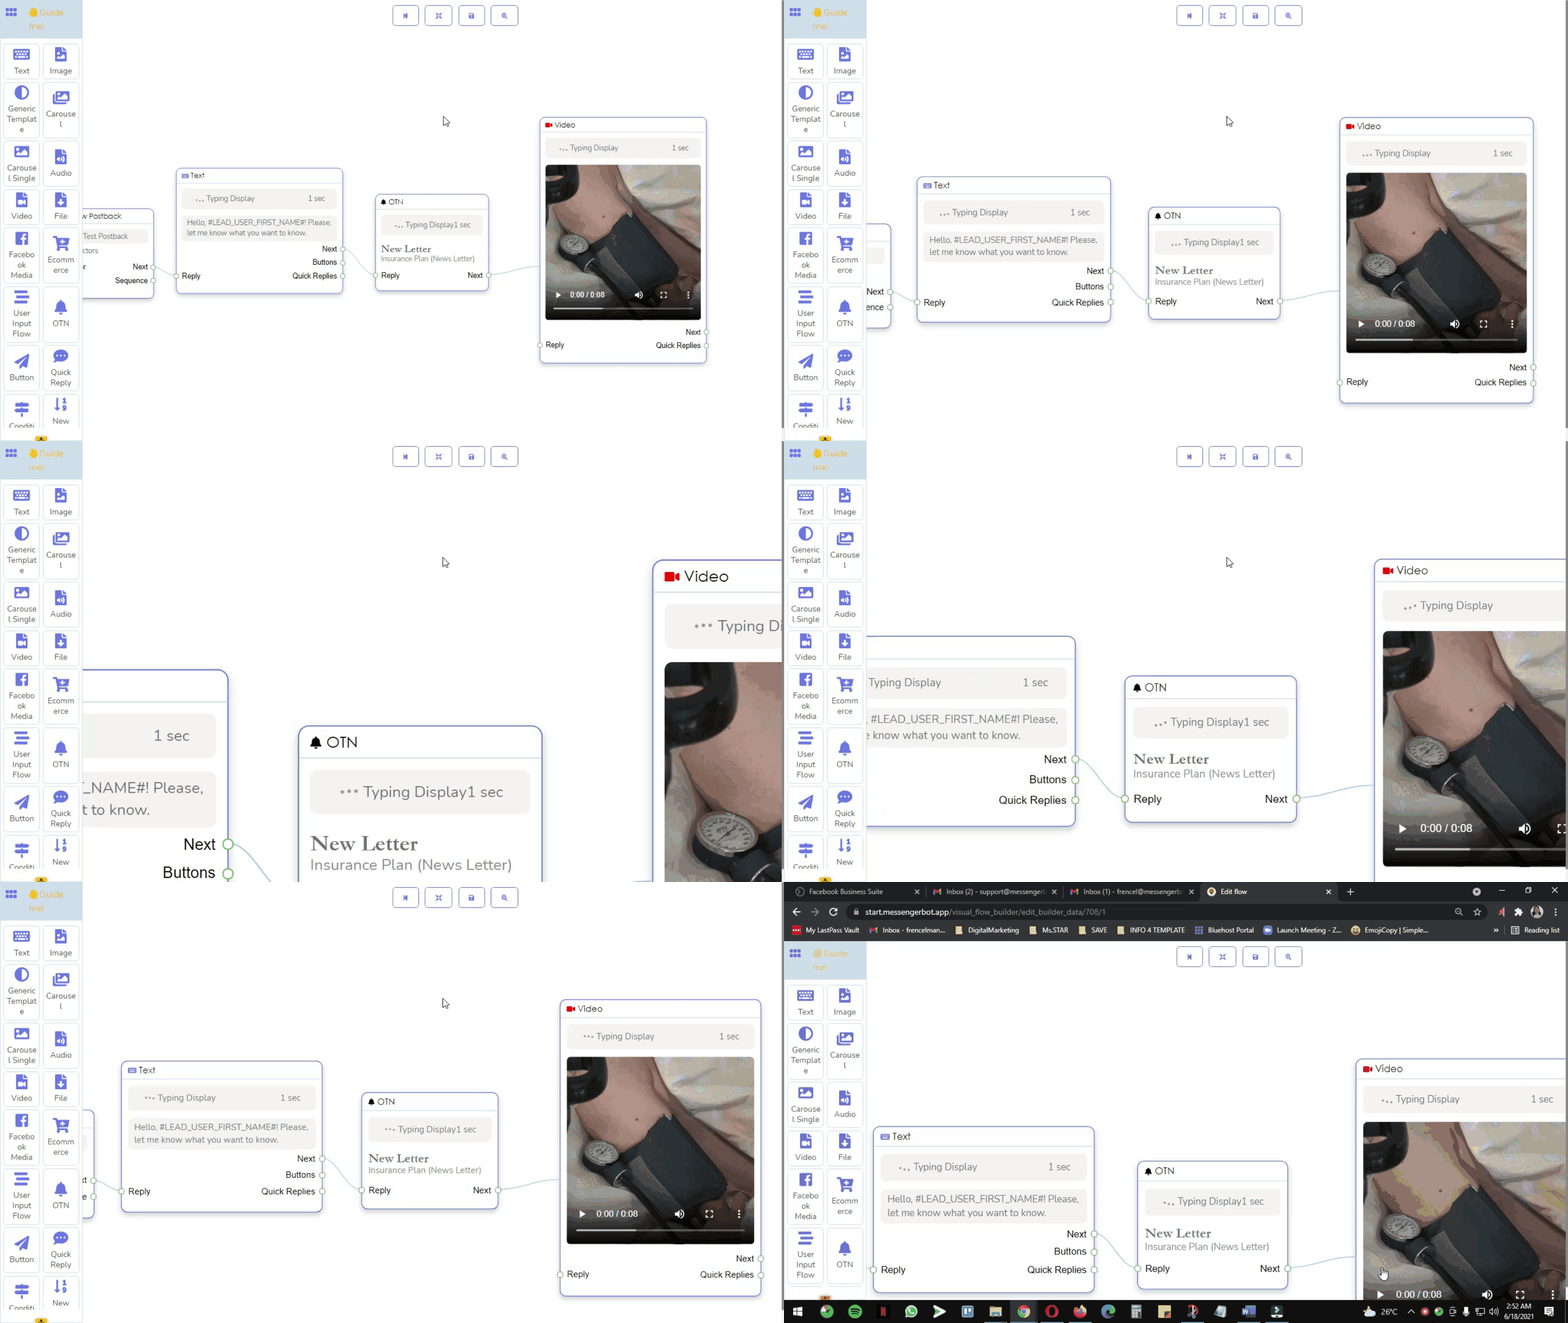
You can also zoom in and zoom out the elements on the editor by scrolling the mouse.
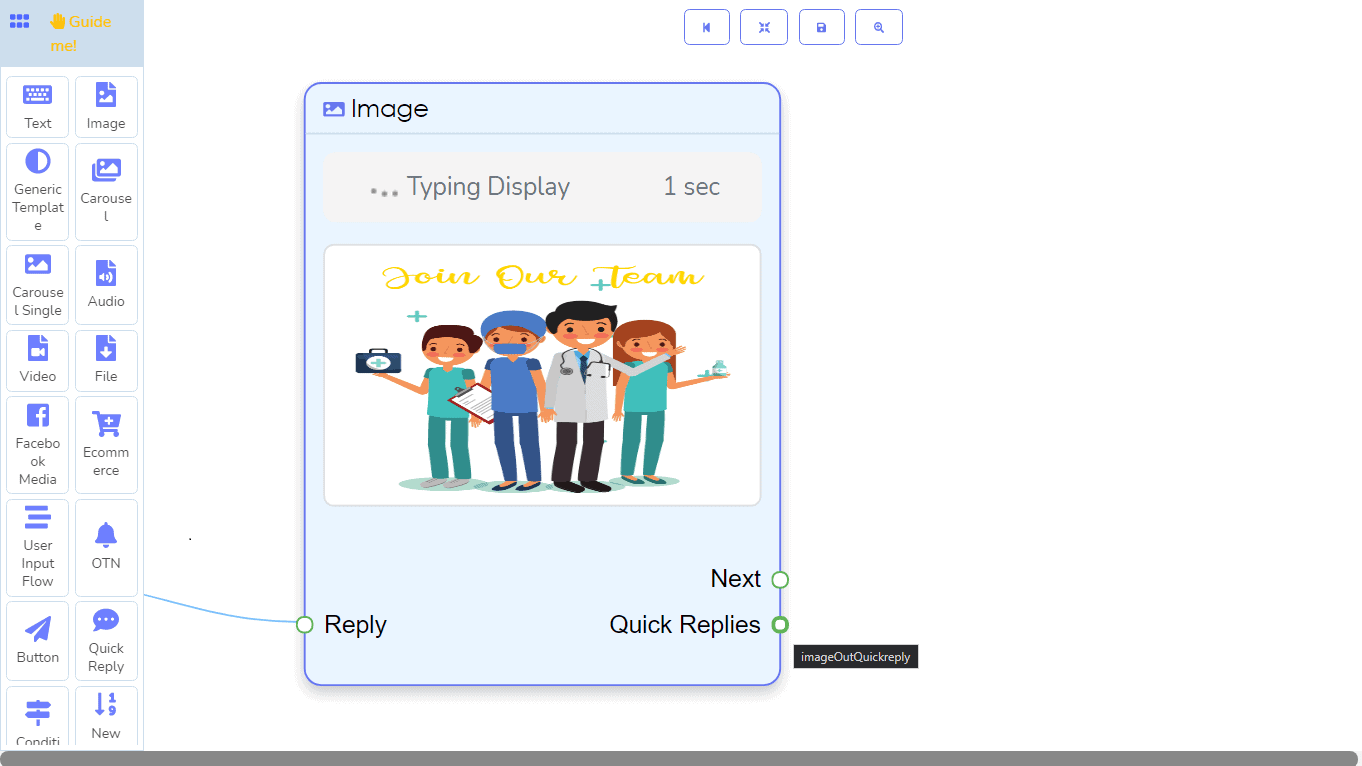
Moreover, you can see the type of socket by hovering your mouse over the tiny circle of the socket. Just as you hover your mouse over the tiny circle of the socket, the tiny circle will be green outlined and a tooltip will appear with the information about the socket.
In fact, you can hide the part of the bot, by dragging the surface of the editor, to free up space to connect more elements to the bot. another bot.
