Comment Automation (Automations)
Comment Automation allows a user to create, edit and delete comment and reply templates. This view gives full control of comment automation and tagging. It gives a summarized report of existing campaigns and templates. For this tutorial, we will use Facebook Automations as a demo.
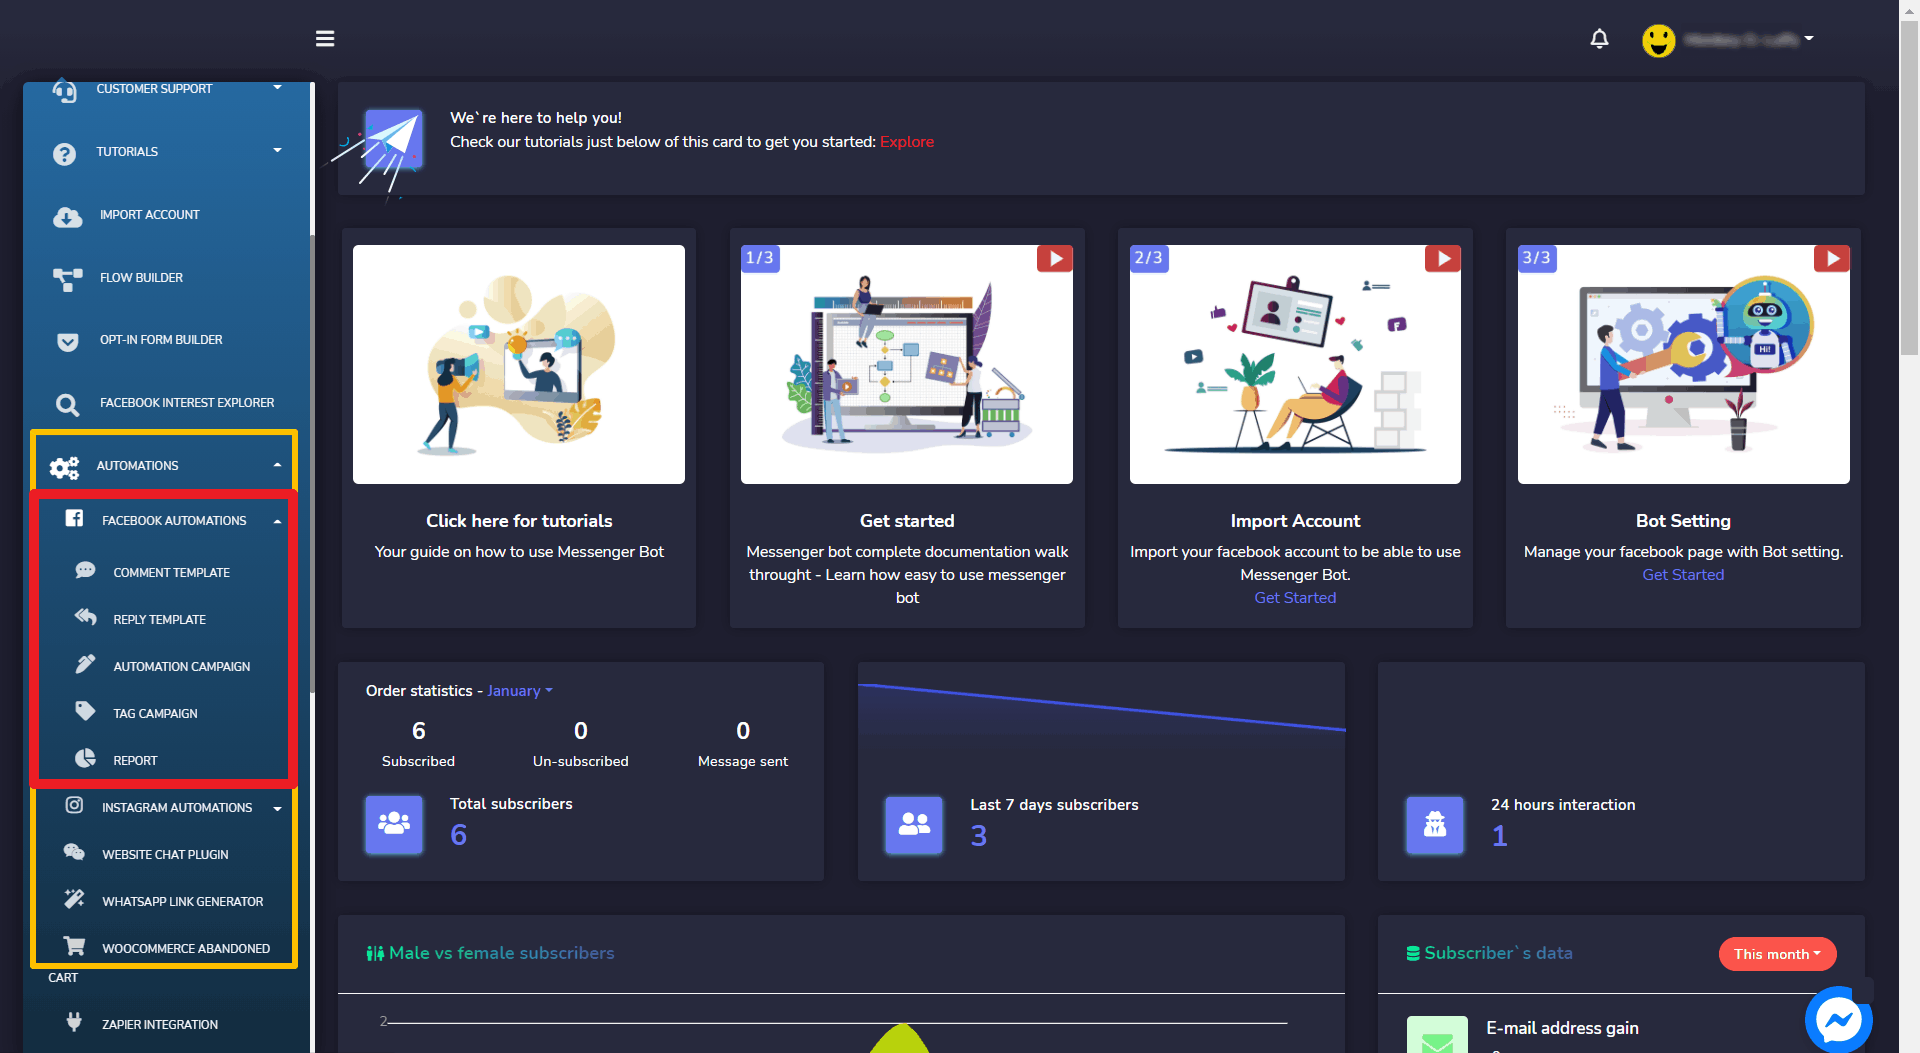
To view this section, navigate to the navigation menu located at the left under the Automations section. Tab on Facebook Automations. The following options will appear in the sub-menu:
Comment Template
First, Comment Template. To view this section, navigate to Automations > Facebook Automations from the navigation menu located on the left side and select Comment Template as shown.
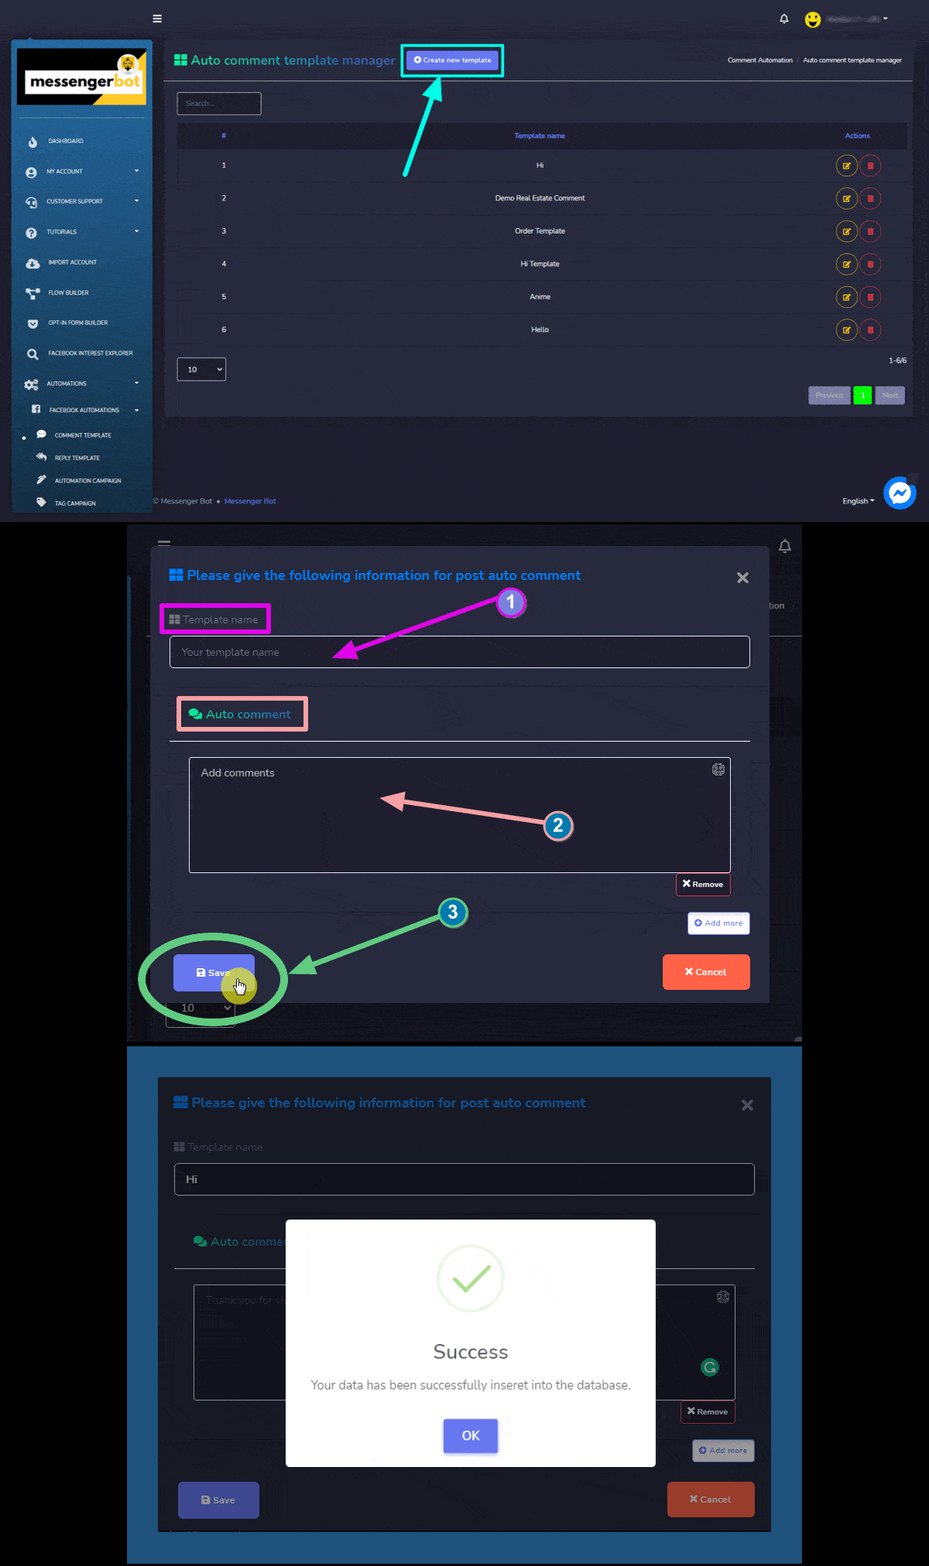
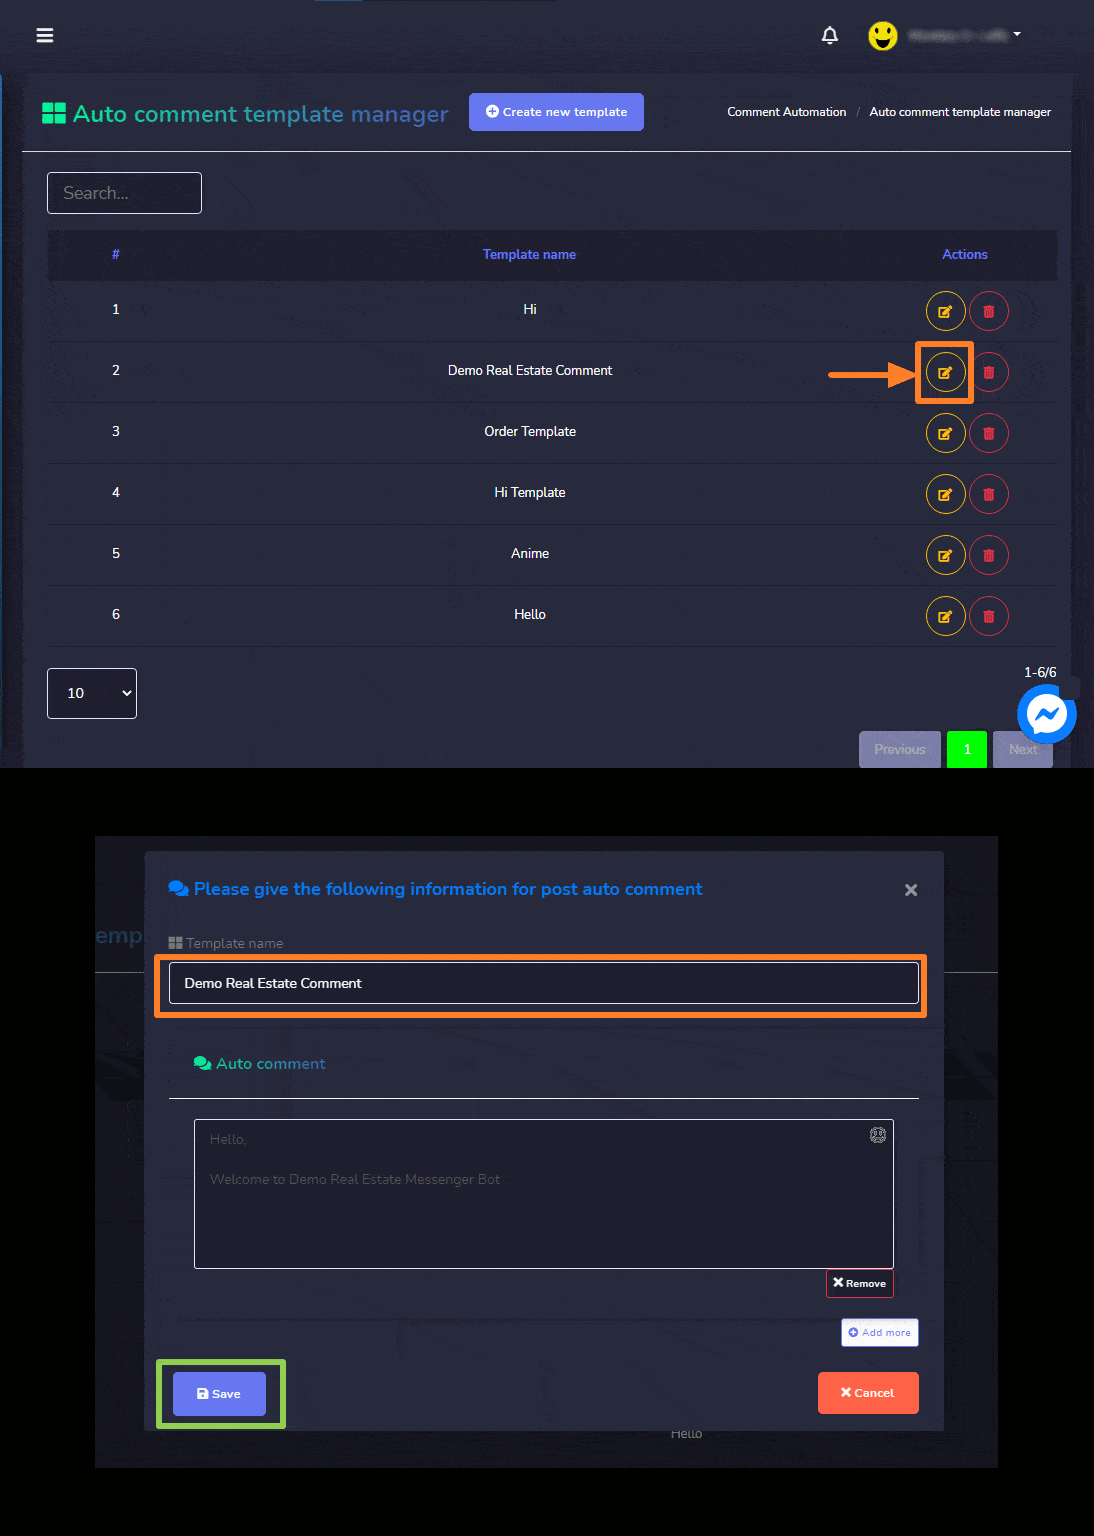
The Auto comment template manager view consists of multiple templates. You can select the number of templates to be viewed per page. You can also search for a particular template by using the search bar.
Create new template
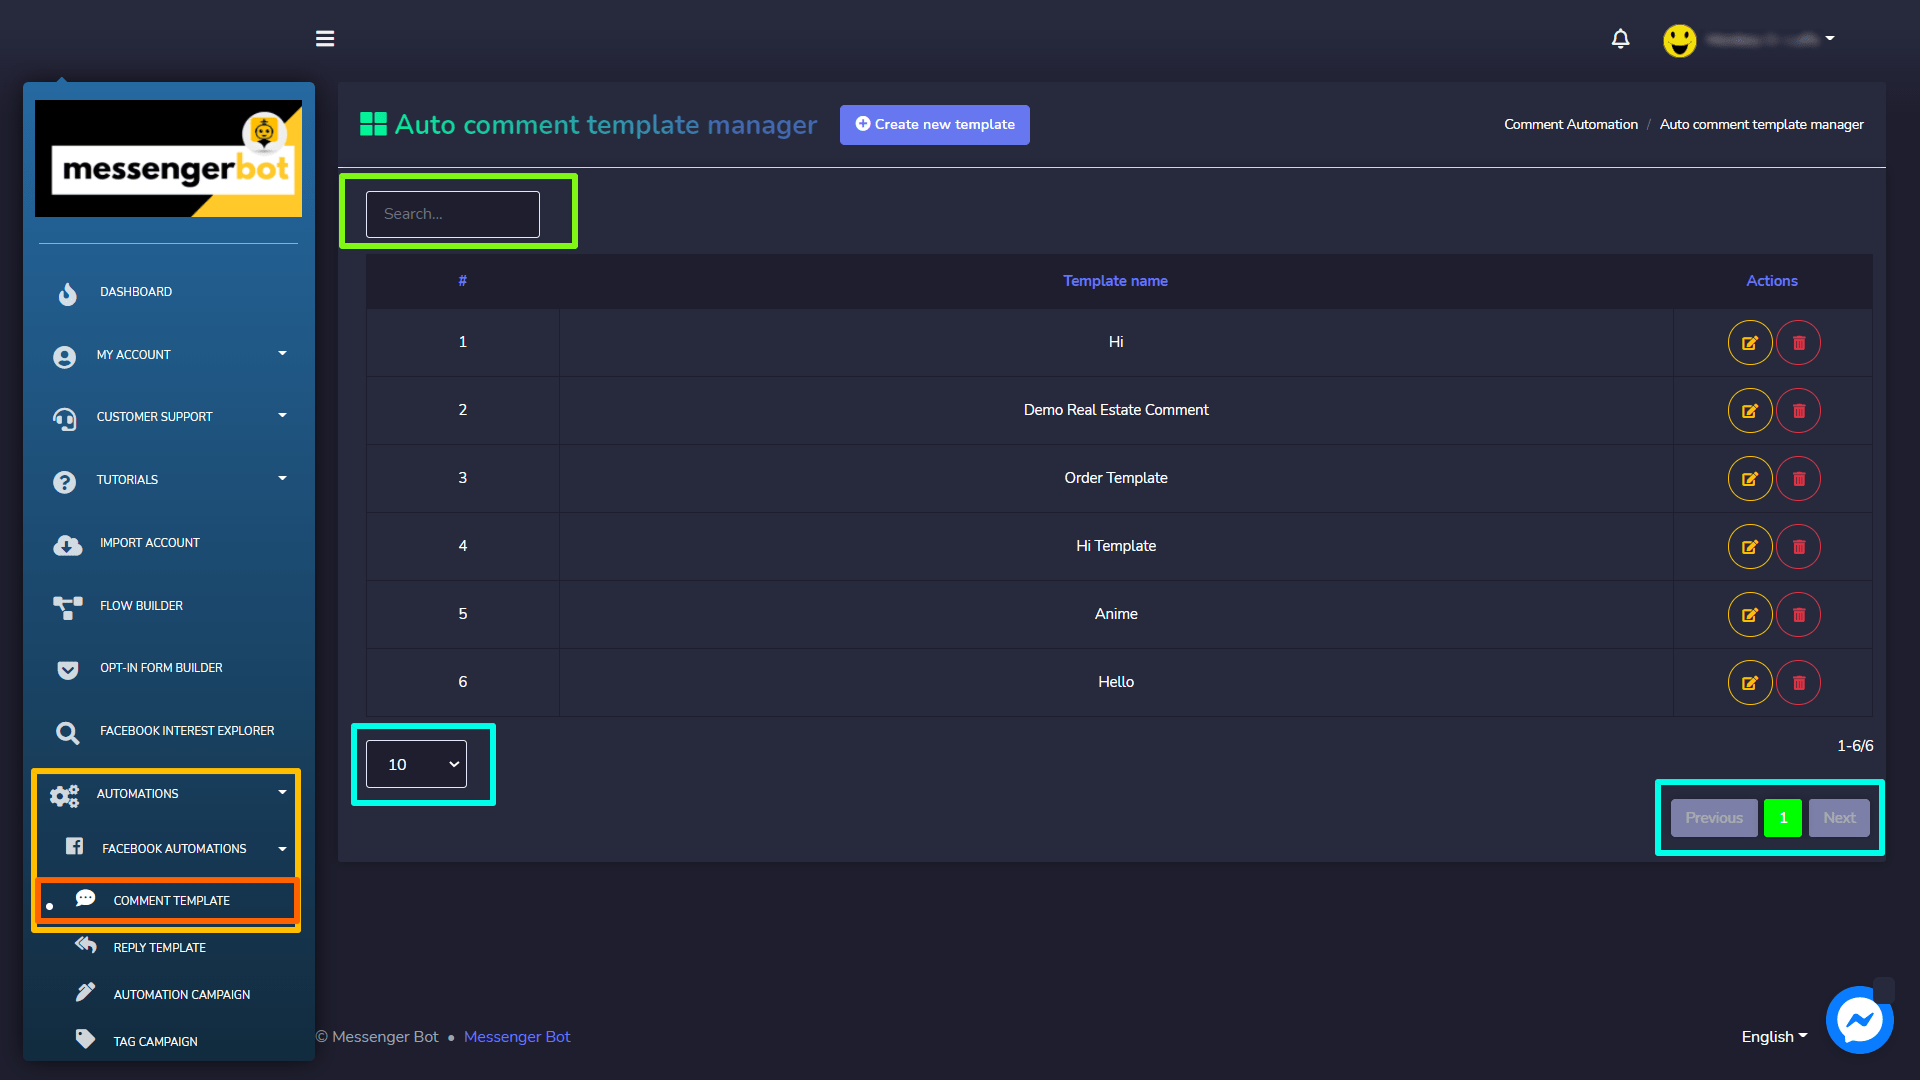
To create a new template, follow the steps given below:
- Select Create a new template option located at the top of the Auto comment template manager
- Provide the information for post auto comment, that includes:
- Template name: Name of your template
- Auto comment: The automatic reply to a comment.
- Select Save to create a new template.
Comment Template Options
You can perform the following actions on the Auto comment template manager screen:
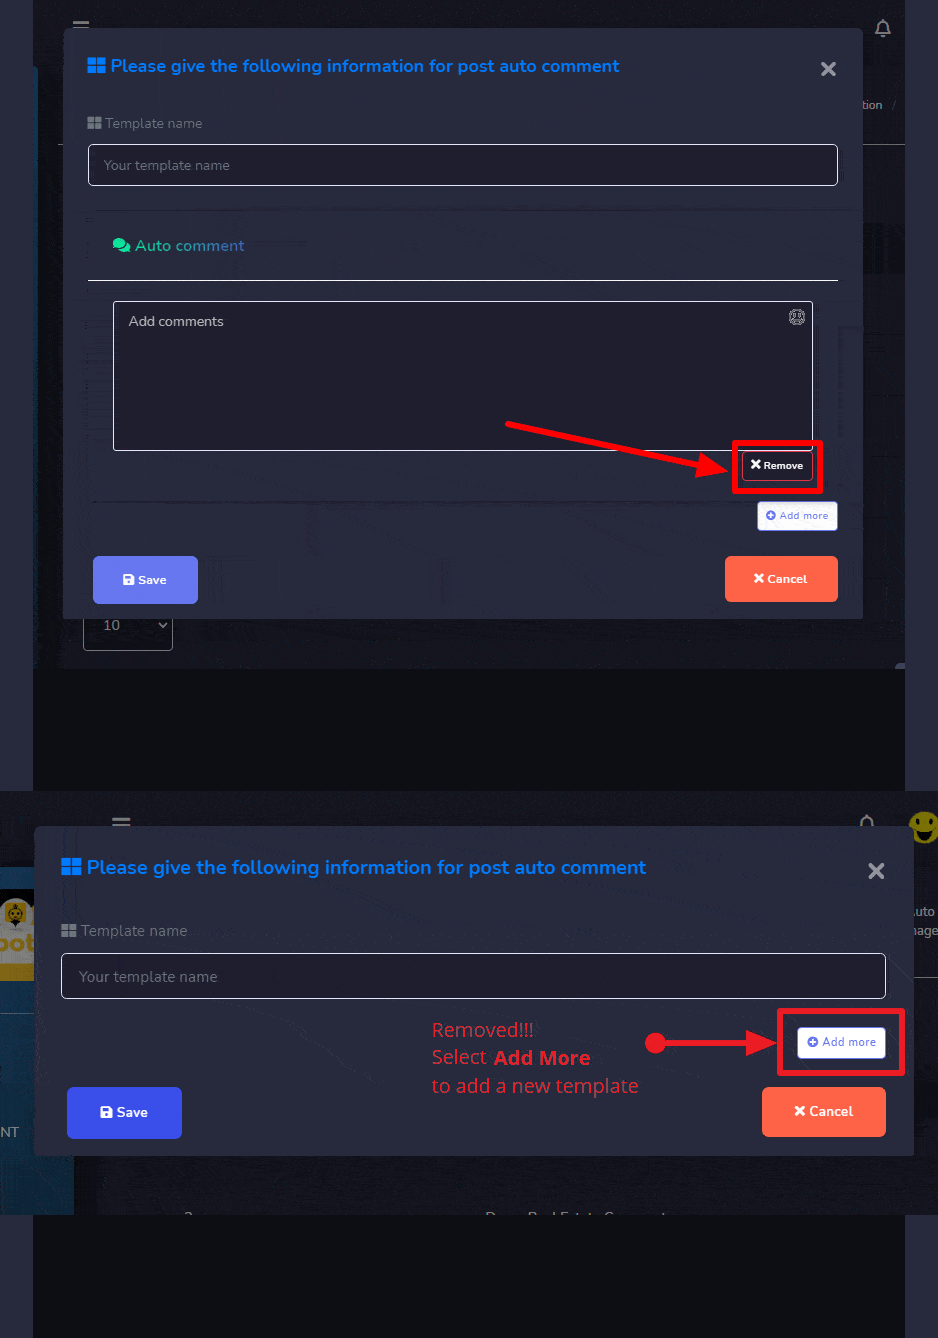
Remove the comment: You can remove the comment from the information providing screen by selecting ![]() button at the bottom.
button at the bottom.
Now it has been removed, you can now select Add more to add a new template.

Reply Template
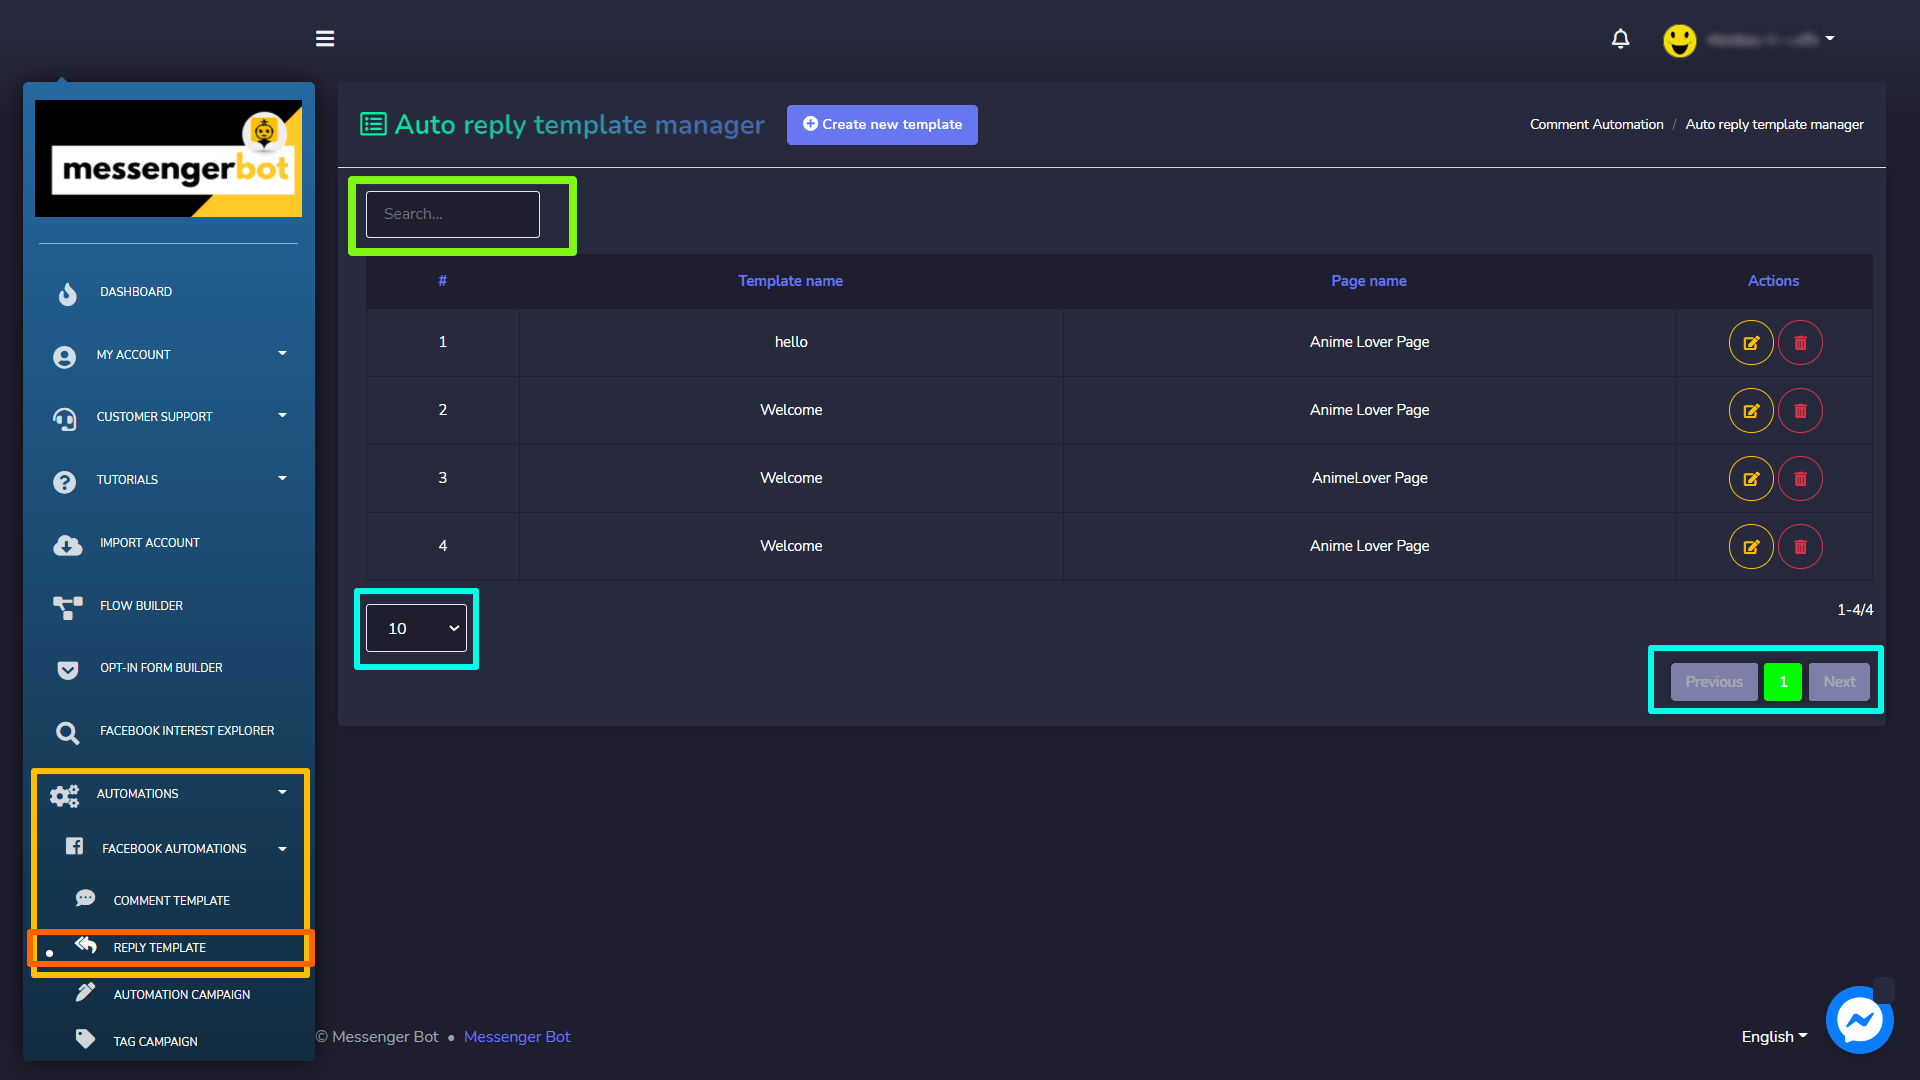
To view this section, navigate to Automations > Facebook Automations from the navigation menu located on the left side and select Reply Template.
The Auto reply template manager view consists of multiple reply templates. You can select the number of templates to be viewed per page. You can also search for a template using the search bar.
Create new template
To create a new template, follow the steps given below:
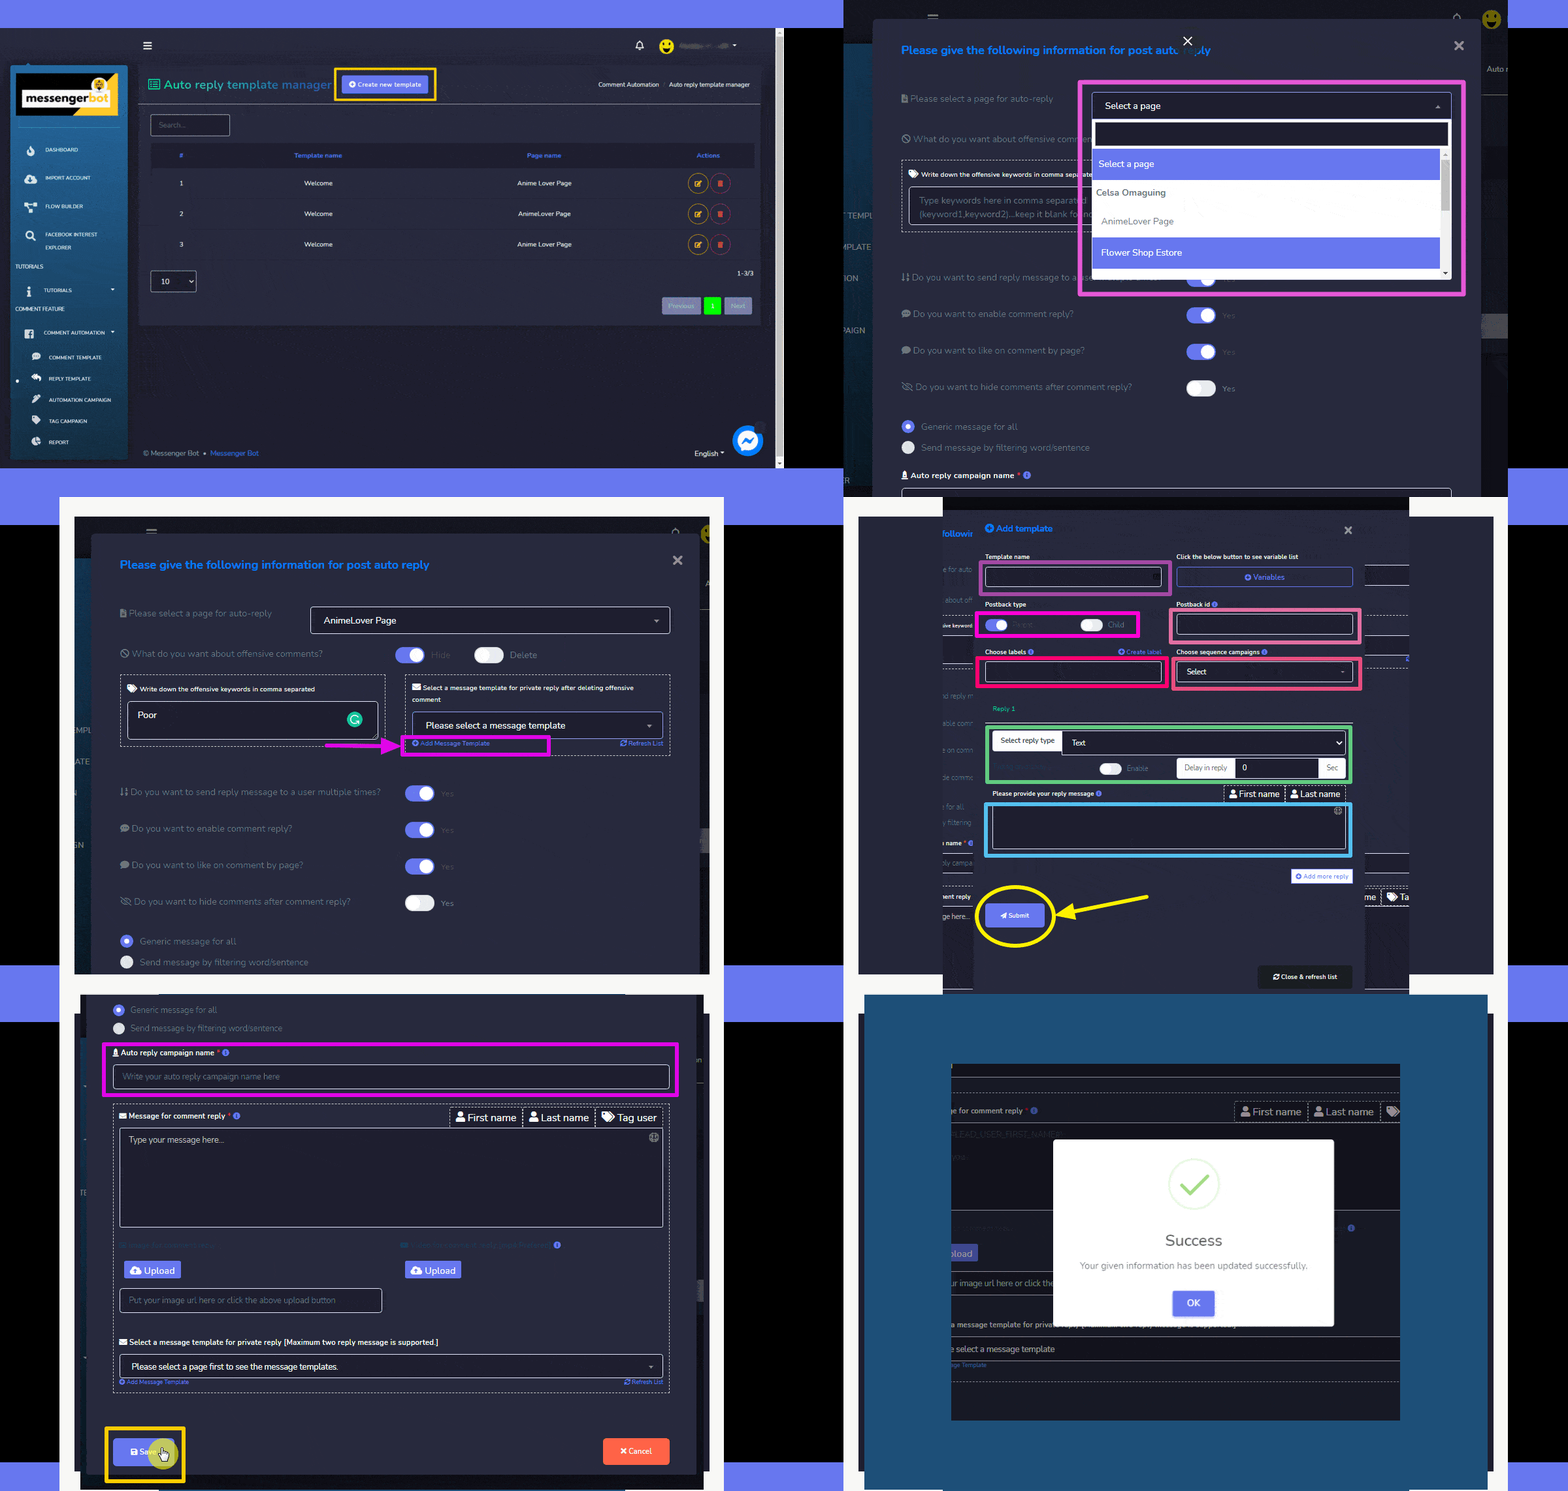
- Select Create a new template option located at the top of Auto reply template manager
- Select the page for which you want to apply auto-reply.
- Add the offensive remarks in inverted commas and select the action corresponding to those remarks.
- Select a message template you want to reply to the person with. Or you can also add a template by selecting “Add Message Template“. Fill up everything needed for your template, then select “Submit“.
- Select all options based on your choice by selecting the toggle button to either Yes/No.
- Provide a name for your auto-reply campaign, then select Save.
Reply Template Options
You can perform the following actions on Auto reply template manager screen:
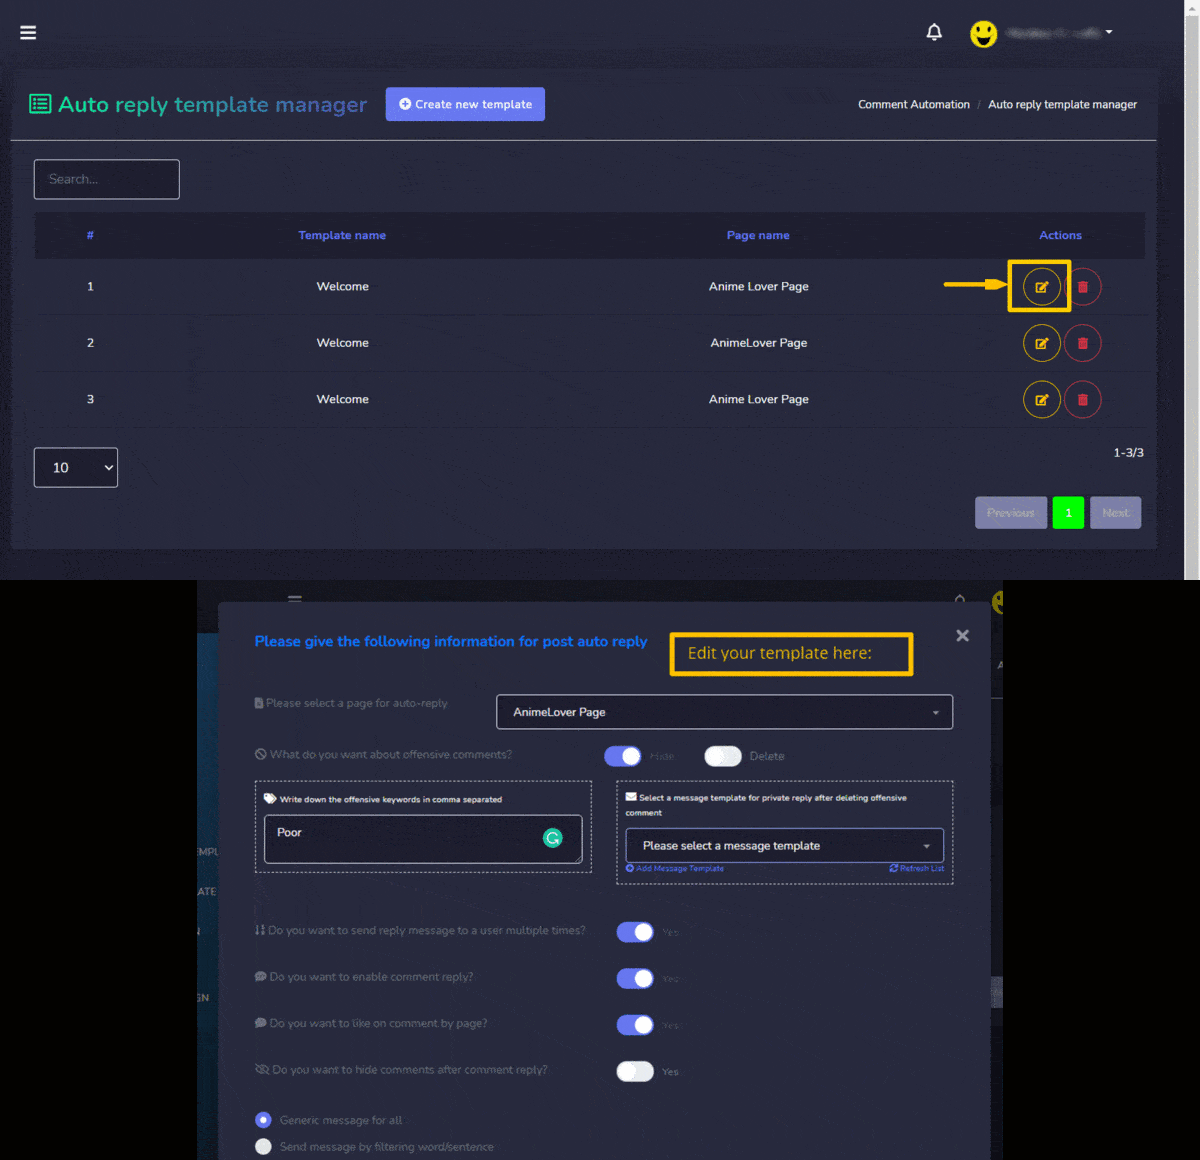
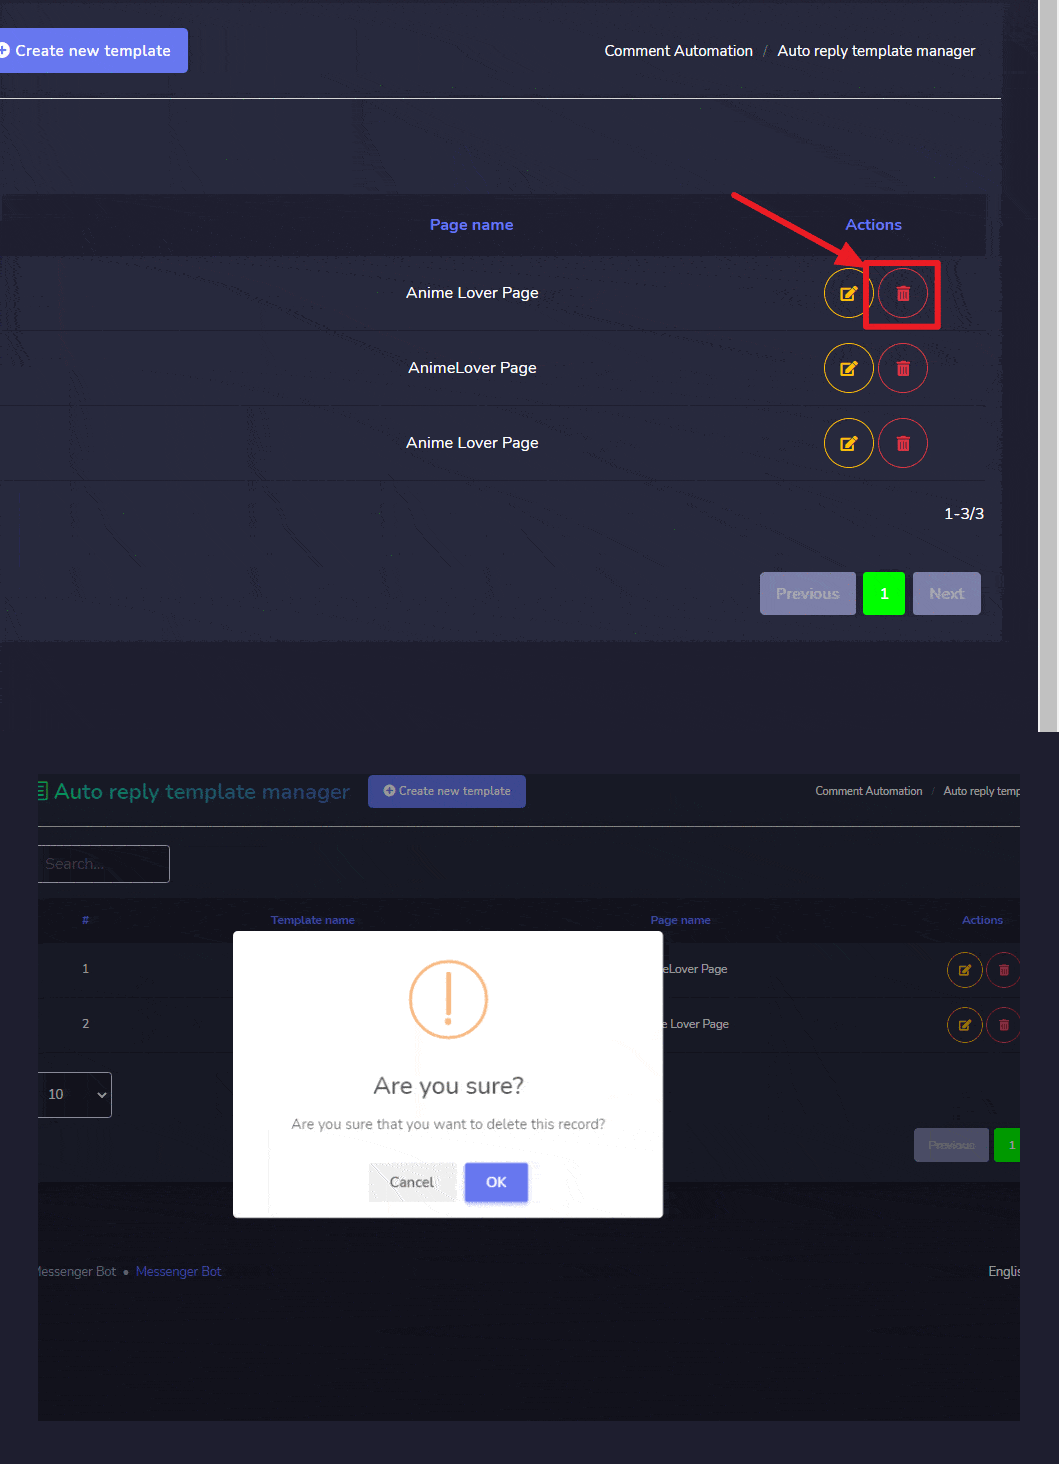
Automation Campaign
To view this section, navigate to Automations > Facebook Automations from the navigation menu located on the left side and select Automation Campaign.
The Create Campaign view consists of multiple options. This view is divided into two sections. The left side allows users to run Full page campaigns. The right side is used for setting the campaigns by ID.
A summarized view of numbers of how many total Auto comments, Auto replies, and Auto campaigns created can be found in the left section. You can create different campaigns, enable auto replies and comments on several posts from this view.
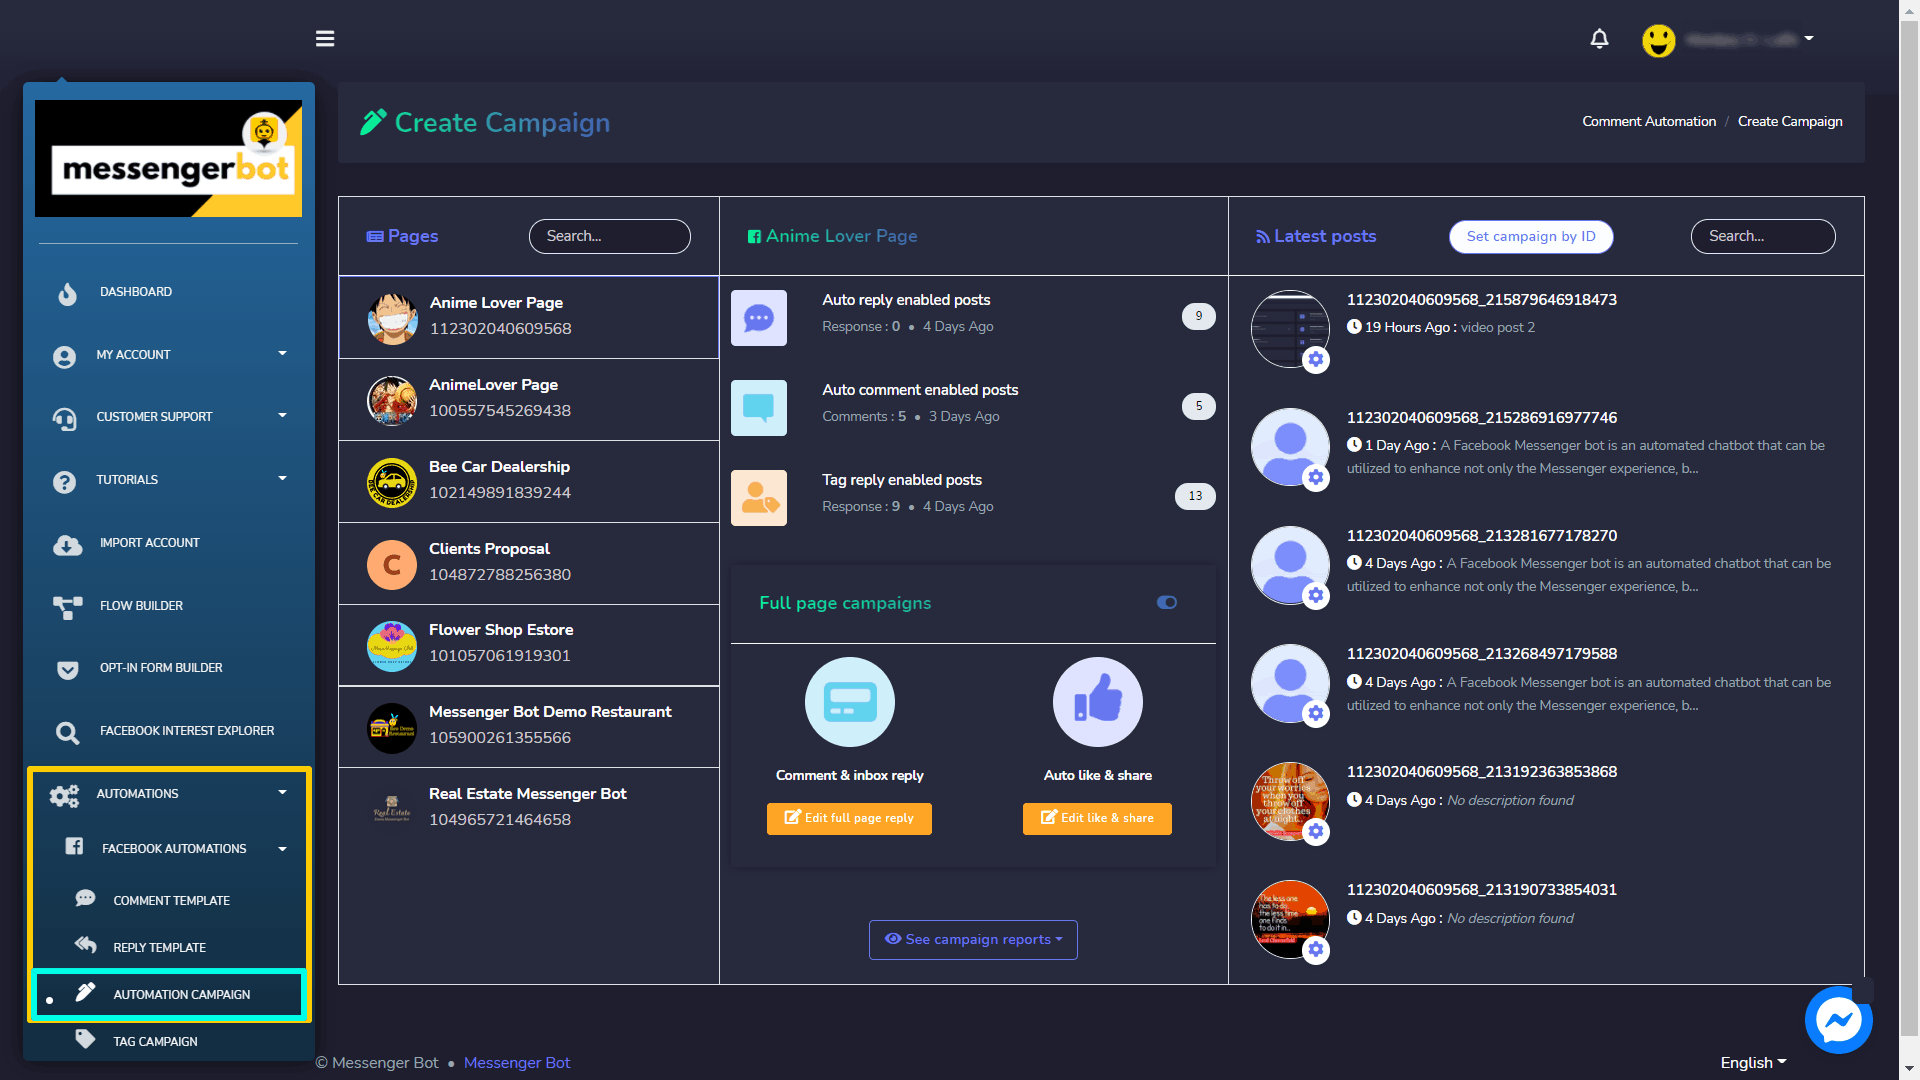
Full page campaigns
Campaigns can be set for Facebook pages. This helps a user to run an overall campaign for their page. The settings apply throughout the Facebook page and for all posts. To set a full page campaign, a user has two methods:
- Comment & inbox reply
- Auto like & share
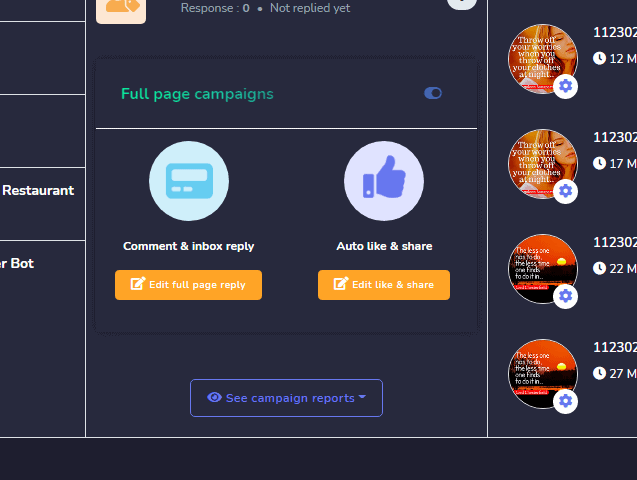
Comment & inbox reply
To comment & give inbox reply, follow the steps given below:
- Select the Edit Full page reply option from Full page campaigns
- Now edit your information for page response, and make updates.
- Select Save, your information will be updated.
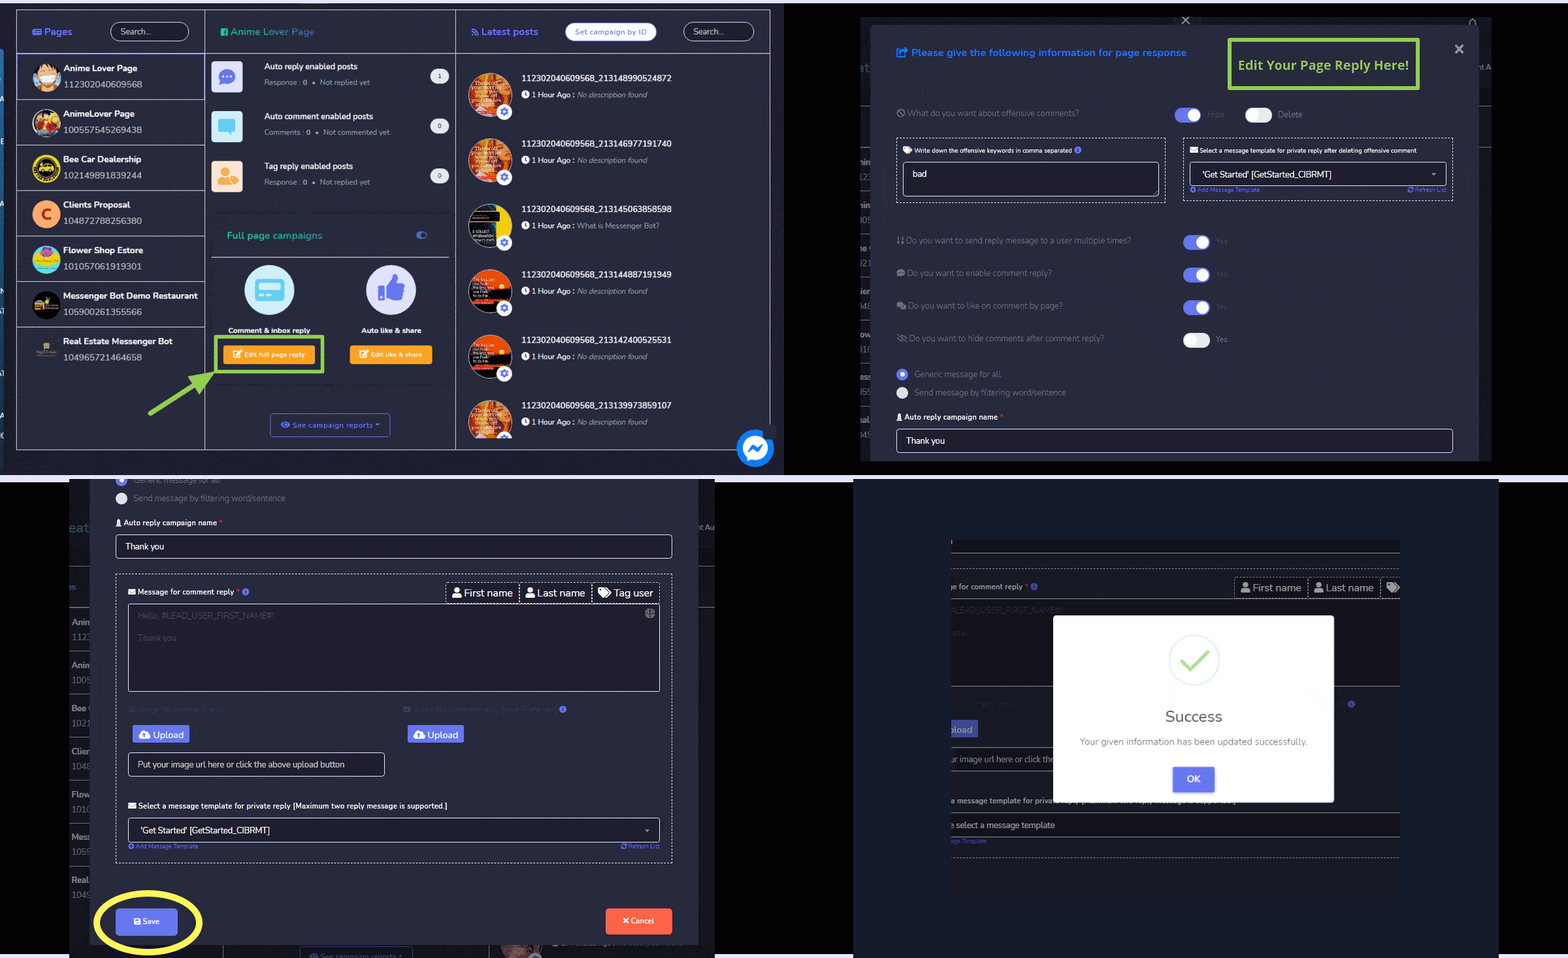
Auto like & share
To auto like & share the page, follow the steps given below:
- Select the Edit like & share option from Full page campaigns
- Now edit the fields available on the Auto like and share screen, and make updates.
- Select Save, your information will be updated.
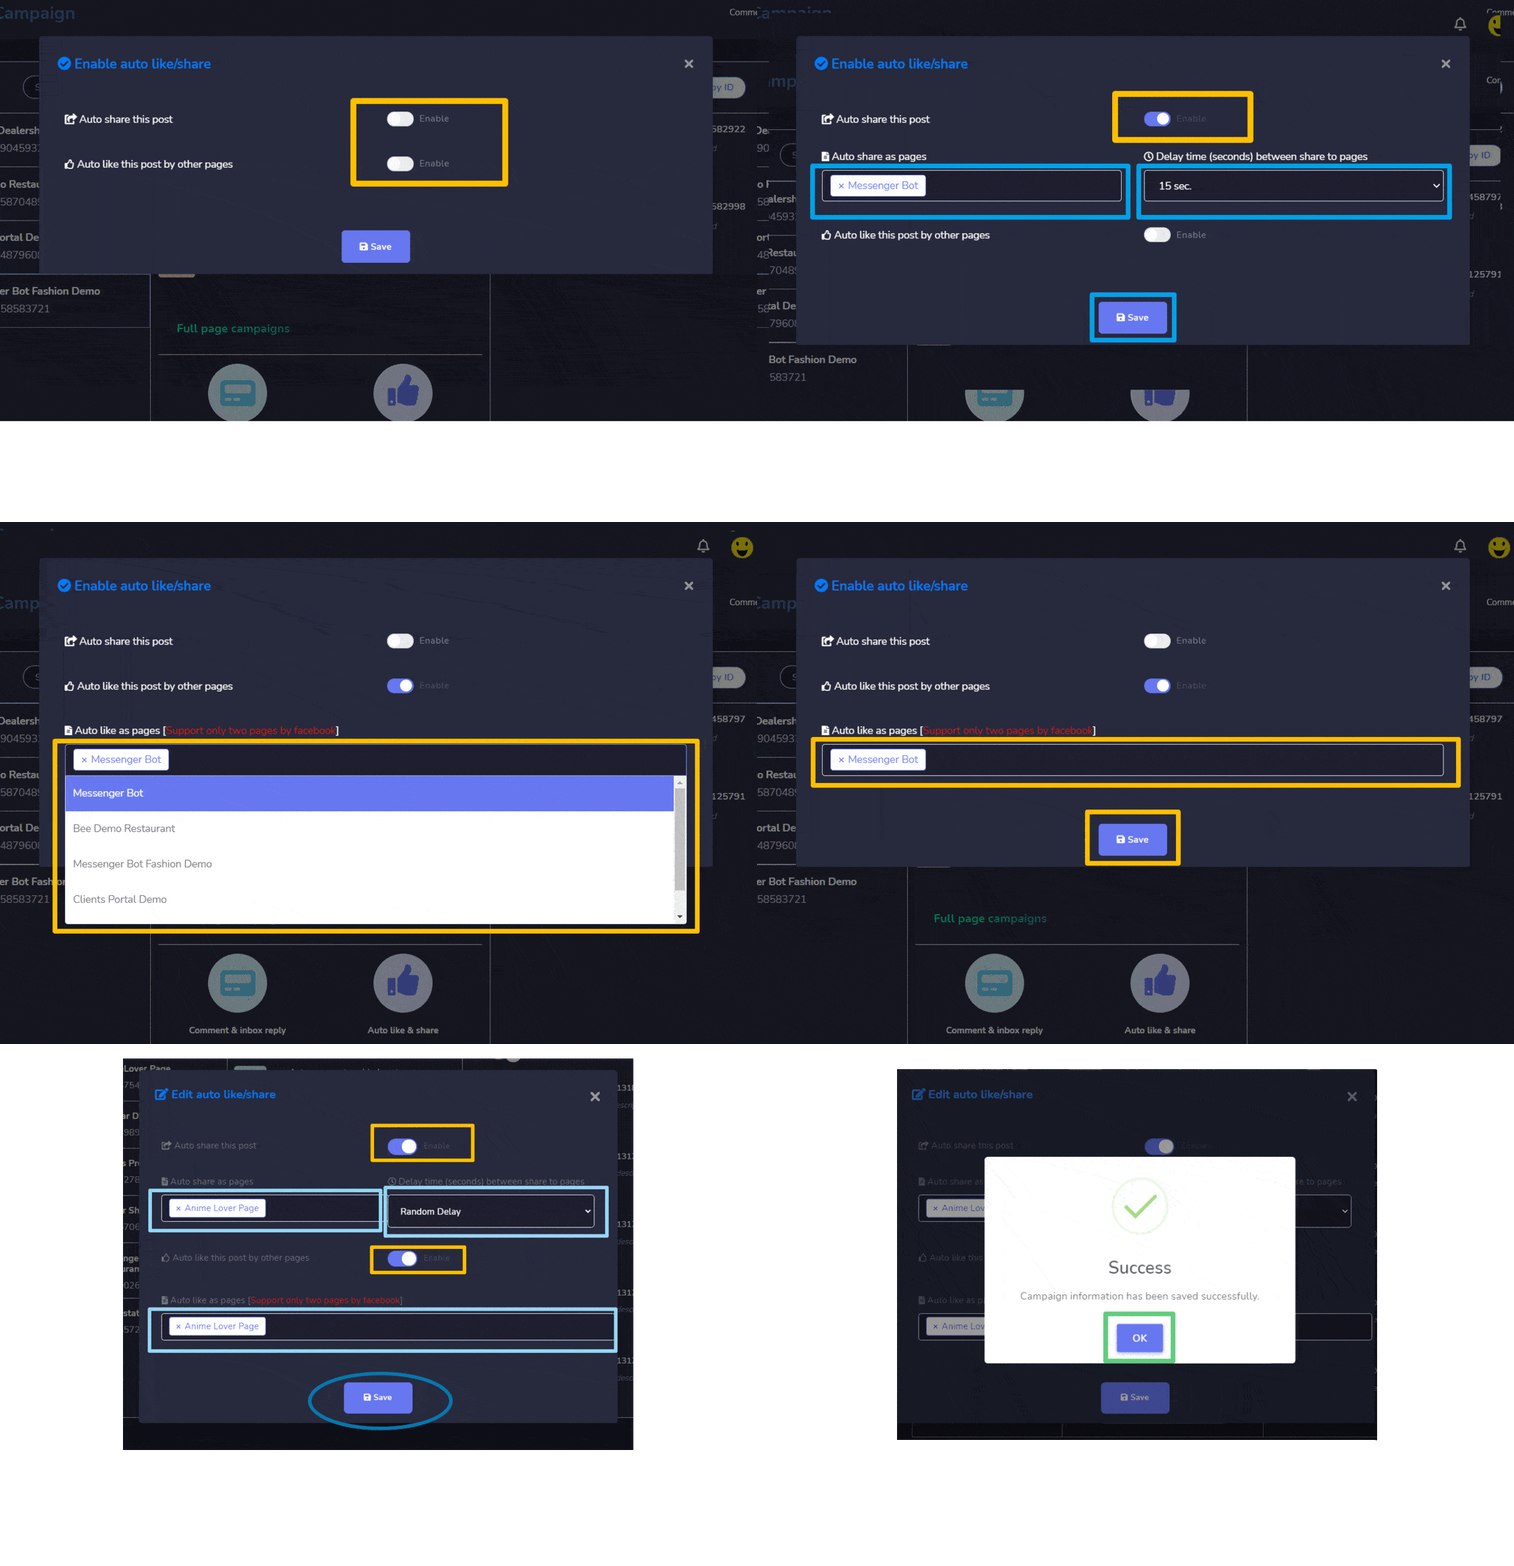
| Note: | |
| · Auto like as page option, supports only two pages at a time. | |
Set campaign by ID
You can also set a campaign for a particular post by using its ID. Just follow the steps given below:
- Select the Facebook page for which you want to create this campaign.
- Select the Set campaign by ID option available on the right section of the screen.
- Enter the Post ID of the post for which you want to set the campaign.
- Enable the options you want to be available for your campaign.
- Provide further information based on your selection from Step 4, then select Submit. A new campaign will be created.
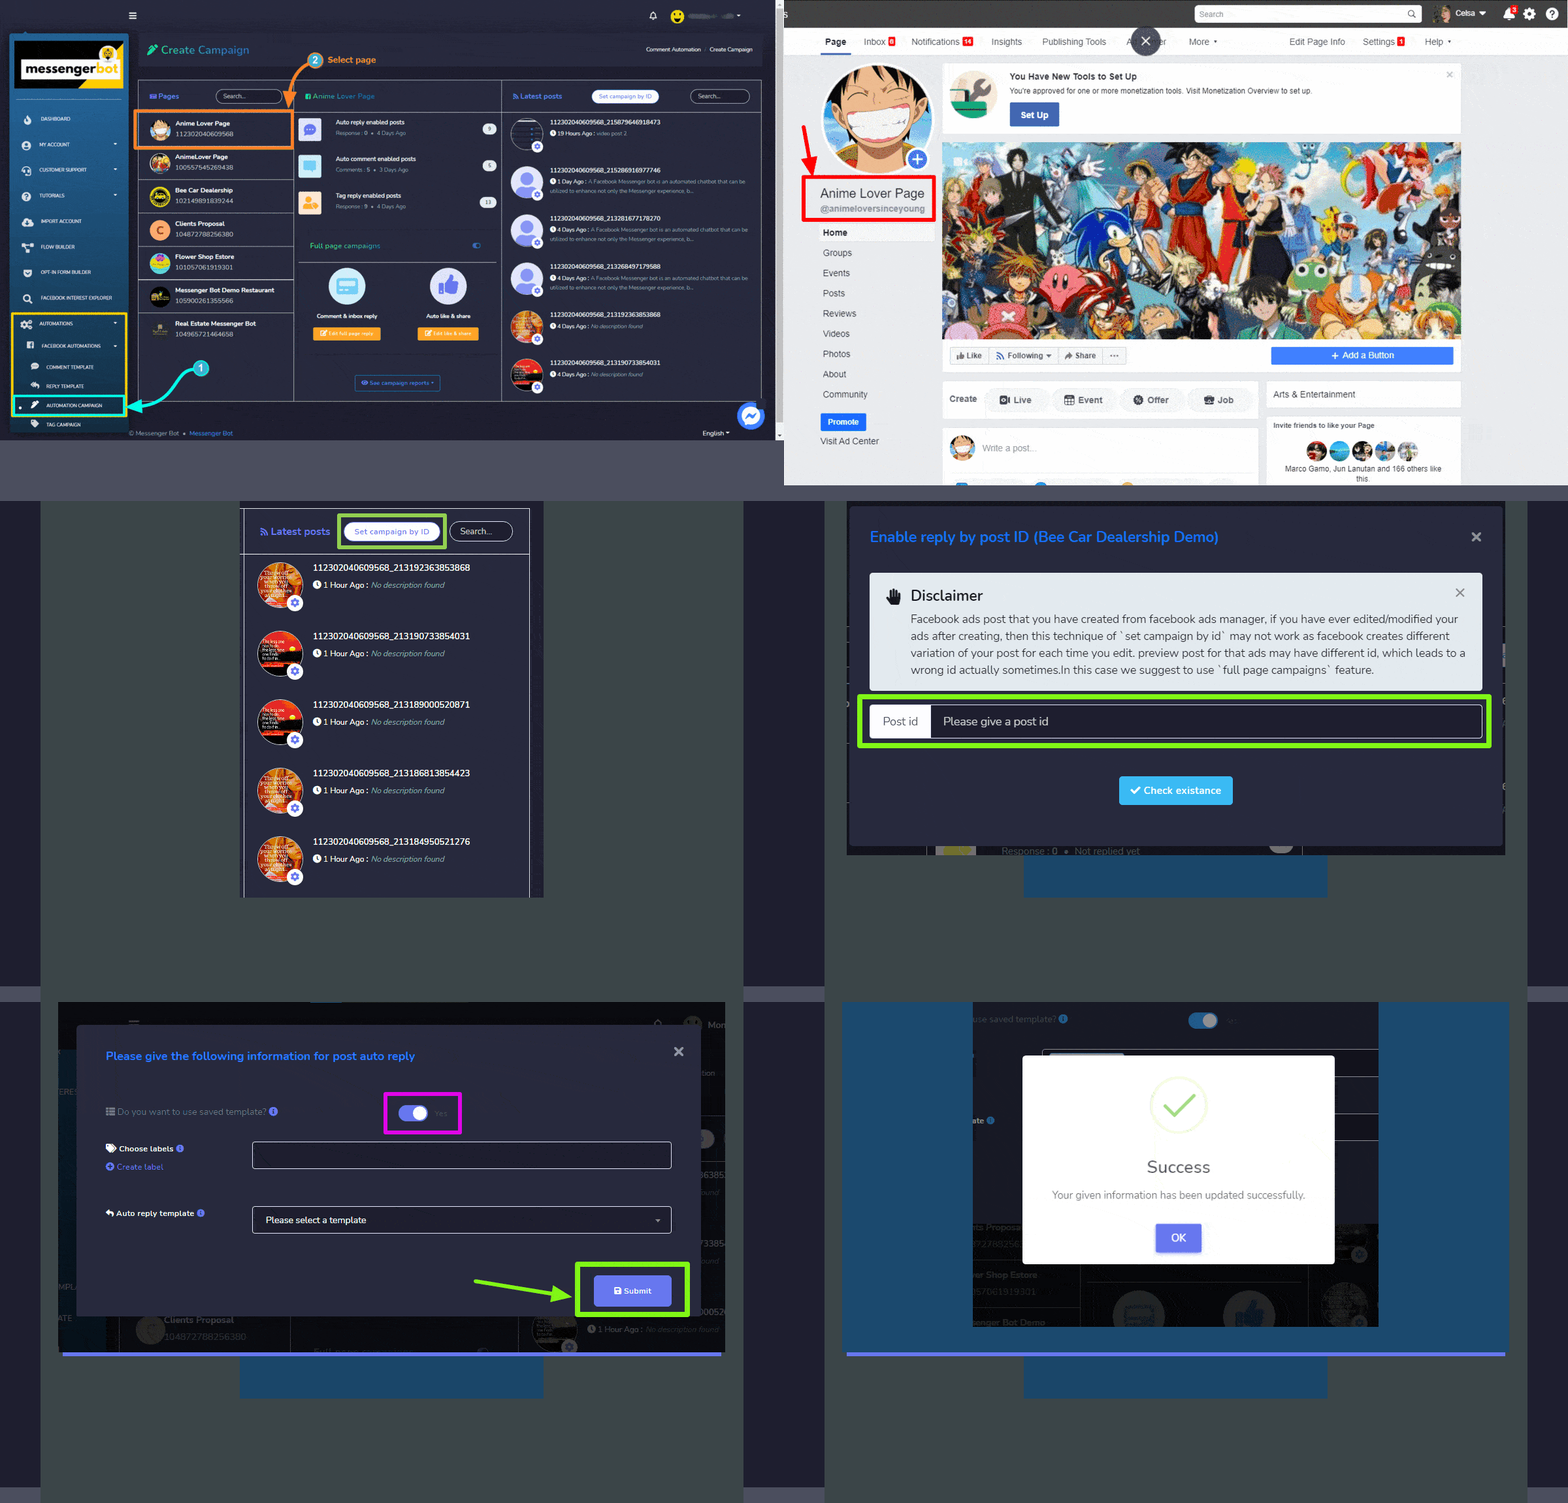
On selecting the ![]() icon, users can perform the following actions:
icon, users can perform the following actions:
- Enable auto reply: You can enable the auto comment feature by selecting
 icon. A dropdown menu will appear, now select the Enable auto reply option.Provide the following information for post auto reply:
 - Choose the labels you created from Labels
- Select the template you want to choose. If you want to choose an already created one, turn the slider button YES.
- Select the auto reply template from the dropdown menu.
- Select Submit. Your auto reply will be enabled.
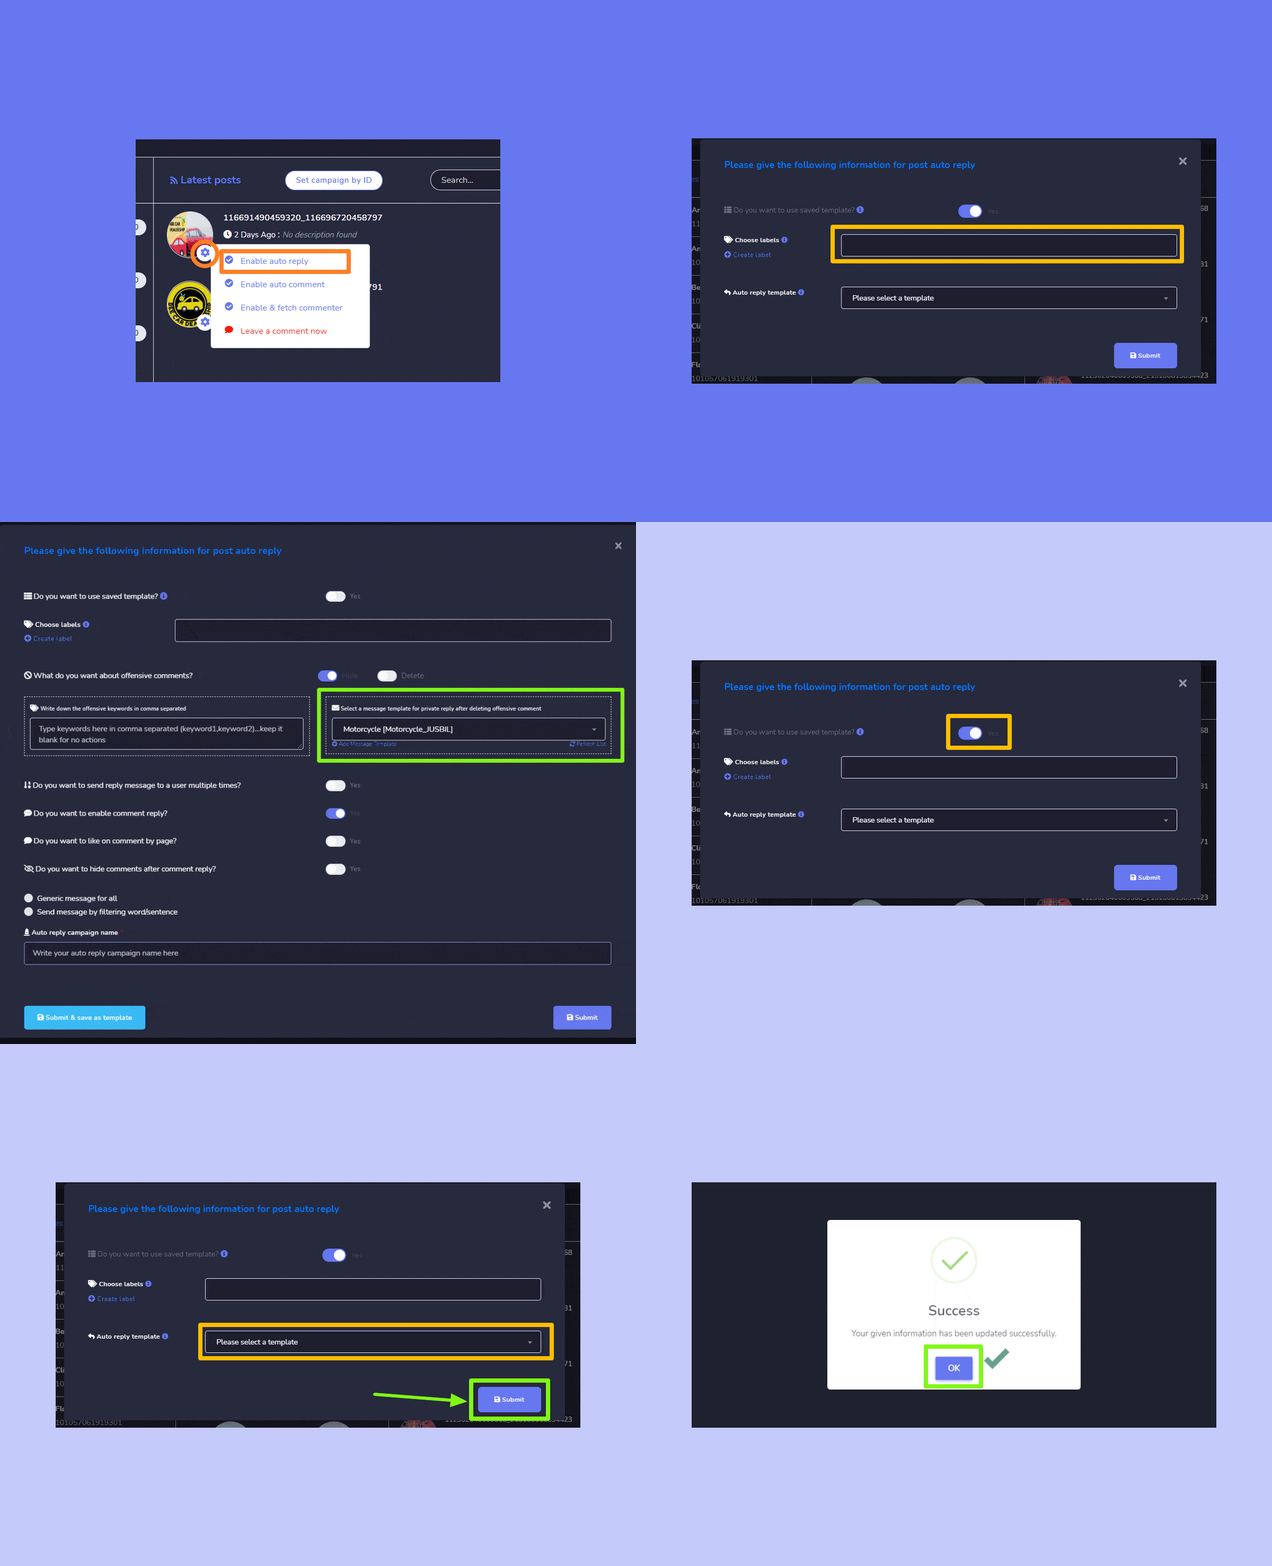
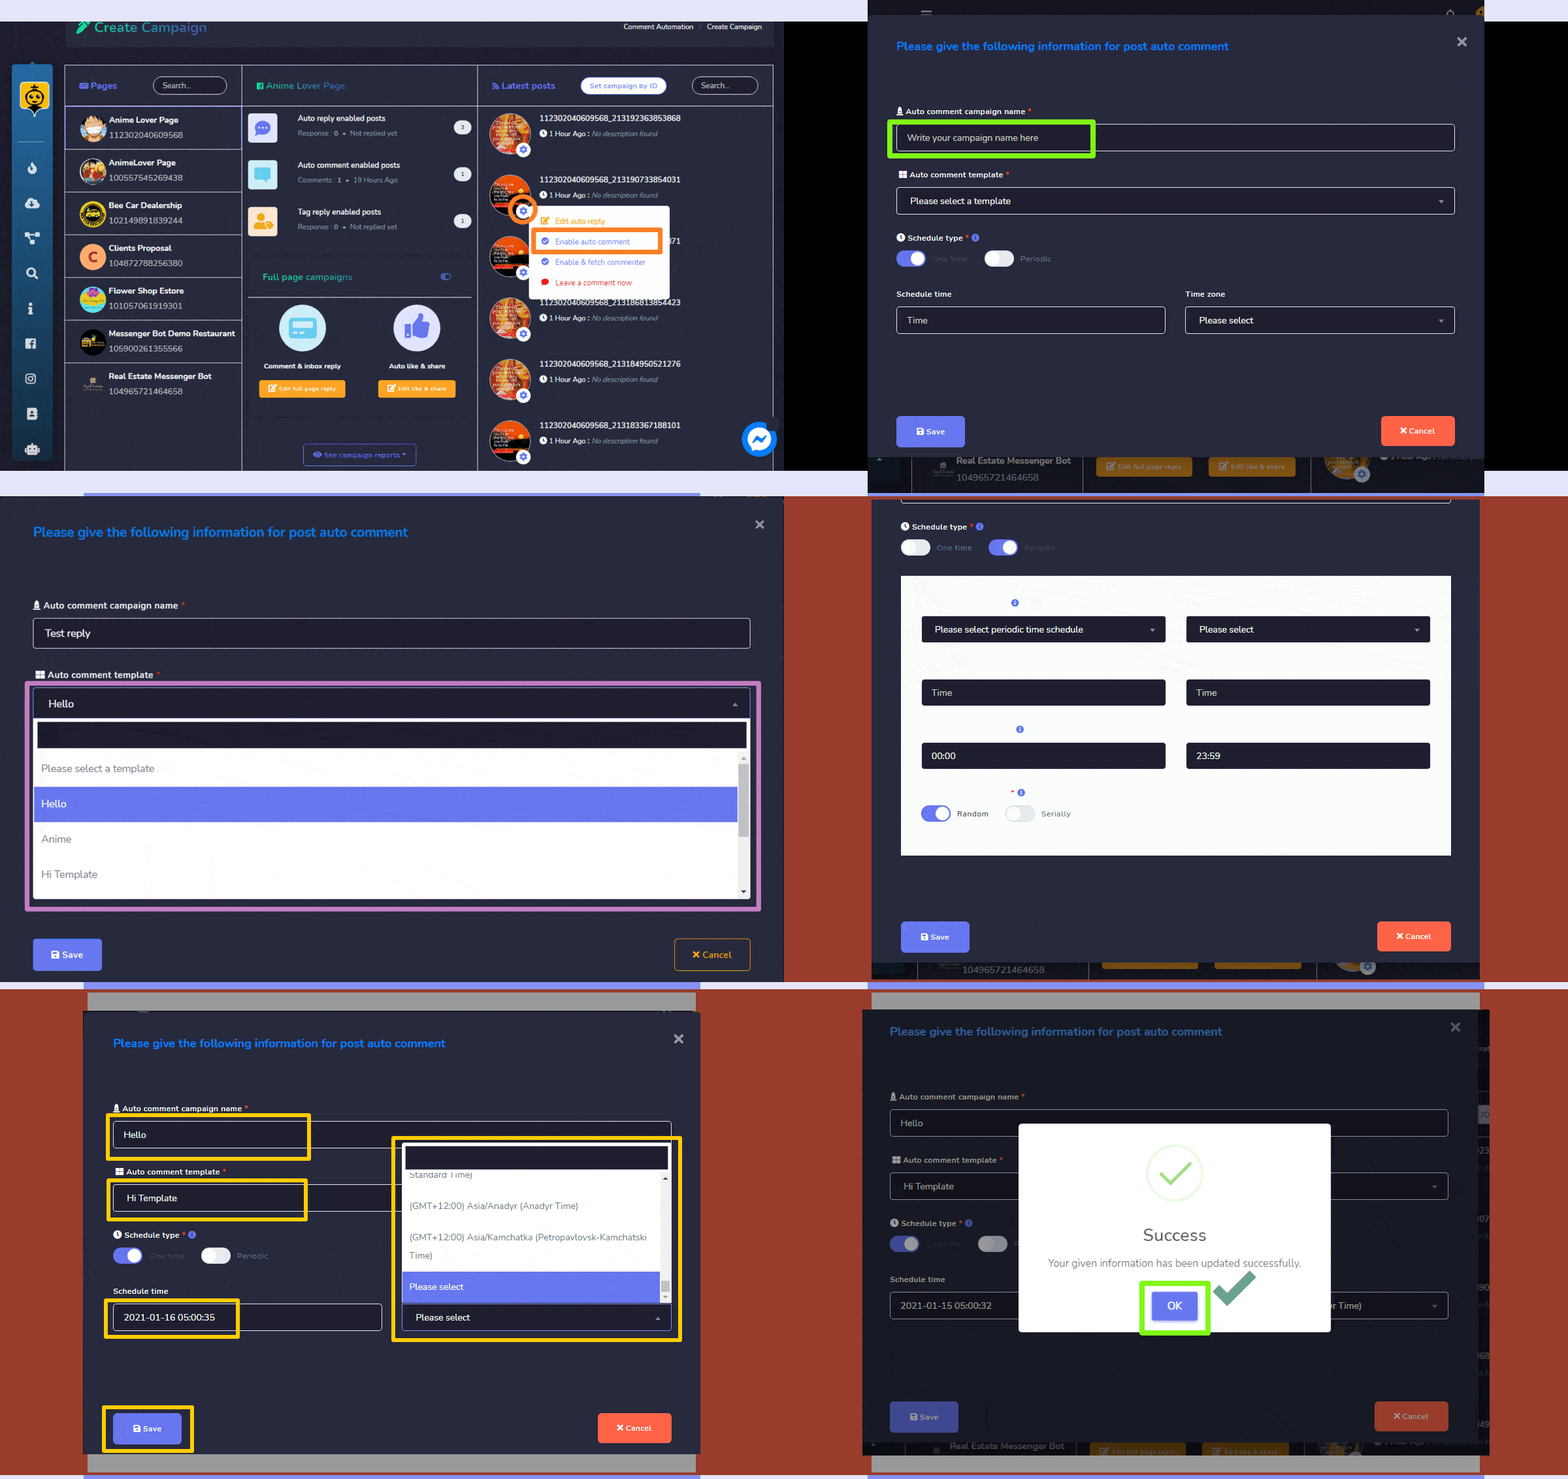
- Enable auto comment: You can enable the auto comment feature by selecting
 icon. A dropdown menu will appear, now select the Enable auto comment option. Provide the following information for post auto comment:
 - Auto comment campaign name
- Select an Auto comment template
- Schedule a type for your post auto comment.
- Schedule a time for the post
- Select your time zone based on your location.
- Click Save. Your auto comment will be enabled.
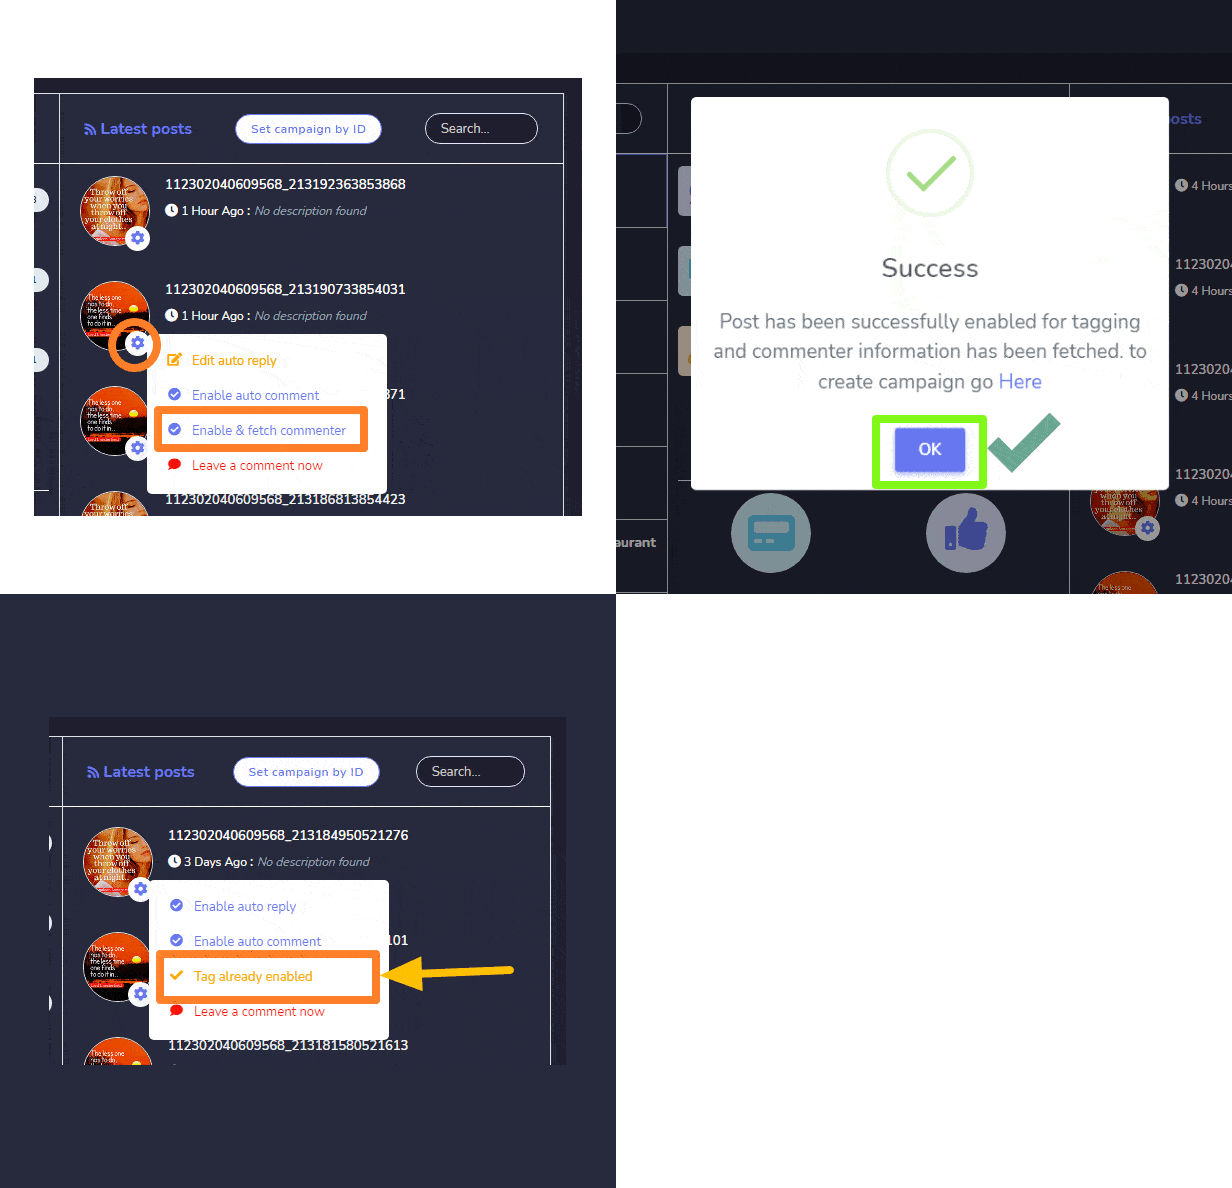
- Enable and fetch commenter: You can enable the auto tag feature by selecting A dropdown menu will appear, now select the Enable and fetch commenter option. Your auto tag feature will be enabled.
Automation campaign output
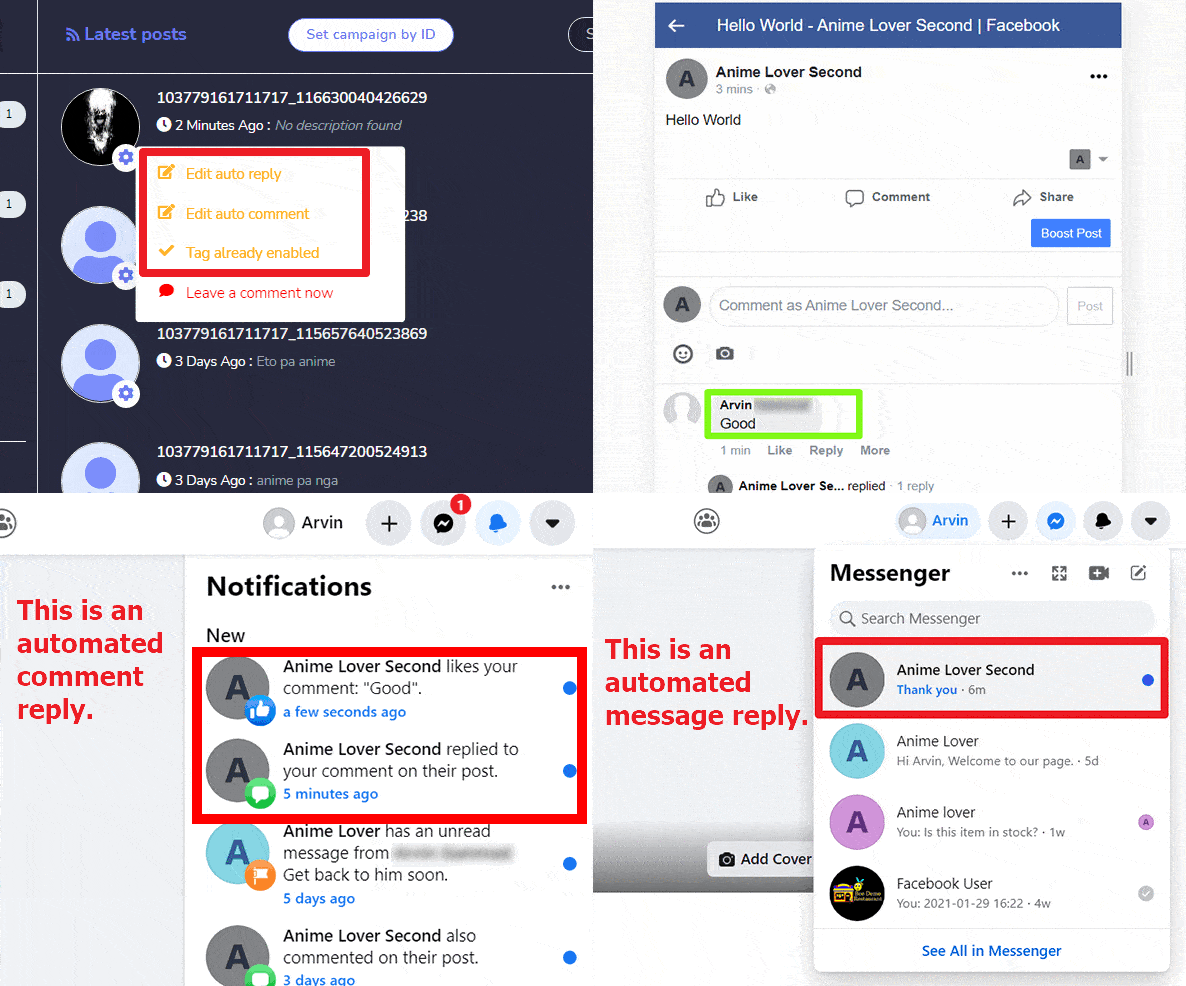
You can see the comment of the user is liked, replied and the message is redirected to the inbox. The end user is notified as well about the reply from the admin side. The admin’s comment and reply in this demo are automated.
Tag campaign
To view this section, navigate to Automations > Facebook Automations from the navigation menu located on the left side and select Tag campaign.
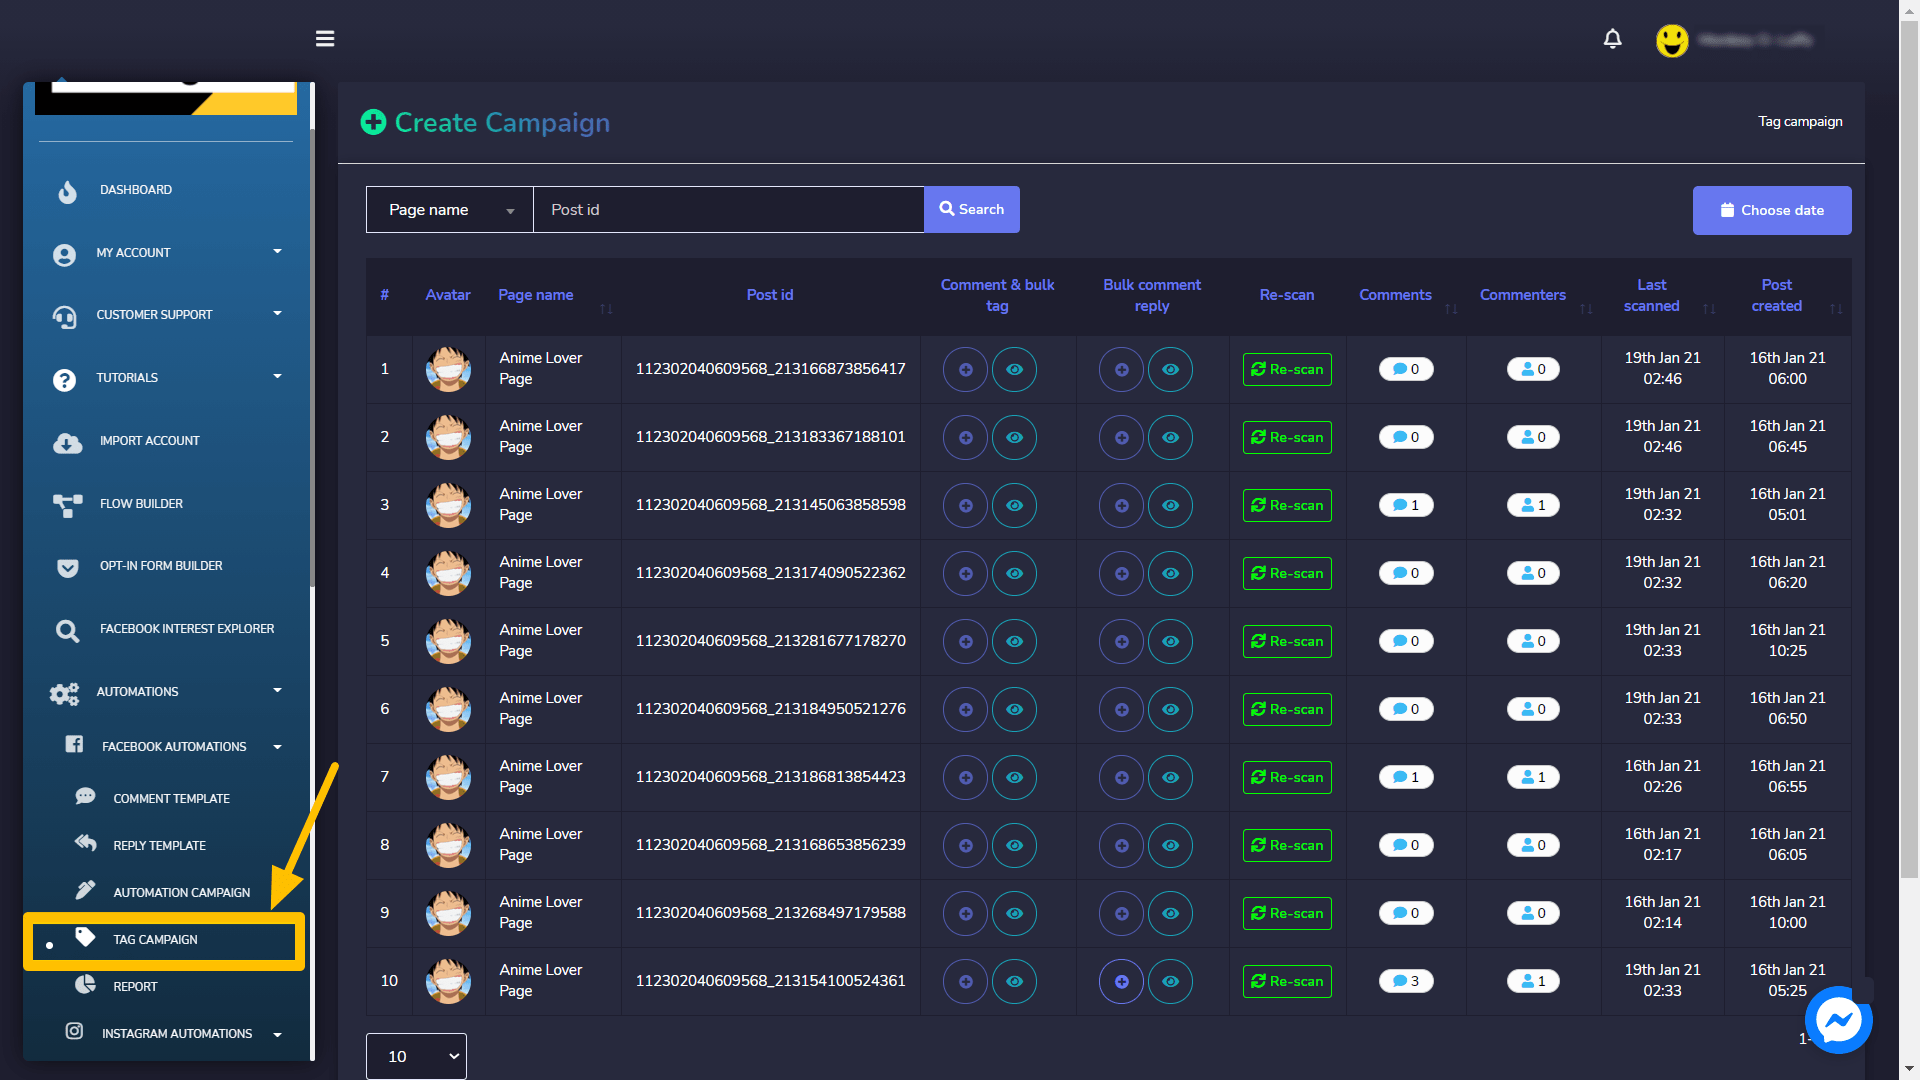
The Create campaign view consists of a campaign list. You can select the number of campaigns to be viewed per page. You can also choose the date range for which you want to view the list. In order to access the hidden fields of the table, move the bottom slider towards the right side. You can also search for a particular campaign using the Post ID in the search bar.

Create Campaigns
Users can perform following actions from create campaign screen:
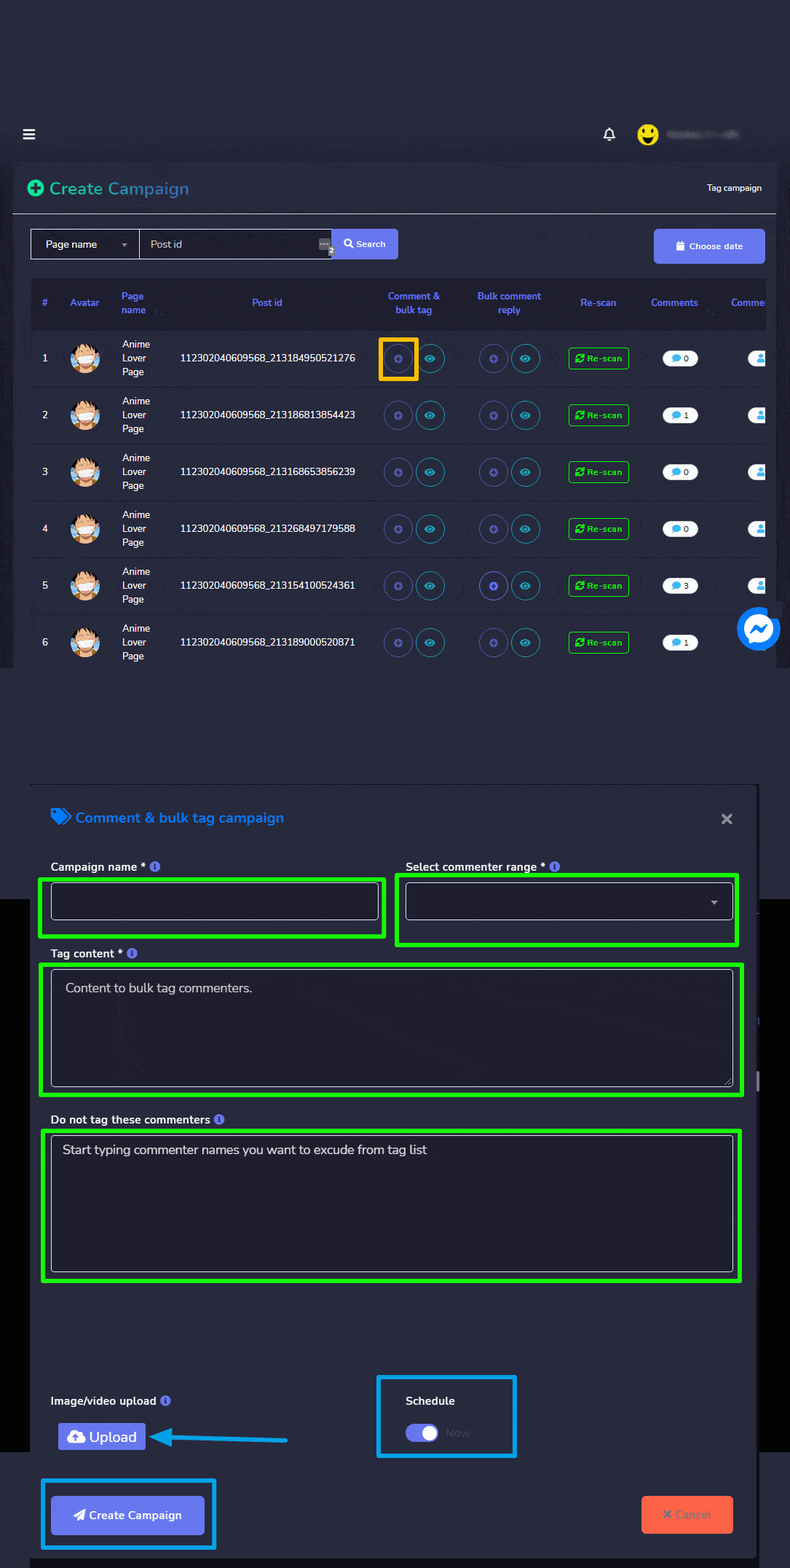
- Create campaign for comment & bulk tag: For the posts with multiple comments, you can bulk tag the subscribers. Just follow the steps given below:
- Select the
 icon against the ID for which the campaign is to be created.
 - A modal will pop up, Enter the campaign name, select the range of commenters from the drop-down menu. Provide the content to bulk tag the commentators.
- You can restrict the tags for some people.
- Select the schedule for your campaign.
- After adding all information, select Create Campaign.
- Select the
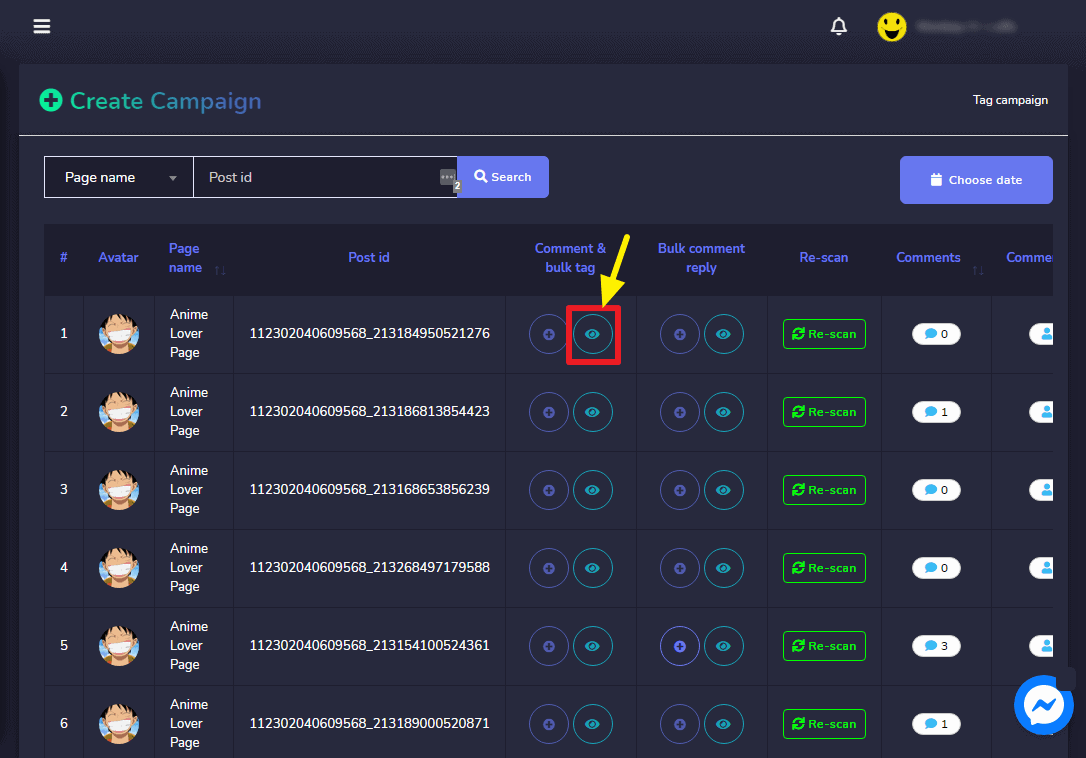
- View report for comment & bulk tag: By selecting the icon against the ID for which the report is to be viewed as shown in the comment bulk tag report
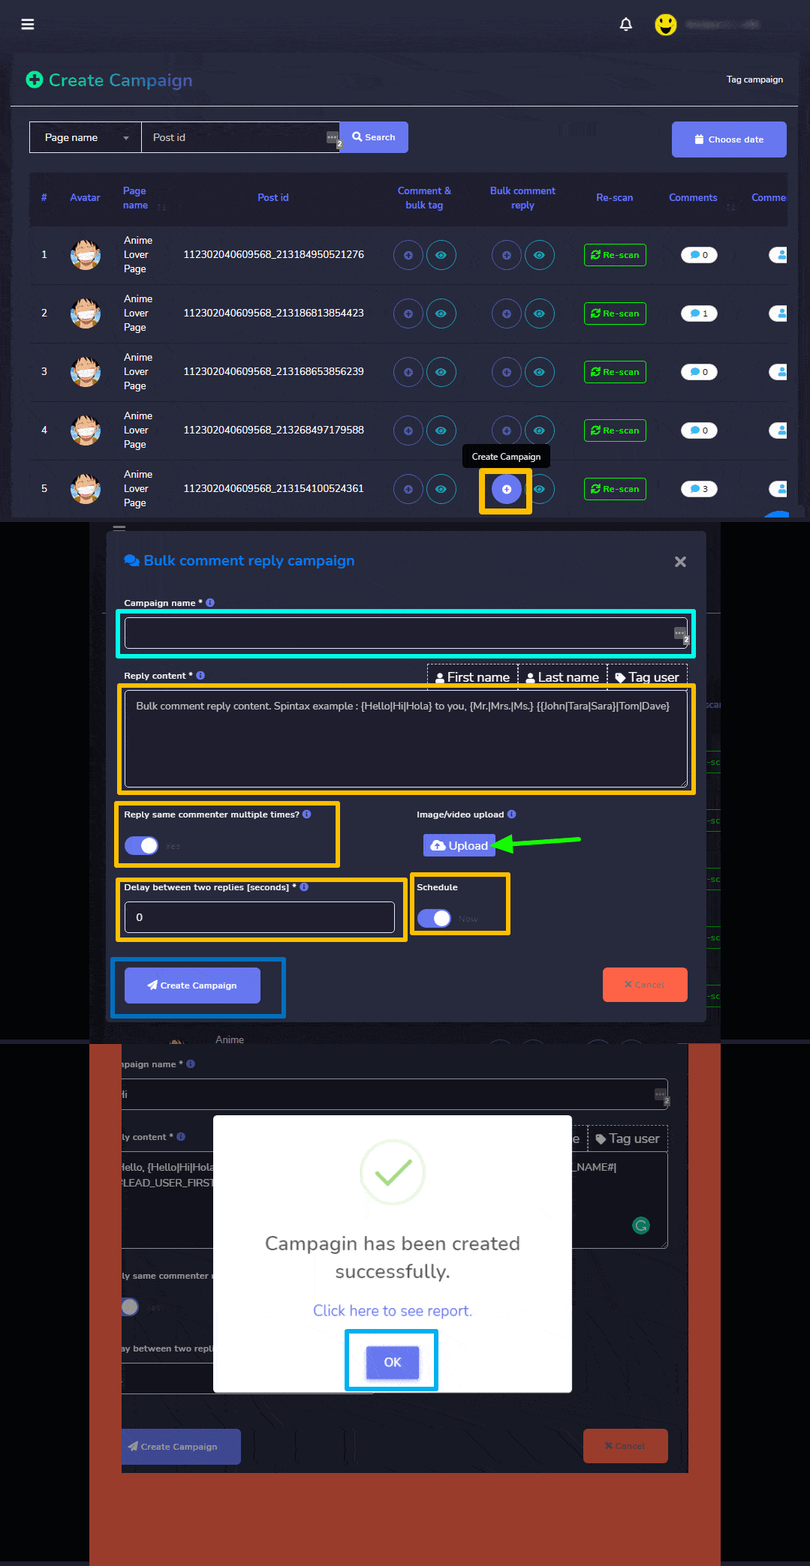
- Create campaign for bulk comment reply: For comment replies in a bulk, follow the steps given below:
- Select the icon against the ID for which the campaign is to be created.
- A modal will pop up, enter the campaign name.
- Provide the reply content in reply content field.
- To enable the same reply multiple times, turn ON the slider button.
- You can schedule the campaign right now or sometime later.
- You can add delay between the replies as well.
- After adding all information, select Create Campaign.
- View report for bulk comment reply: By selecting the icon against the ID for which the report is to be viewed as shown in bulk comment reply report

- Rescan the existing comments: By selecting the Rescan option against the Post ID whose comments are needed to be scanned. A dialogue box will appear for confirmation.
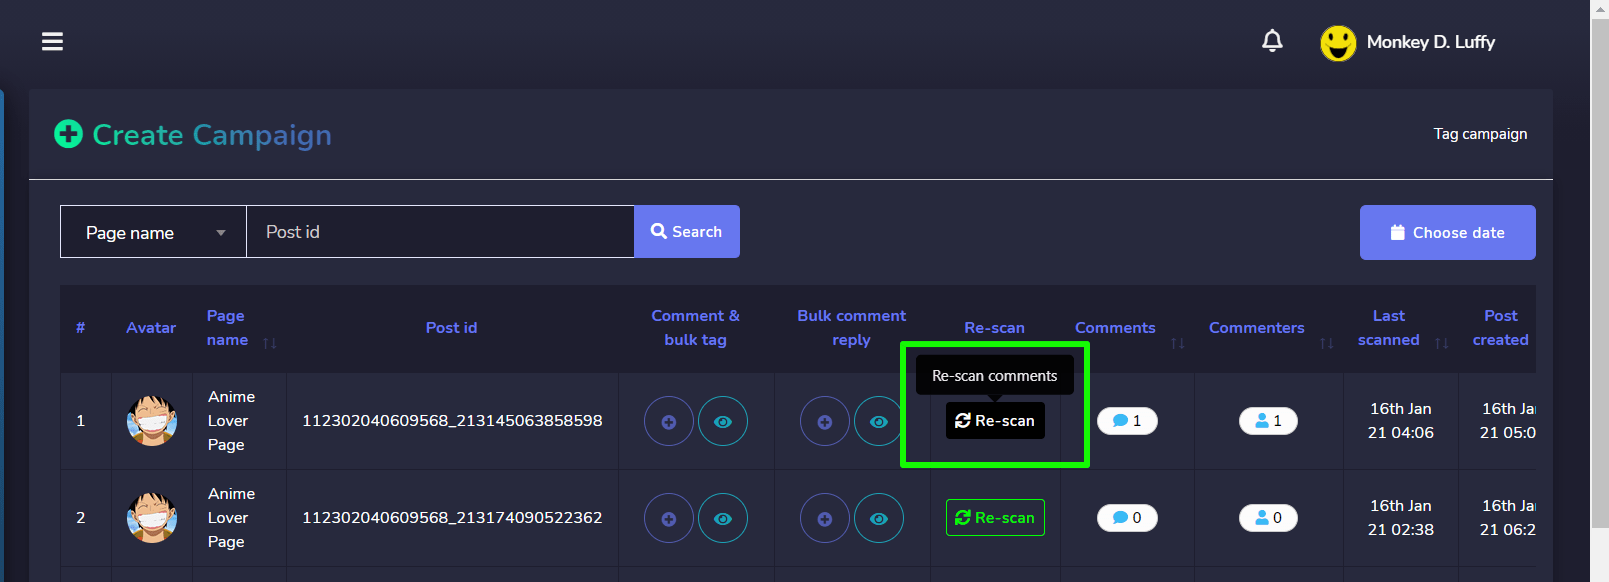
- View the comments: By selecting the number of comments, a modal will appear which allows you to:
- You can visit the Facebook page.
- You can go the post by selecting the Visit Post
- You can also download the comment list in .CSV file.
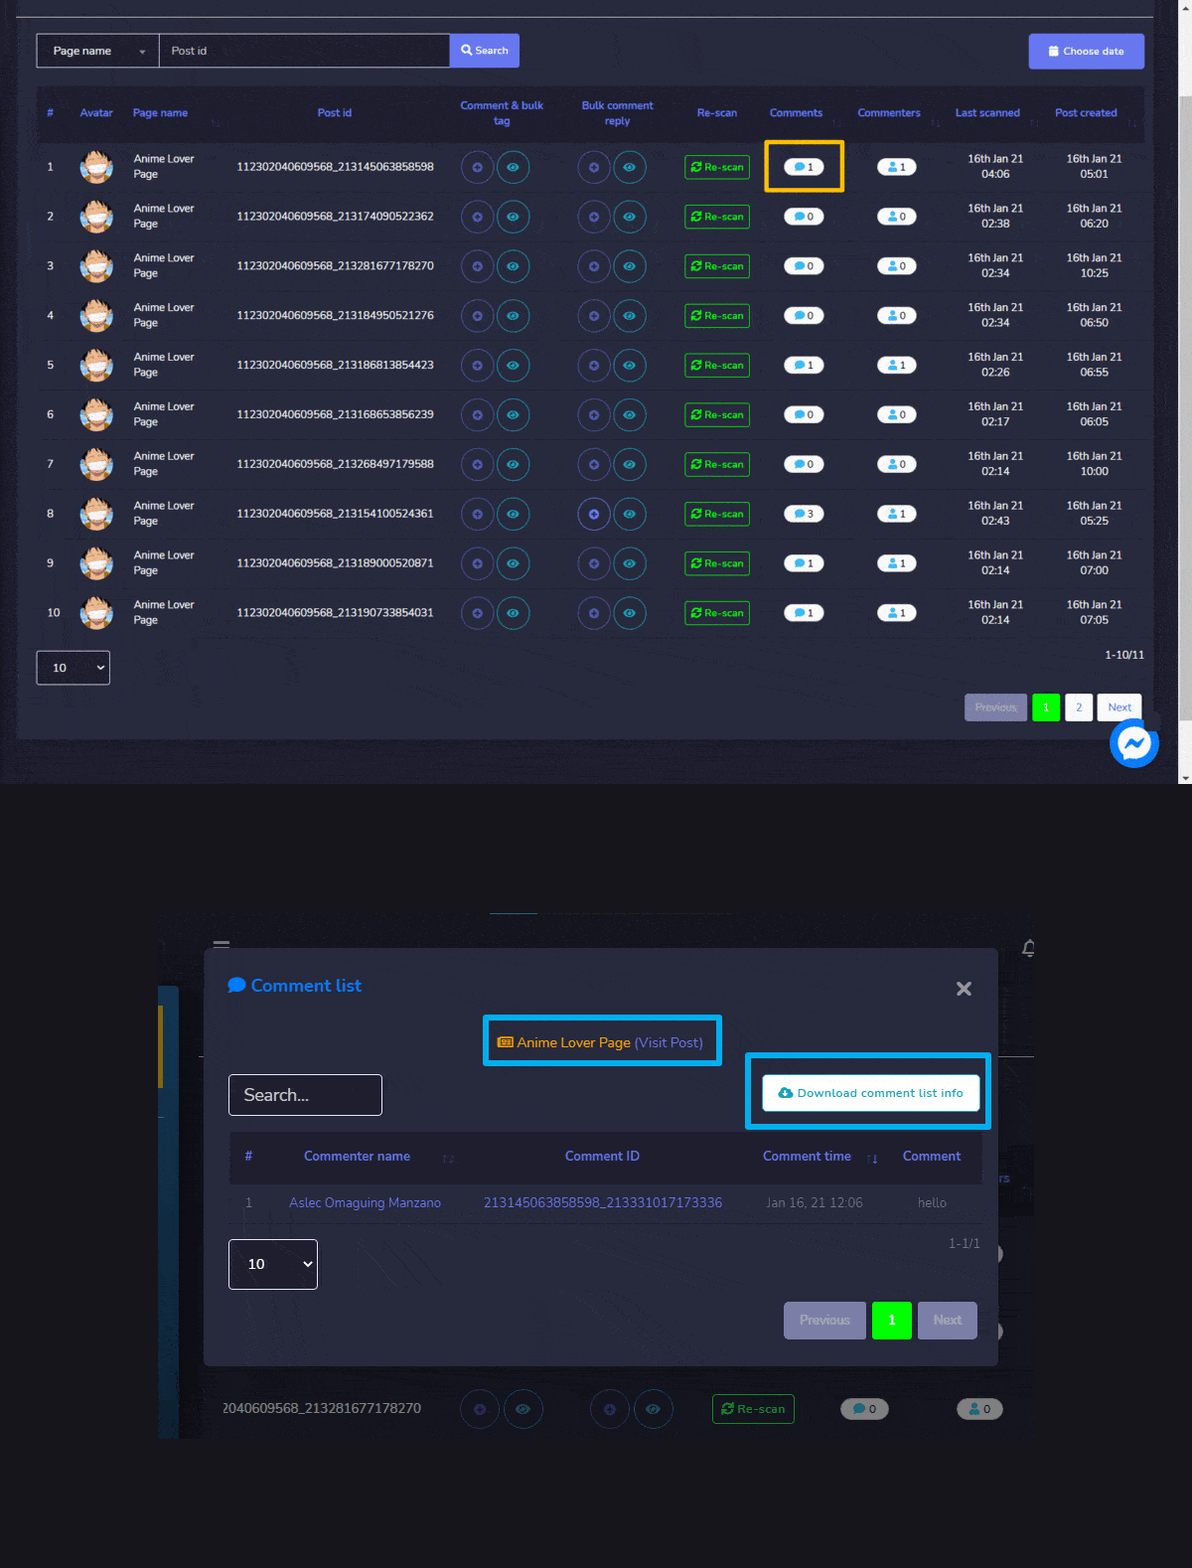
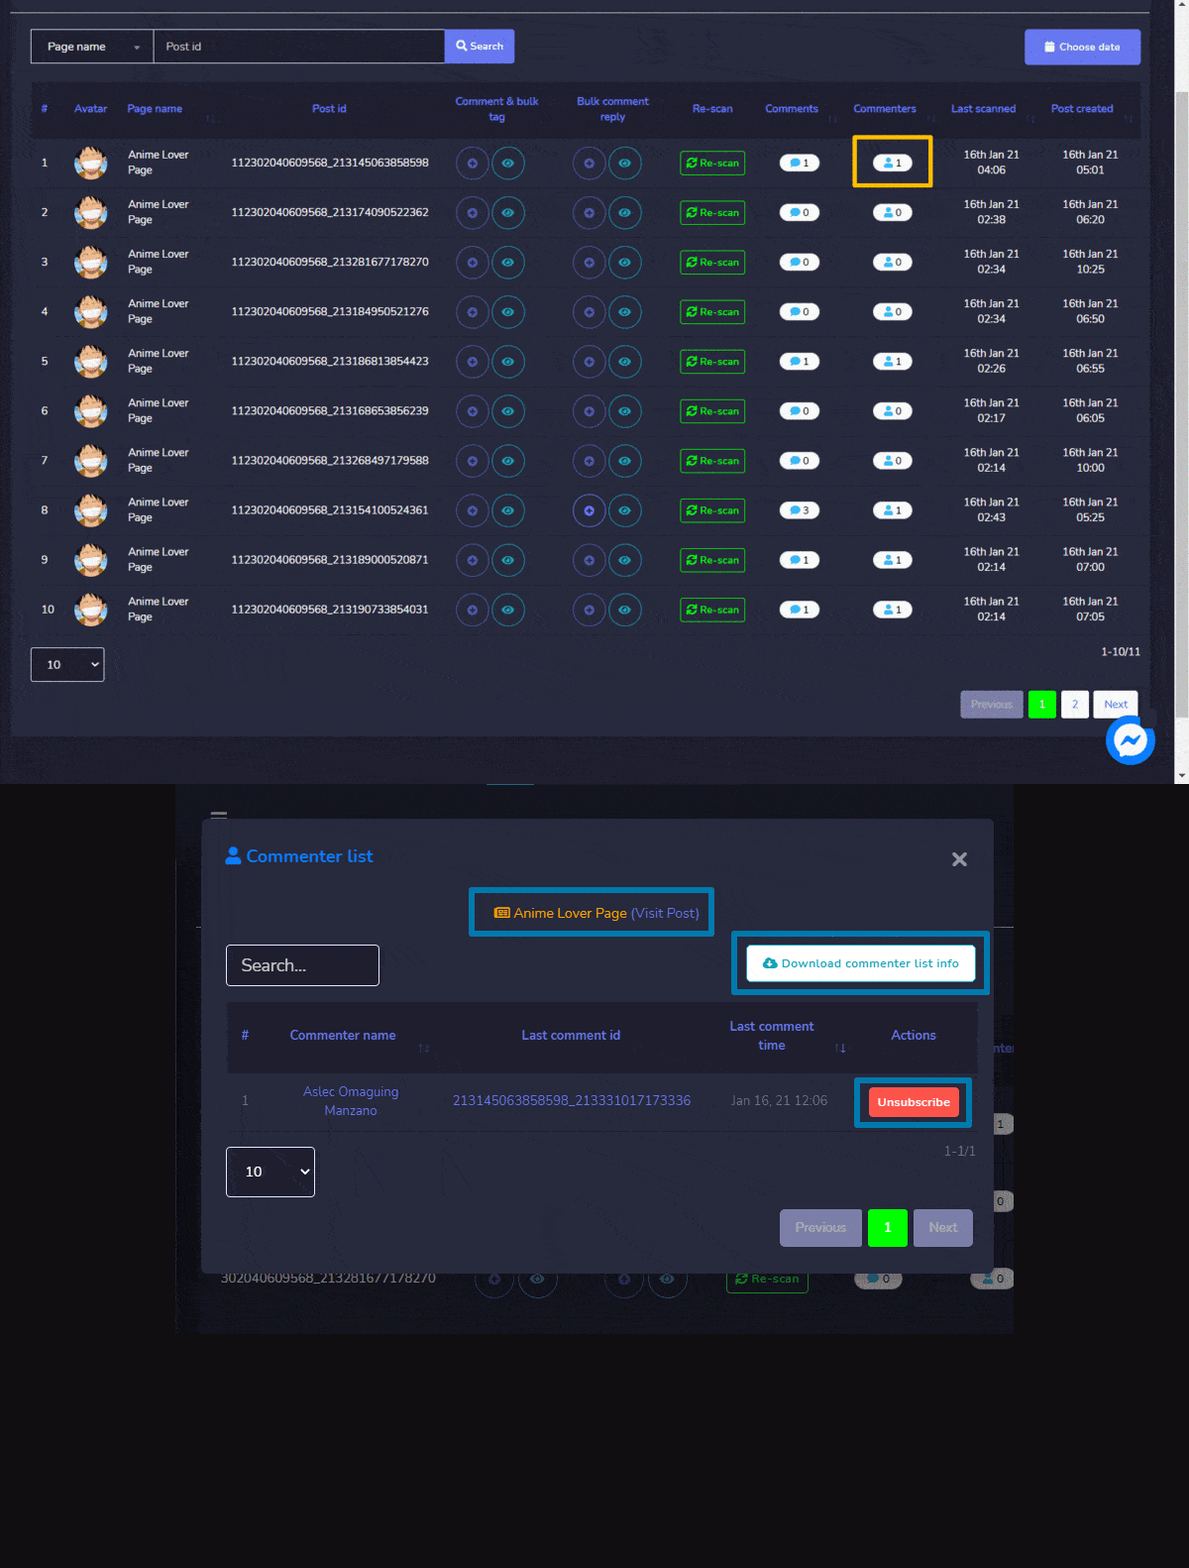
- View the commenters: by selecting the number of commenters, a modal will appear which allows you to:
- You can visit the Facebook page.
- You can go the post by selecting the Visit Post
- You can also download the commenters list in .CSV file.
- You can also unsubscribe the commentator by selecting
 .
.
